Dez
Bodger Extraordinaire
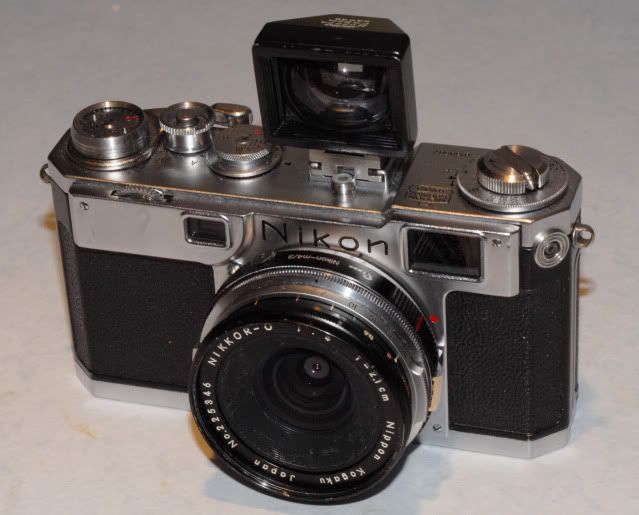
A Home-Made Nikon F to Nikon S Adaptor
These devices are no longer being produced, and can be considered pretty close to unfindable. They will allow you to use many Nikon F lenses on your Nikon S, Contax, or Kiev camera. If ever one does come up for sale, expect to spend a ridiculous amount to buy it.
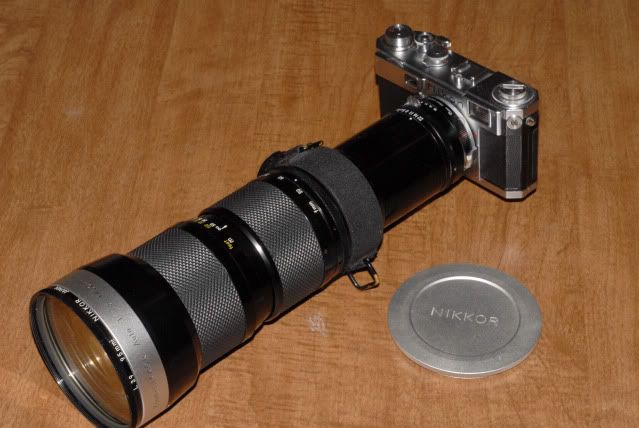
The usual lens that causes Nikon S-mount camera owners to seek an adaptor is the Nikkor-O 21mm f4. This lens is intended for the F-series cameras, but requires the mirror to be locked up. The rear part of the lens protrudes back almost to the shutter, and must be oriented correctly: if it rotates, it will damage the camera or lens. Old T-mount lenses will also work with the adaptor, but many automatic diaphragm lenses will not, as protrusions on the rear of the lens will foul the inner mount when on the rangefinder camera. My goal was to make an adaptor for the 21mm f4, so the design is optimized for that lens.
To build this adaptor, you will need a Nikon F to 4/3 adaptor. There are probably many different versions of this device, and some may not have the dimensions you need to do the job. I bought mine on ebay, item number 140339963002. I suspect the same part is available from Chinese vendors with different brands. The one I received looked like the one in the listing, but had a different brand on it. The vendor’s name is “Hard Man”
http://myworld.ebay.com/hard-man
To build the adaptor you will require:
Part 1: the Kiev mount
To remove the outer bayonet mount from a disposable Kiev lens, remove the three screws that retain the outer matte finish chrome ring, and remove the ring. This will need to be ground down somewhat to avoid fouling the front plate of a Nikon S camera. The raised portion at the rear of the ring needs to be removed. The easiest way I found to do that was to place a piece of sandpaper on a flat surface, and rub the ring over the paper until the back of the ring is completely flat.
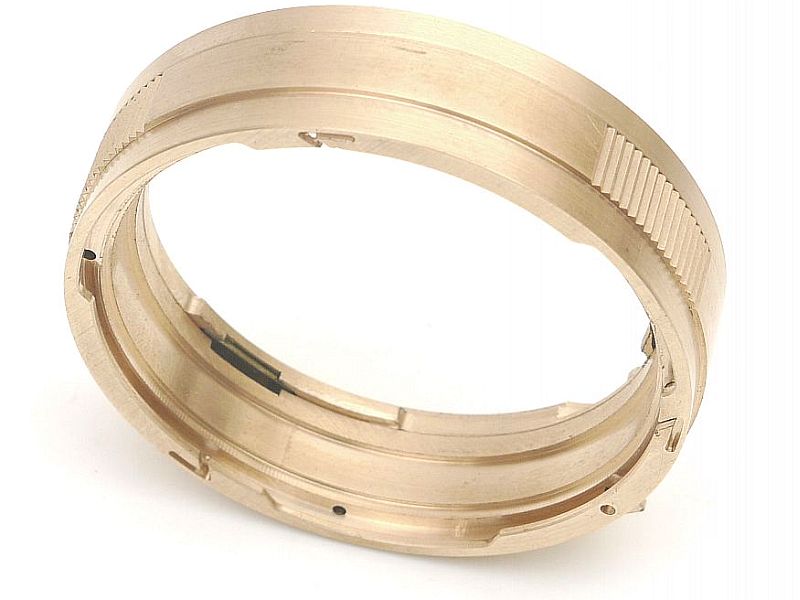
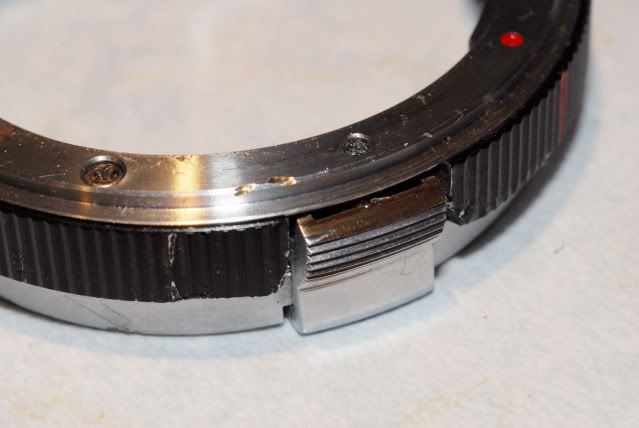
This picture shows the ring before it is ground down..
With the ring off, you will find 3, or in some cases 4 small screws that secure the mount to the back of the lens. It unscrews, but you may need to put a lot of muscle into in to get it to cooperate. I used the mount from a throw-away Jupiter 11 135mm lens. This was actually a mistake, as the latching lever from the Jupiter 11 is not suitable for this project. I ended up scrounging a latching lever from a 35mm Jupiter 12.
Part 2: some dimensions
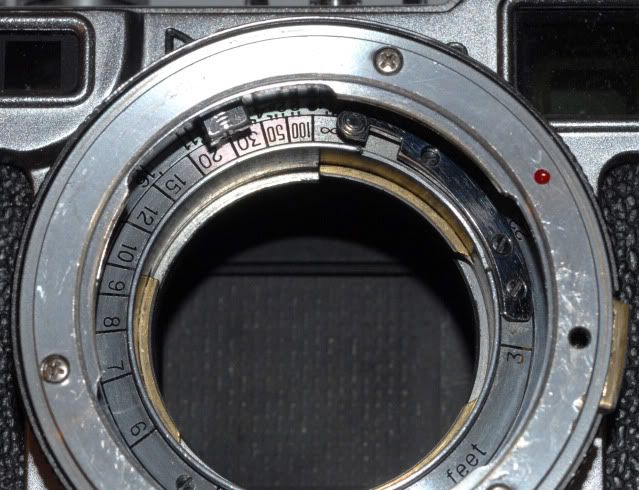
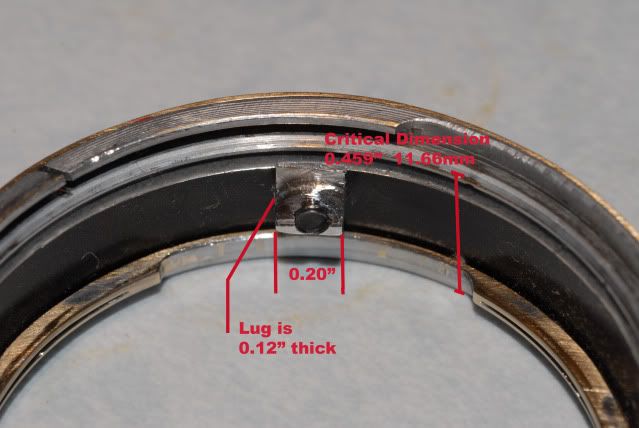
The dimension from the flat of the Nikon F mount to the film plane is 46.50 mm. The equivalent dimension for the S-mount is 34.85mm, measured to the front surface of the external bayonet flange. The difference is 11.65mm or 0.459”, and this is the critical dimension that defines the project.
The Kiev mount has a nice flat surface where it attaches to the lens, and a flat, continuous ring that butts up against the front of the outer bayonet when it is mounted. The dimension between these flat surfaces is the mount’s contribution to your total budget of 0.459”. Using the micrometer, measure it in the three places where it is easily accessible and average the measurements. In the case of the mount I was using, this dimension was 0.137”. DO NOT TAKE THAT AS BEING CORRECT FOR YOUR MOUNT. While Kiev was the best made of the Soviet cameras, it would be foolhardy to expect this to be consistent. Measure it.
The second important dimension is the internal diameter of the screw threads that attach the mount to the body of the lens. My dimension was 1.949”. You will need that dimension when you turn down the body of the 4/3 adaptor. As I mentioned above, I used the mount from a Jupiter-11. I do not know if these dimensions are the same for the mounts on different Jupiter lenses. If the inner diameter is significantly smaller than 1.9”, you will have major problems in the assembly.
So for my mount, I had 0.322” left for the rest of the project.
Part 3: The 4/3 adaptor
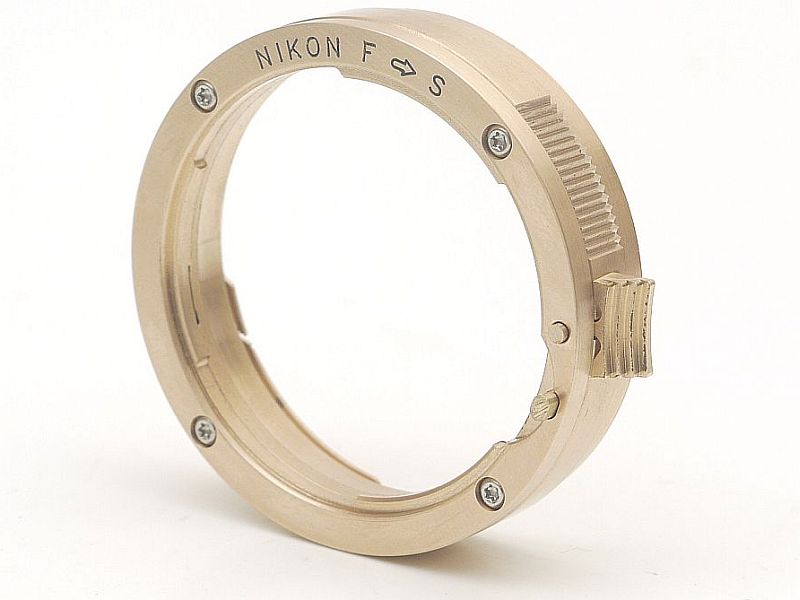
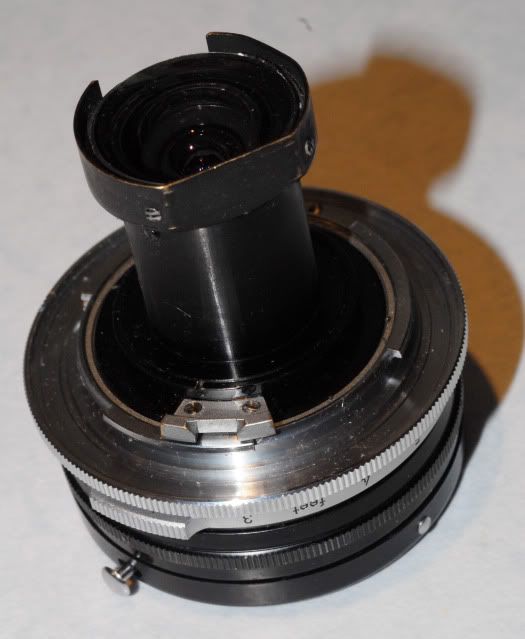
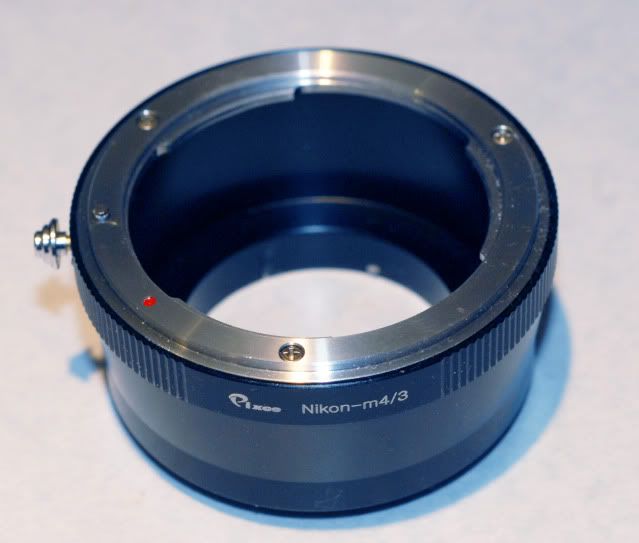
Here is the 4/3 adaptor as purchased.
A lot of metal needs to be removed. The great thing about this part is that the walls are very thick aluminum, over ¼” in my example. You will need all that thickness.
Unscrew the button of the F-mount latch. Remove the mounting flange from the body of the adaptor, and remove the latch body and spring, then put the F mount back on. Make all your measurements with the F mount assembled to the adaptor.
Chuck the adaptor using the internal lathe jaws, with the F mount in. With my lathe, the outer surface of the internal jaws had become fairly beat up, so I chucked in a round piece of stock, and carefully turned the outer surface of the jaws to make sure they were true.
Use a cutoff tool to get reasonably close to the thickness you need. If you don’t have a cutoff tool but do have a lot of patience, you can turn it all the way down.
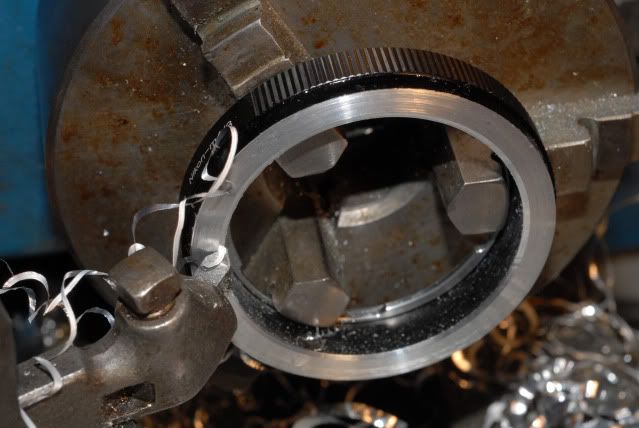
Before you turn it too far down, make a flange on the inside of the workpiece to fit tightly within the screw threads of the mount to locate it properly, and make the final product much stronger. In my case, I turned the flange to 1.947”. With my adaptor, there was very little material to form this flange, so if the 4/3 adaptor has thin walls, or the inside diameter of the mount is not significantly larger than the inside diameter of the 4.3 adaptor, you will have problems. It is not particularly important how high the finished flange is, so long as it is less than the depth of the threaded part of the Kiev mount. I had been hoping to use the setscrews that originally held the mount onto the lens to secure the mount to this turned part, but there was not enough metal in this thin flange to do this.
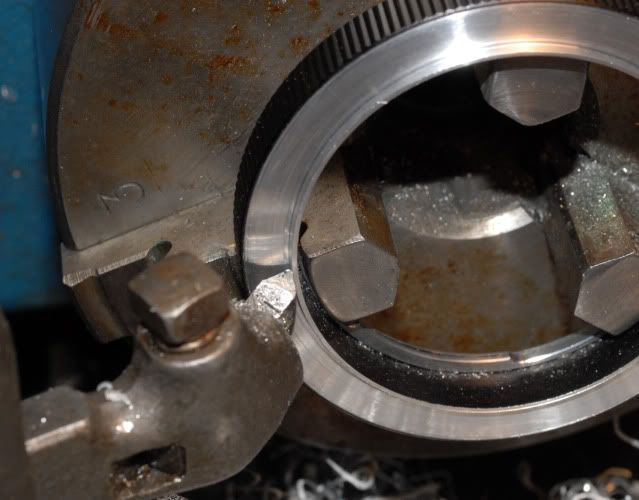
Turn the outer part of the machined surface down to the dimension you need. In my case, this was nominally 0.322”. Be very careful here. You cannot assemble the Kiev mount to this piece at this time as the latching lever gets in the way, so you can’t measure the stack-up. Check your arithmetic a couple times. It is better to make it a tiny bit below the nominal; if the final product is too thin, you can shim the F mount to increase the dimension. You will have an opportunity to turn it a bit further later if needed. Undercut the edge of the flange a bit to ensure that the Kiev mount will sit flat on the surface.
You will find that before you finish machining this piece you cut into the drilling that housed the F mount latch. If you are going to have an F mount latch in the final product, you will have to cobble something up for it, as the original parts are too big.
Next, you need to cut a slot in the adaptor to accommodate the S mount latch. At this point you need to determine the position of the latch relative to the final orientation of the F lens on the camera. To do this, mount the Kiev mount on your camera, rotating it CCW until it latches. Mount a Nikon F lens in the adaptor piece, and place the adaptor against the Kiev mount. Turn it until you get the orientation you want and mark the edges of the S mount latch on the body of the adaptor. I found that this resulted in the S latch and the F latch being right on top of each other, definitely a problem. At that point, I decided I could live without the F latch, and marked my spot with the lens oriented as it would be on a Nikon F. The orientation must be the same as for the F-mount cameras if the 21mm lens is to work.
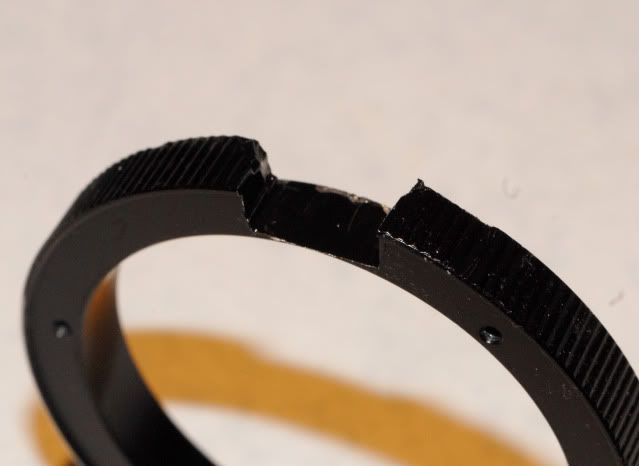
Next you need to file out the adaptor ring to make a notch wide enough for the S latch. Remove the F mounting flange again, clamp the ring in a vise, and file away the material between the marked edges. I found I could keep a thickness of only about 1mm to clear the hinge of the latch. I did a sloppy job of this, as I originally figured I could cut out a smaller notch with a Dremel tool while the F mount flange was still attached.
It will be necessary to file down the end of the S latch to allow it to fit into the slot without fouling the replaced F mount flange.
At this point, it will be possible to fit the Kiev mount into the adaptor, and see if you got the dimensions right!
If the crucial flange-to-flange dimension is too large, you can at this point turn it down to fit.
I assembled the two halves by using JB Weld epoxy on the threads of the Kiev mount, and chucking it under pressure in a vise overnight. This will not fall apart. Note that having the epoxy set in the vice will ensure the best possible contact between the Kiev mount and the adaptor. It also resulted in an allover dimension that was .002” smaller than I thought it would be.
At this time, you have an adaptor that will allow the use of many F-mount lenses on an S-mount camera.
CONTINUED IN PART 2
These devices are no longer being produced, and can be considered pretty close to unfindable. They will allow you to use many Nikon F lenses on your Nikon S, Contax, or Kiev camera. If ever one does come up for sale, expect to spend a ridiculous amount to buy it.
The usual lens that causes Nikon S-mount camera owners to seek an adaptor is the Nikkor-O 21mm f4. This lens is intended for the F-series cameras, but requires the mirror to be locked up. The rear part of the lens protrudes back almost to the shutter, and must be oriented correctly: if it rotates, it will damage the camera or lens. Old T-mount lenses will also work with the adaptor, but many automatic diaphragm lenses will not, as protrusions on the rear of the lens will foul the inner mount when on the rangefinder camera. My goal was to make an adaptor for the 21mm f4, so the design is optimized for that lens.
To build this adaptor, you will need a Nikon F to 4/3 adaptor. There are probably many different versions of this device, and some may not have the dimensions you need to do the job. I bought mine on ebay, item number 140339963002. I suspect the same part is available from Chinese vendors with different brands. The one I received looked like the one in the listing, but had a different brand on it. The vendor’s name is “Hard Man”
http://myworld.ebay.com/hard-man
To build the adaptor you will require:
- The Nikon F to 4/3 adaptor
- A mount from a Kiev lens. I suggest Jupiter 12.
- A bit of aluminum stock. You will be making a piece 0.2” x 1.2” x 0.3”
- A tiny flathead screw (see the text) with a tap, pilot drill and clearance drill for it
- A lathe
- A drill press, or a really steady hand
- A medium-size flat machinist’s file
- Vernier caliper
- A micrometer for places you cannot reach with the vernier caliper
- Either some reasonable skill with machinery, or else an inflated view of your ability. I made do with the latter.
Part 1: the Kiev mount
To remove the outer bayonet mount from a disposable Kiev lens, remove the three screws that retain the outer matte finish chrome ring, and remove the ring. This will need to be ground down somewhat to avoid fouling the front plate of a Nikon S camera. The raised portion at the rear of the ring needs to be removed. The easiest way I found to do that was to place a piece of sandpaper on a flat surface, and rub the ring over the paper until the back of the ring is completely flat.
This picture shows the ring before it is ground down..
With the ring off, you will find 3, or in some cases 4 small screws that secure the mount to the back of the lens. It unscrews, but you may need to put a lot of muscle into in to get it to cooperate. I used the mount from a throw-away Jupiter 11 135mm lens. This was actually a mistake, as the latching lever from the Jupiter 11 is not suitable for this project. I ended up scrounging a latching lever from a 35mm Jupiter 12.
Part 2: some dimensions
The dimension from the flat of the Nikon F mount to the film plane is 46.50 mm. The equivalent dimension for the S-mount is 34.85mm, measured to the front surface of the external bayonet flange. The difference is 11.65mm or 0.459”, and this is the critical dimension that defines the project.
The Kiev mount has a nice flat surface where it attaches to the lens, and a flat, continuous ring that butts up against the front of the outer bayonet when it is mounted. The dimension between these flat surfaces is the mount’s contribution to your total budget of 0.459”. Using the micrometer, measure it in the three places where it is easily accessible and average the measurements. In the case of the mount I was using, this dimension was 0.137”. DO NOT TAKE THAT AS BEING CORRECT FOR YOUR MOUNT. While Kiev was the best made of the Soviet cameras, it would be foolhardy to expect this to be consistent. Measure it.
The second important dimension is the internal diameter of the screw threads that attach the mount to the body of the lens. My dimension was 1.949”. You will need that dimension when you turn down the body of the 4/3 adaptor. As I mentioned above, I used the mount from a Jupiter-11. I do not know if these dimensions are the same for the mounts on different Jupiter lenses. If the inner diameter is significantly smaller than 1.9”, you will have major problems in the assembly.
So for my mount, I had 0.322” left for the rest of the project.
Part 3: The 4/3 adaptor
Here is the 4/3 adaptor as purchased.
A lot of metal needs to be removed. The great thing about this part is that the walls are very thick aluminum, over ¼” in my example. You will need all that thickness.
Unscrew the button of the F-mount latch. Remove the mounting flange from the body of the adaptor, and remove the latch body and spring, then put the F mount back on. Make all your measurements with the F mount assembled to the adaptor.
Chuck the adaptor using the internal lathe jaws, with the F mount in. With my lathe, the outer surface of the internal jaws had become fairly beat up, so I chucked in a round piece of stock, and carefully turned the outer surface of the jaws to make sure they were true.
Use a cutoff tool to get reasonably close to the thickness you need. If you don’t have a cutoff tool but do have a lot of patience, you can turn it all the way down.
Before you turn it too far down, make a flange on the inside of the workpiece to fit tightly within the screw threads of the mount to locate it properly, and make the final product much stronger. In my case, I turned the flange to 1.947”. With my adaptor, there was very little material to form this flange, so if the 4/3 adaptor has thin walls, or the inside diameter of the mount is not significantly larger than the inside diameter of the 4.3 adaptor, you will have problems. It is not particularly important how high the finished flange is, so long as it is less than the depth of the threaded part of the Kiev mount. I had been hoping to use the setscrews that originally held the mount onto the lens to secure the mount to this turned part, but there was not enough metal in this thin flange to do this.
Turn the outer part of the machined surface down to the dimension you need. In my case, this was nominally 0.322”. Be very careful here. You cannot assemble the Kiev mount to this piece at this time as the latching lever gets in the way, so you can’t measure the stack-up. Check your arithmetic a couple times. It is better to make it a tiny bit below the nominal; if the final product is too thin, you can shim the F mount to increase the dimension. You will have an opportunity to turn it a bit further later if needed. Undercut the edge of the flange a bit to ensure that the Kiev mount will sit flat on the surface.
You will find that before you finish machining this piece you cut into the drilling that housed the F mount latch. If you are going to have an F mount latch in the final product, you will have to cobble something up for it, as the original parts are too big.
Next, you need to cut a slot in the adaptor to accommodate the S mount latch. At this point you need to determine the position of the latch relative to the final orientation of the F lens on the camera. To do this, mount the Kiev mount on your camera, rotating it CCW until it latches. Mount a Nikon F lens in the adaptor piece, and place the adaptor against the Kiev mount. Turn it until you get the orientation you want and mark the edges of the S mount latch on the body of the adaptor. I found that this resulted in the S latch and the F latch being right on top of each other, definitely a problem. At that point, I decided I could live without the F latch, and marked my spot with the lens oriented as it would be on a Nikon F. The orientation must be the same as for the F-mount cameras if the 21mm lens is to work.
Next you need to file out the adaptor ring to make a notch wide enough for the S latch. Remove the F mounting flange again, clamp the ring in a vise, and file away the material between the marked edges. I found I could keep a thickness of only about 1mm to clear the hinge of the latch. I did a sloppy job of this, as I originally figured I could cut out a smaller notch with a Dremel tool while the F mount flange was still attached.
It will be necessary to file down the end of the S latch to allow it to fit into the slot without fouling the replaced F mount flange.
At this point, it will be possible to fit the Kiev mount into the adaptor, and see if you got the dimensions right!
If the crucial flange-to-flange dimension is too large, you can at this point turn it down to fit.
I assembled the two halves by using JB Weld epoxy on the threads of the Kiev mount, and chucking it under pressure in a vise overnight. This will not fall apart. Note that having the epoxy set in the vice will ensure the best possible contact between the Kiev mount and the adaptor. It also resulted in an allover dimension that was .002” smaller than I thought it would be.
At this time, you have an adaptor that will allow the use of many F-mount lenses on an S-mount camera.
CONTINUED IN PART 2