Spyderman
Well-known
I recently acquired this lens, but there was some dust inside. When it comes to lenses I tend to be a perfectionist, so I couldn't resist the urge to open it and blow the dust away.
Here I'll try to share some tips on partial disassembly of the Zuiko 35-70mm f/3.6 lens.
One more thing worth mentioning before the disassembly steps is that I only needed to get access to the glass surfaces and diaphragm to blow the dust away. I haven't tried to disassemble the zoom or focus mechanism for relubing (even though this particular lens could use some relube of the focus ring...)
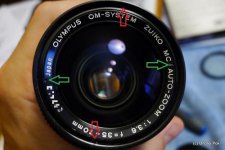
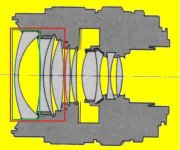
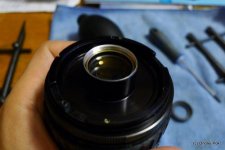
There are 2 pairs of notches visible from the front: the nameplate holds only the frontmost element (green arrows and green box in the optical scheme). The outer 2 notches remove the front group consisting of 4 elements, 2 of them glued. This could be handy if your lens has any kind of fungus or haze, but there is little chance dust could get behind this front group. I didn't continue removing the remaining 2 elements in front of the diaphragm.
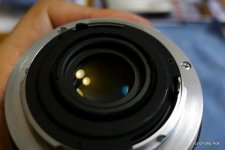
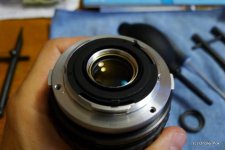
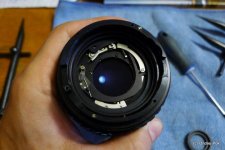
From the back, before you can remove the lens mount, you need to remove the ring around the rearmost element. Only then can the mount be removed. Then you can unscrew the large part holding the entire rear group of elements to get access to the diaphragm.
I stopped at this point and just blew the dust away and cleaned the surfaces in front of and behind the diaphragm.
Here I'll try to share some tips on partial disassembly of the Zuiko 35-70mm f/3.6 lens.
One more thing worth mentioning before the disassembly steps is that I only needed to get access to the glass surfaces and diaphragm to blow the dust away. I haven't tried to disassemble the zoom or focus mechanism for relubing (even though this particular lens could use some relube of the focus ring...)
There are 2 pairs of notches visible from the front: the nameplate holds only the frontmost element (green arrows and green box in the optical scheme). The outer 2 notches remove the front group consisting of 4 elements, 2 of them glued. This could be handy if your lens has any kind of fungus or haze, but there is little chance dust could get behind this front group. I didn't continue removing the remaining 2 elements in front of the diaphragm.
From the back, before you can remove the lens mount, you need to remove the ring around the rearmost element. Only then can the mount be removed. Then you can unscrew the large part holding the entire rear group of elements to get access to the diaphragm.
I stopped at this point and just blew the dust away and cleaned the surfaces in front of and behind the diaphragm.