I cannot comment on PSE as I have not used it for a few years.
Instead I use Corel PaintShop Pro (PSP) which I think is even better (more tools for photographers). I will explain what I do then perhaps someone with PSE knowledge will be kind enough to explain how to do it in PSE - but in principle its the same. There are a couple of ways of doing it. I will try to explain the easiest way.
First I downloaded some free typing fonts from the internet and installed them on my PC. How to do this is beyond the scope of this reply but its easy. If you search for "fonts download" you will find thousands of them. Also do a search on the internet to explain how to install these new fonts on your PC. I particularly liked
script fonts so I could do something that looked like a signature. Once the fonts are installed on the PC they are available for use by any typing program on your PC.
Having installed the fonts as per above, I then opened my graphics program (in my case, PSP) and went to the text tool and selected the font I wanted to use bearing in mind that the new font I downloaded and installed now shows up.
On a new blank image I then typed the words I wanted to use to identify my images. In my case this is " Life in Shadows". Word of caution use the largest font size your PSE handles and use black as the color.
Then using the selection tool in PSE you can select the words you have typed. You may have to experiment a bit to work out how to do this and select all of it well but having written the word in black (on the white background of the blank page) helps make the selection easy.
Then you need to save this image of the words as a "brush" in PSE. This probably means first saving it in the correct format for brushes in PSE. Someone else here should be able to advise you what format that is - I am vague as my program, PSP works similarly to PSE but in detail the methods, commands and file formats are different although in principle they do the same thing. There should be a method of importing new brushes into PSE and saving them with your other brushes. PSP certainly has this option. Again someone here may be so kind as to advise you how to do it in PSE or you can search on Google.
You then have a
large version of your signature saved in PSE as a brush. A large version works better when you come to use it. Now having created the signature and saved it as a brush in PSE, all you need to do when you want to apply it is to go to your
paint tool in PSP, select the brush with your signature on it, size it correctly (this is why you used the largest font - a large image gives better resolution when downsized than an small image that is enlarged when it is being used) and select the color you wish to use. Then stamp it onto the image wherever you wish to put it.
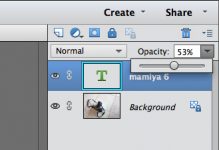
Alternatively to make it semi transparent you can put it onto another layer and slide the transparency slider down to make the signature semi transparent. Then collapse all layers into one final layer and there you have it.
Of course having created the signature once you can use it over and over and over in any color, size, location on the image etc.
I tend to apply mine on a white border around the edge of the image as that is simply my preference. Creating borders is a whole other story but again is simple. Here is an example below. There is no reason why you cannot put your signature / words anywhere that takes your fancy. There are also other ways of doing this - e.g. by creating and saving a blank / transparent layer with the image of the signature on it but that's a bit more technical and there is no reason why you need to bother when you have a "stamp" with the words on it.
That is pretty much it. It may sound difficult when explained in this way but it should not be hard in practice and I am sure others here can fill you in on the detail about how to do it in PSE.
PS As you can see below I have made a number of variants so I can use whichever one takes my fancy at the time. You cna see below 2 images with different versions of the name both using various script fonts saved as described above.
 Structure, Colour 4
 by
yoyomaoz, on Flickr
 Deep, dark
 by
yoyomaoz, on Flickr