Howtek drum scanner DIY thread: maintenance, troubleshooting, mods

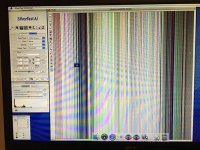
Hmm... Looks pretty bad. So, the first scan is at low resolution and the one with the lines is at higher resolution?

Sorry, I don't have any ideas. The pattern looks to regular to be attributed to the dirty calibration area of the drum. I would suggest cleaning the contacts on the lamp sockets but I'm sure there would be streaking also in the low res scans if that was the culprit.
 
Yes, first scan is at 1K DPI where there is no hint of the lines, second with the lines is at 2K DPI. Similar structure of lines at 4K and 8K. If the calibration strip or area were damaged which it does not seem to my amateur eye to be, wouldn't the lines appear in every scan?

I will try mounting some film on the other, cleaner drum that has original pads on it today to see if that improves the situation but as lubricating the lead screw did reduce the severity or depth of the lines, I'm thinking the fault is in the lead screw motor area.
 
Made a bit more progress since last posting.

-Cleaned and cleaned again the pulleys for the drive belt.
-Cleaned and lubed the lead screw again.
-Cleaned and lubed the tailstock bearing.
-Cleaned the same drum I had been using.
-Re-did the DIY pads I had been using, slightly thinner so they were all within the small recess as the factory pads are. Before, some were slightly too wide which led to the drum not centering correctly on the tailstock.
-Cleaned the dust out from behind the FOPI, on that lens.
-Cleaned the lens on the other side of the FOPI, illuminator lens?

Now does 2K dpi scans with no hint of lines so that's a big relief.

Next thing to suss out is now when I set 4K DPI in Silverfast, it always returns an F702 error when checking lumens. At 1K, 2K there is never a problem but at 4K each and every time it pulls the error code.

Sample shot attached:

Wartime black paint Anniversary Speed Graphic
Black paint Kodak Ektar 127/4.7
HP5 in HC110 1:100 semi-stand
Blue painter's tape, dry mounted
Scanned at 2K DPI


Howtek D4000 Drum Scanner Lives Again by Anthony Gross, on Flickr
 

Attachments

  • Film_2-5-17_(1_of_1)-3.jpg
    Film_2-5-17_(1_of_1)-3.jpg
    26.9 KB · Views: 0
The error indicates that there could be a problem with slow drum rotation speeds. Higher resolutions mean slower drum speeds. If you can hook it up to a PC you can run a test program to confirm.

Change the belt and see if that helps.
 
Made a bit more progress since last posting.

-Cleaned and cleaned again the pulleys for the drive belt.
-Cleaned and lubed the lead screw again.
-Cleaned and lubed the tailstock bearing.
-Cleaned the same drum I had been using.
-Re-did the DIY pads I had been using, slightly thinner so they were all within the small recess as the factory pads are. Before, some were slightly too wide which led to the drum not centering correctly on the tailstock.
-Cleaned the dust out from behind the FOPI, on that lens.
-Cleaned the lens on the other side of the FOPI, illuminator lens?

Now does 2K dpi scans with no hint of lines so that's a big relief.

Next thing to suss out is now when I set 4K DPI in Silverfast, it always returns an F702 error when checking lumens. At 1K, 2K there is never a problem but at 4K each and every time it pulls the error code.

Sample shot attached:

Wartime black paint Anniversary Speed Graphic
Black paint Kodak Ektar 127/4.7
HP5 in HC110 1:100 semi-stand
Blue painter's tape, dry mounted
Scanned at 2K DPI


Howtek D4000 Drum Scanner Lives Again by Anthony Gross, on Flickr


I would take a look at the SCSI hardware and settings. Also the belt tension. Take a picture (or video) of the belt at work. Perhaps there's something to see.
 
Belt tension was correct, too loose. I had thought it was a bit loose when first was inspecting the scanner before I started trying to use it. I adjusted it up a bit (not too tight as I'm well aware of adding bearing wear via excessive tension on drive belts/chains in other applications) and it's now scanning 4K seemingly happily.

I guess it's time to pay for Silverfast and actually start using the thing!

Thank you again for your help, onnect17 and brbo. I quite literally could not have done this without you!

Glad to hear you're now able to use the 4K and also being careful not to pass too much stress to the bearing in the motor.

I'm not a fan of the neoprene belts. Not enough elasticity. I prefer the ones made of silicone, but not too soft. I'm away from home right now but l will post the info later. You should give it a try.

Mac Master part number 9396K304. I use it for the small Howtek scanners, i.e. 4000, 4500, 8000, etc. For the 6500/7500 the part numbers is 9396K324.

Happy scanning!
 
Got a USAF 1951 target to test what resolution I'm getting from my H4500:

H4500.silverfast.usaf1951.8000dpi.jpg


Resolution is not bad (if my math is good, I'm getting full 4000dpi). I guess I do have a problem with color channel alignment, though. Not using the dead center of the lens and therefore getting color aberrations?

It looks more like the optical path is too wide (as it comes from the manufacturer) and some lateral scattered rays (produced by the grain in the emulsion) managed to get in. A very similar pattern is seen when using RGB leds as the light source without a diffuser.

Also the emulsion itself may be in not the best condition. Did you wetmount it? Is the scanned target a positive or a negative inverted?

Also, I noticed some compression in the image posted but not sure of the source. Jpeg?

Still, the image looks nice and sharp to me.
 
Yes, it's jpeg and the target is dry mounted. I will repeat with my good drum (this one has slight crazing) and wet mounted. Also noticed this is a sample that I scanned in Silverfast at 8000dpi (I get a tiny bit better resolution that way?!). I might try making my light path narover if even the good drum produces this effect. What do you use for a light diffuser? Do you only use it for LED light source? Btw, do you have any side-by-side comparison between halogen and LED light source?

I've now bought DPL (it still hurt$$$). I'm pretty happy with scanning negative film at 4000dpi and 13microns. If I prescan as Wide Gamut Negative and then create custom profile (the Histogram's Auto Adjust tool picks up the end points nicely) all 12bits are then spent on real data in the negative. I almost have a finished picture straight out of scanner. No messing with ColorPerfect or Silverfast's NegaFix and I've found that I'm less prone to go down a "wrong" path when scanning/post processing negative film.

For example, I was reasonably happy with a scan from some time ago on my Minolta 5400 (scan as positive and ColorPerfect inversion):


I've rescanned the negative yesterday in DPL and arrived at this:


Higher contrast, cooler, grain is more visible, but I like it quite a bit better.
 
A couple of scans of IT8:
https://1drv.ms/f/s!AugK5NQO79gPgyE2_05t_2c5nEWQ

Yes, I am using leds (XML-Color). I was never able to get a noise free scan at 6 microns with a regular lamp. To diffuse the light I use sand paper with a 400 grit or thinner directly on the surface of the led.

Remember to use the log mode with negatives. That's the only advantage of DPL. It used to be $400 and now it sells for $600. Still SF does a better job focusing.
 
Thanks!

Do you use external power supply for LEDs?

Yes, SF enables you to pick the area which you want to use for focusing. I've found out that both DPL and SF missed focus a bit with my resolution target (DPL picked 146, my eyes (manually through viewport) suggested 143 (although everything from 143 to 146 looked the same to me) and the sharpest scan was actually achieved at 145). Evan from Aztek thought that unreliable autofocus could indicate hardware issue, weak lamp or user tampering with focused illuminator - that would probably be me trying to get more centered light beam on aperture wheel?!

In real world I don't think I would notice this, but it was evident with resolution target.

With the current design version I don't need an external power supply because the Howtek lamp driver brings 11v (not 8v as the specs show) so I connect the red, green and blue dies in series with a 2 ohm resistor. I do not use the white die. A small fan keep the temperature under control to avoid any color drift.

SF pick the focus in middle of the image, or you can select it manually. That's useful because you can pick a high contrast areas to focus. Besides, if your scanning area covers 8" of the drum, the focus at each end is different due to mechanical imperfections.

With DPL I do the same but manually. I scan first a small area and use the same focus value, entered manually with the intended larger scanning area.

I don't remember seeing any hardware problems with the focusing mechanism in the 4000 and 5000 dpi howtek scanners. I can't say the same of the 8000 dpi models. I would assume the difference is more related to the position of the surface of the drum at different rotation speeds. Also, a more centered beam only helps.
 
So, classic case of one step forward, two steps back over this past weekend.

Finally took some time to RTFM and discovered how to get into FST on the MacUtil. I had used MacUtil after finding it in the files section of the Yahoo group to update firmware and that worked just fine. I ran the full set of tests in FST and passed all of them, much to my surprise. I made that last post and the day after, it started throwing a 702 error consistently and never worked on 4K again, hence my research and looking at FST.

Now, this is my most recent Prescan in SF, a shot of it while it is in pre-scan. Absolute gibberish. It does seem to produce the same gibberish each time I try it.

Any actual scans that I do are almost entirely black.

I took the top plate off of the encoder, thinking I might be able to get in there and clean as has been mentioned elsewhere. I removed the 4x Philips head screws where the encoder wire goes into the enclosure and once I saw it's not readily accessible, I replaced the cover, but did not adjust or touch anything else.

Any ideas on what I did?
 

Attachments

  • IMG_3417.JPG
    IMG_3417.JPG
    102.8 KB · Views: 0
So you can pass all the FST tests and then do a prescan and get this in Silverfast?

Have you tried running Trident trial just to see if you get the same there?
 
Yes, it passed the FST, ran it through the cycle a couple of times. Then the program itself hung up and I had to shut down the comp/scanner. That happened a few times. Trident/Aurora show the same sort of whatever that is but a different pattern in the scan itself.

Last night, I tried one last time and it showed mostly the same gibberish over the pre-scan area but it did show a few strips of the film/tape mounted to the drum.
 
So, classic case of one step forward, two steps back over this past weekend.

Finally took some time to RTFM and discovered how to get into FST on the MacUtil. I had used MacUtil after finding it in the files section of the Yahoo group to update firmware and that worked just fine. I ran the full set of tests in FST and passed all of them, much to my surprise. I made that last post and the day after, it started throwing a 702 error consistently and never worked on 4K again, hence my research and looking at FST.

Now, this is my most recent Prescan in SF, a shot of it while it is in pre-scan. Absolute gibberish. It does seem to produce the same gibberish each time I try it.

Any actual scans that I do are almost entirely black.


I took the top plate off of the encoder, thinking I might be able to get in there and clean as has been mentioned elsewhere. I removed the 4x Philips head screws where the encoder wire goes into the enclosure and once I saw it's not readily accessible, I replaced the cover, but did not adjust or touch anything else.

Any ideas on what I did?


You have other problem. Double check everything you did, (cables you touched, etc.) I never managed to the get the Mac FST working. If you touched the firmware then make sure you used the right version (not the same file between Mac and PC)

Good luck!
 
It isn't likely that I screwed up the encoder just by taking off the top plate where the cable runs in, right?

I guess that's my big worry right now. I'll go through and trouble shoot but would relax a bit if I knew it wasn't likely to have killed the $1500 encoder.
 
It isn't likely that I screwed up the encoder just by taking off the top plate where the cable runs in, right?

I guess that's my big worry right now. I'll go through and trouble shoot but would relax a bit if I knew it wasn't likely to have killed the $1500 encoder.

Removing the cover does not break the encoder. Test it with the FST.
 
Back
Top Bottom