J9 Collimate Questions

Jeff_S

Member
Local time
9:59 AM
Joined
Aug 31, 2005
Messages
34
I thought I would post this thread in this forum, I had PM'd Brian earlier about this lens so I wanted to continue the conversation here.

I have a '63 vintage J9 which I want to service. Helicoids aren't too bad but if it looks like I can get the performance I want out of it I will re-lube (or have it re-lubed).

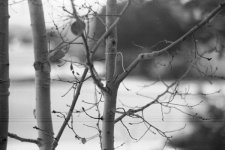
When I originally bought the lens it performed OK but I would like to see if I can get it a little sharper, particularly at maximum aperture.

But here are a couple of questions first.

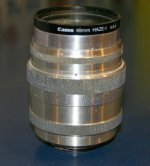
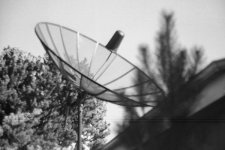
As you can see from the first photo, the aperture indicator ring is not lined up with the red dot. As a matter of fact it is on the other side of the lens barrel. There are three possible positions for this ring, when I loosen the screws and try all three none line up very well.

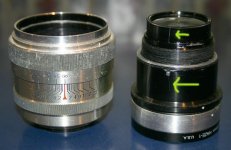
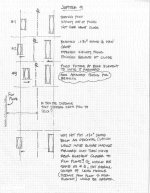
The second photo shows the lens pack out of the lens. You can see some scratch marks where someone (maybe the manufacturer - who knows) lined up the inner lens group.

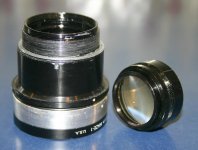
Then the third photo shows this lens group removed from the lens pack. There was no shim in this inner group seat.

So what I've done is this. Using the procedure on Kim Coxin's site I set up another SLR and attempted to collimate this lens at infinity. I ended up removing both of the shims you see in the first photo. Checked focus at 1m and it seemed good. So I shot a few exposures, developed them, and found the lens was focusing behind.

So when we talk about removing or adding shims, where are we talking about? Where the two shims are shown in under the lens pack? Or inside the pack at the back group? And how do you know which ones to change? If I send the lens to a repairman to lube and collimate do they work with both areas? And last question (for now), is the rear group that didn't have a shim the difference between the silver and black J9's - is that where you have to file down the fixture to make a change?

Thanks in advance for any information you can give me.

Jeff
 

Attachments

  • j9 before dissassembly.jpg
    j9 before dissassembly.jpg
    47.9 KB · Views: 0
  • j9 lens pack out.jpg
    j9 lens pack out.jpg
    39 KB · Views: 0
  • jp lens pack dissembled.jpg
    jp lens pack dissembled.jpg
    40.9 KB · Views: 0
The Black J-9's that I've had use a secondary shim for the rear group. The two silver J-9's that I have do not: the rear fixture was manufactured to fit in without the shim. I ended up filing the fixture down to move it in.

So- the shim to set is the main one, the one exposed when you take the optics out. Someone has probably already adjusted it once, which is why the aperture does not line up. You need to do that step last. Tap out new holes for the set screws to line it up.
 
The Black J-9's that I have seen have the secondary shim for the rear group; the silver ones do not. Those required that the rear fixture be filed down. The shim to set is the main one, shown around the optical fixture.
 
The Black J-9's that I've had use a secondary shim for the rear group. The two silver J-9's that I have do not: the rear fixture was manufactured to fit in without the shim. I ended up filing the fixture down to move it in.


How did you know to file down this fixture rather than just adding or removing shims at the main group?


So - the shim to set is the main one, the one exposed when you take the optics out. Someone has probably already adjusted it once, which is why the aperture does not line up. You need to do that step last. Tap out new holes for the set screws to line it up.

It's been several years since i messed with this lens but I don't think the aperture indicator was incorrect when I first got it (I just can't remember). Could I have done something in all my fooling around to move it by mistake? Is there another way to move it other than redrilling the holes? Does moving the rear lens group in or out move this alignment? I don't think that changing the main shims changes this alignment, does it?
 
It was not possible to make the lens focus accurately close-up and at distance by changing the main shim. That means the focal length has to be changed before changing the main shim. Moving the rear group in reduces focal lenght, like a zoom. The rear group could not be moved in far enough to correct focus across range.

The aperture not lining back up- happens when the main module is not srewed into the same position. Rear group has no effect on it.

Bottom line on J-9's: Kim Coxon has had luck bringing some, but not all, into good agreement with a Leica. I can make mine work well with a Contax, but cannot make any of the three I've tried work to my satisfaction with a Leica. I use a Nikkor 8.5cm F2 and Canon 85 F2 made for the Leica.
 
The machining required would be the Cam internal to the lens that translates the motion of the 84.5mm helical to the RF cam that connects with the camera's RF follower. The Pitch of that inner cam needs to be changed. It needs to be re-indexed.
 
Thank you both for the time you have taken to reply to my questions. I do have a FSU body which would probably need a CLA but the biggest drawback is the lack of an onboard light meter. That's why I was hoping to get it to work with my Bessa R.

I'm still going to fiddle with it a little more but I have lowered my expectations somewhat. I can handle the removal or addition of shims but I don't think I want to get into filing or grinding down the rear group fixture. I wouldn't mind doing that if I had some idea that would help but right now I don't understand lens optics well enough. So then does that mean that the best I can do is to collimate the lens at infinity and then everything else is what it is?

Brian could you give me a step by step of what I should do including filing down the rear group fixture if needed?
 
The rear group- I removed the glass from it, and "elbow-greased" metal off of it by circular motions over sand-paper set flat in a box. Took as much off the rear fixture to get even with the glass, that is about the limit you can hope for. Focal length reduced slightly, after that you have to adjust the main shim for the point that you want in best focus. Go for an intermediate range, such as 3m. That way best focus will be closer in. Mine is great from 2m to about 5m, after that stio fown to F4.
 
I thought I'd provide an update on my attempts to collimate this lens. At the main lens module this particular lens had two shims in it, both .016" thick for a total thickness of .032". I unscrewed the rear element from the lens module - there were no shims there which seems to be consistent with what people have been saying about the silver versions.

I started with checking infinity focus using the two camera method outlined on Kim Coxon's website. With both shims infinity was out of focus at f2. As I removed first one shim, then the other, infinity focus improved. But, as I removed the shims and improved the infinity focus I noticed that at 1M or so, close focus was focusing behind my desired point of focus.

So I started to remove some material from the rear element fixture, essentially moving it forward in the lens module. As the rear element moved forward in the module close focus seemed to improve (move forward also). I came to point though, where the rear element was as far forward as it would go. I think the threads actually bottomed out.

The other thing I noticed was if I put the shims back at the main module (which moved it forward) close focus was improved but infinity focus was bad. So it seems to be a balancing act, infinity focus and close focus are both affected in converse ways by the addition or removal of these shims or moving the rear element forward or rearward.

Anyway, I attached a few pictures. Pretty bad scans (2400 dpi) with my old Photosmart, film and development not optimized for scanning, but the best I have. These are all at maximum aperture (f2).

String around tree branch is at approximately 2M. Focus on string.

Satellite dish about 15M. Focus is at center rod with plastic cover.

Last is infinity focus down the street.

I was wondering what advice you might give me. I haven't taken the lens apart so I have no idea whether it was assembled correctly before I received it. Like I said earlier there was a scratch mark for alignment which might have meant it had been apart before, just don't know for sure. It just seems odd that it had two shims in it when I received it and both the module and the rear element had to to their maximum position to get it to focus like this. I can post some crops of 100% scans if that would help.

Thanks again for your help.
 

Attachments

  • Scan40-002 6x4 72dpi.jpg
    Scan40-002 6x4 72dpi.jpg
    30.6 KB · Views: 0
  • Scan43-002 6x4 72dpi.jpg
    Scan43-002 6x4 72dpi.jpg
    27.6 KB · Views: 0
  • Scan38-002 6x4 72dpi.jpg
    Scan38-002 6x4 72dpi.jpg
    29.1 KB · Views: 0
One thing about Jupiter-9 (as well as many other LTM lenses, and not just russian, btw) is to learn to focus it. What I mean by this - many have a long(ish) focus throw and their mechanics are not very precise. So what happens is - when you turn focus ring clockwise it puts optical block at one position/distance to the film plane, but when you focus on the same thing by turing focus ring counter-clockwise - it's at the other. You can see it by observing a distance scale on the lens. So, you have to determine which way is most correct for any given lens. Easiest to do with digital body , of course.
Now - all this assuming that your lens is calibrated and shimmed correctly.
I have a silver J-9 that produces very nice results across the whole distance range, but I have to make sure I turn focus ring in a certain direction when focusing to get those best results. Otherwise it looks like lens is not focusing well. It's mechanics are not the best and allow for that little play that can affect focus. But when you learn to focus one correct - it delivers:

up close and wide open:
EPSN5452.jpg


or at a distance and wide open:
Scan317.jpg
 
One thing about Jupiter-9 (as well as many other LTM lenses, and not just russian, btw) is to learn to focus it. What I mean by this - many have a long(ish) focus throw and their mechanics are not very precise. So what happens is - when you turn focus ring clockwise it puts optical block at one position/distance to the film plane, but when you focus on the same thing by turing focus ring counter-clockwise - it's at the other. You can see it by observing a distance scale on the lens. So, you have to determine which way is most correct for any given lens. Easiest to do with digital body , of course.

Thank you for the reply and the suggestion. I will keep that in mind as I shoot with it and see if there is some variability depending on which way the lens is traveling. My problem though is I am not good enough with rangefinder focus technique that I can just get to the focus point and stop. I seem to have to "hover" around it a bit to make sure I am in focus. So I am not sure if this applies to me or not. I'll try to look for it though.

Nice photos by the way.
 
Your results are consistent with my experience.

I would suggest focusing on a ruler, tape measure, or something that you can see how far off the actual focus is with respect to the RF. My "Fence Photos" give me a good idea.

I have seen slop in the helical cause a lens to focus properly in one direction, but not in another. Also have seen the helical moce a bit in the mount cause the same thing. On the latter, I used some plumbing grease in the threads of the Wartime Sonnar mount to tighten the helical screwing into place.
 
Jeff- hard to tell from the images posted. They all look a bit soft to me, but could be the scans. The string does not look as "crisp", and infinity looks soft.

Mine at F2, and 2m, after adjusting focal length and the main shim.

picture.php
 
Brian, can you tell me as a general rule, if the focus is in front of where you intend does the lens need to go forward or back? And vice versa for focus behind the intended point?

And does that hold true from close to infinity?
 
Front Focus: If the actual focus is in front of the point that the RF indicates, the optics are too far from the film plane and the shim needs to be reduced.

Back Focus: If the actual focus is farther that what the RF indicates, the optics are too close to the film plane and the shim needs to be thicker.

That normally holds for close-up to infinity if the lens and RF are calibrated to the same standard. The problem: Leica standard is nominal 51.6mm and FSU standard is nominal 52.4mm.
 
Thank you. Just to clarify, where do we measure to? Film plane to rear element? centerline of optics?

The reason I ask, what is the relationship of the elements in the optics module? When I moved the rear element forward in the module what was happening to the lens?

Is it possible I could have optimum location of the module (with the proper thickness shim) but not have the sharpest image possible because of a incorrect distance from the front to the rear element?

Is there a certain order you work when you collimate a lens? Or do you tweak everything a little at a time?

What a puzzle...
 
Ignore the distance scale, place the ruler about 5feet away, and use the RF to focus on the center of it. You should be able to see how far off the actual focus is from the RF.

I tweek the placement of the rear element and the main shim until I get a two-point agreement at 2m and 5m.
 
So I had a little time this weekend to fiddle with this lens some more. Basically I think I'm down to the point of just minor tweaks to get it a little closer. I'm certainly not saying it's perfect but it may be the best performance this copy is capable of. I'll see what pointers you guys can give me.

I attached a jpg of some sketches I made showing what I have done, it shows three steps but in reality there has been a lot of moving the main lens pack and/or the rear element back and forth. And also some pictures, will probably need 2 posts to get them all in.

One question I had though. What happens when you actually decrease the distance from the front element to the rear element like I did? Does it change it from a 85mm lens to a 83mm or 87mm lens?

Anyway here are the samples. All at f2. I shot all of these handheld. Shutter speeds were close to 1/125 sec. No sharpening in the scans. Downsized from 900 pixels per inch to 100, if any of that matters.

I think the lens may still be back-focusing a little and have tweaked it but not shot with it yet.
 

Attachments

  • j9 Scan.jpg
    j9 Scan.jpg
    52.4 KB · Views: 1
  • j9 2m string 02_19_2011 100dpi.jpg
    j9 2m string 02_19_2011 100dpi.jpg
    148.2 KB · Views: 1
  • j9 3m 02_19_2011 100dpi.jpg
    j9 3m 02_19_2011 100dpi.jpg
    158.1 KB · Views: 1
Back
Top Bottom