Kiev 4A tune-up write-up (with black repaint)

evanmayer

Cellulose Junkie
Local time
12:06 PM
Joined
Jul 3, 2015
Messages
13
Hi, I'm new. This past week, I opened up my 1978 Kiev 4A to repair the usual light leaks (sprocket holes, yak hair channel) and clean up old grease, and ended up with a full repaint job. To make this post short, I hope it's alright if I link to my 4-part write-up on an external site (my personal site). If it isn't, I'd be happy to paste the (photo-heavy) content in this forum in a series of posts. I searched the forums for similar writeups for the Kiev/Contax (although I'd never do this myself to a Contax), and since there seemed to be space for it, I thought you all would find it useful. My disassembly and light leak fixes are, like most Kiev repairs, based heavily/entirely on the Kiev Survival Site.

My write-ups:
kiev 4a tune-up pt. 1 (disassembly)

kiev 4a tune-up pt. 2 (paint prep)

kiev 4a tune-up pt. 3 (painting)

kiev 4a tune-up pt. 4 (reassembly)

I don't claim to be an expert, but I was satisfied with my results, and it was good fun.

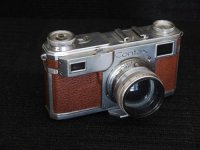
Here's the before and after:


Untitled by Evan Mayer.


Untitled by Evan Mayer.


Questions? Confused, enraged rants? Fire away!

Evan M.
 
Wow, that's a really thorough how-to! An excellent write-up. I have a similar Kiev myself and have had a hankering to repaint it. Thanks for sharing and welcome to RFF!
 
That does look good in black. Much better than the super glossy ones you see on eBay. I'll have to check out your site later on.

PF
 
An alternative to the white lacquer stick is to use white appliance touch up enamel. I use a small bottle of such a solution made by Whirlpool for their washers and dryers - 72017 White. The advantage over the stick is that the thinner white paint won't completely fill up the groove of the lettering, such as a paint stick would. Also, clean up is almost immediate - after filling the lettering groove with the paint, just go around the edges with a Q-tip or a cloth to remove the excess paint. The appliance enamel is very durable after drying, and covers very well - even over black.
 
An alternative to the white lacquer stick is to use white appliance touch up enamel. I use a small bottle of such a solution made by Whirlpool for their washers and dryers - 72017 White. The advantage over the stick is that the thinner white paint won't completely fill up the groove of the lettering, such as a paint stick would. Also, clean up is almost immediate - after filling the lettering groove with the paint, just go around the edges with a Q-tip or a cloth to remove the excess paint. The appliance enamel is very durable after drying, and covers very well - even over black.

That's pretty helpful, thanks. I wasn't sure where to start aside from the often-recommended Testor's model paint from Micro-Tools.

Thanks for the responses, everyone. I'll surely post updates as I get the first short roll back, and if I fill in the engravings.
 
I put two rolls though the camera, and of course the lab obliterated the images on one of them. Here are two samples from the surviving one. It's the oldest roll of Kodak Gold I've ever seen, and has a ridiculous purple shift.

tumblr_nulbdjpmy31shzqwco1_1280.jpg


Color-corrected:
tumblr_nulbdjpmy31shzqwco2_1280.jpg


It's clear that one leak was still there, albeit attenuated, the persistent sprocket hole leak. I spent some time with a flashlight, running in and out of a closet, identifying the leaky spot, and gluing in a supplementary piece of foam to finally seal it up. For good, I hope.

tumblr_nulbpbyBzB1shzqwco1_1280.jpg


The Lacquer-Stik worked great, filling in even my shallow stamped lettering. It would work better (i.e., not give me as much trouble when wiping across to remove excess) on deeper engravings. The black enamel finish is just fine, with some chipping on high traffic corners. This doesn't bother me, having thrown the camera in and out of my work bag. I know a more durable finish could be achieved with a higher-quality enamel, and more coats.

Edit: sorry for the large images. I can fix if there's an easy BBCode snippet to enable image resizing.
 
I have a similar light leak in mine! Where did you find yours to be? I've not yet had a chance to investigate mine.

Ronnie
 
I love it - my approach was to turn all the metal work to silver with tan leather - also works a treat !

Rebuilt scrap/spares Contax with Kiev back and small parts - courtesy of ex-Arsenal techs in Ukraine .
 

Attachments

  • Tan Contax 6 .jpg
    Tan Contax 6 .jpg
    25.5 KB · Views: 0
I have a similar light leak in mine! Where did you find yours to be? I've not yet had a chance to investigate mine.

Ronnie

Ronnie, I'll see if I can dig up and add a circle or two to some pictures I took while it was taken apart. It has film in it right now.

As you're looking with the back taken off, it's the space above the top sprocket on the right side. (top left corner of this photo)


Untitled by Evan Mayer

The area that likely has a missing or poorly shaped baffle is circled in yellow in this photo:


sprocketleak_circled by Evan Mayer

If you shine a flashlight into your RF window and tilt the camera to look up into that gap, you'll probably see light coming through if you hold it a few different ways. For me, it appeared most often when winding the shutter+film to take the next shot. That's why it can appear to be fixed, but crop up roll after roll, and not in every frame. Imagine taking a photo, then advancing the film in the shade, with the RF window away from light. You'd probably avoid the wedge-shaped leak.

For more details, and a closer inspection of this area, see this page:
Kiev Survival Site: Fixing Light Leaks

And this photo from the same page:

IMG_2278b.jpg


I'd add a name to give more credit, but all I can find is this person's email. It's on the site.

I love it - my approach was to turn all the metal work to silver with tan leather - also works a treat !

Rebuilt scrap/spares Contax with Kiev back and small parts - courtesy of ex-Arsenal techs in Ukraine .

That's a beautiful color combo.
 
Thanks.

I think I know where your talking about. Between the shutter crate and the body there is a wee gap. I did have my suspicions about there so will try to fill the gap with some spare foam I have.

Ronnie
 
Just to be absolutely clear, the area I just fixed, and the area intended to be covered by the Kiev's original, lackluster baffle, is circled in red here:


kiev-shutter (source image without red ellipse from Kiev Survival Site)

There is also a gap between two parallel castings in the same area, which you may be referring to, Ronnie. The two adjacent castings are nearby in the top right, the film plane/shutter cover casting, and the body casting that supports the film winding assembly. It could be a problem, but either I got it when I did my repair, or it was never a problem for me. In the image above, this parallel gap would be between the yellow arrow and yellow ellipse.
 
Thanks. I was thinking it might be the gap between castings but I'll have to think about the red circle now too. Might have to lay the negs on the body and see what lines up. :)

Ronnie
 
A few months on, and the spray enamel hasn't lasted very well around the edges. I don't mind it, since it's a beater anyway, but I would think others would get better adhesion by professionally having the chrome and nickel removed. Then going at it with paint. I would also stress the right conditions for painting; I won't try to spray again when it's so hot and dry. Engine or appliance enamel would probably be even better.
 
Back
Top Bottom