Konica Auto S2 ... success!!

Greyscale

Veteran
Local time
4:00 AM
Joined
Jul 26, 2010
Messages
5,381
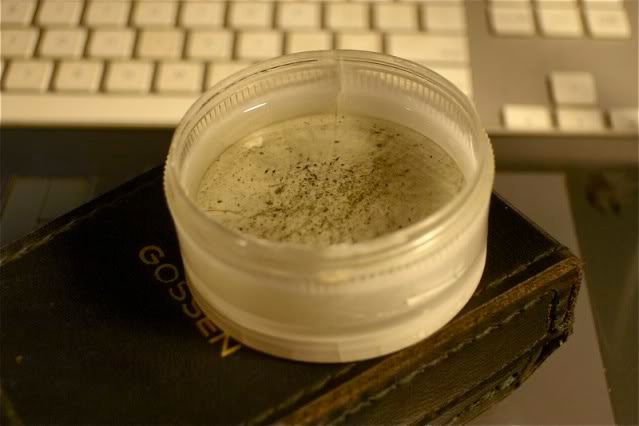
I finally got the shutter and aperture clean and working properly on my KAS2 after nearly a week of cleaning. How dirty was it? The picture below shows some of the dirt and debris that was removed by my "techno-pop sonic thump full immersion" technique:


Shutter crud from Konica Auto S2 by Greyscale3, on Flickr

I may yet get to run a roll of film through this camera. :D
 
I cleaned the viewfinder, so no more cloudiness, fixed the parallax correction (tiny spring out of place), bought a light meter (Sears branded Gossen Pilot, supposed to be in working condition), ordered new vinyl leatherette from cameraleather.com (I managed to shrink the old covering a bit), and am getting a light seal kit. Hopefully, by this time next week, I will be taking some pretty pictures with this camera.
 
That's very cool Greyscale.

Could you possibly explain your "techno-pop sonic thump full immersion" technique a bit?

I'm working on a plain old vanilla KAS right now and would love to know what you're talking about....??? lol

Also, how do you open up the hood on these puppies? The advance arm doesn't have the normal spanner holes to get a grip on.
 
Jack, if you use a thin piece of rubber, like from a dishwashing glove, you should be able to get enough grip to remove the knob on top of the advance arm. If you don't get enough grip that way, gentle use of a pair of padded pliers may be necessary.

My unconventional method for cleaning the gunk was to place the camera lens-barrel down in the custard cup seen in the photo above, with the cup filled with enough naphtha (lighter fluid) to completely immerse the entire shutter assembly (remove the front element first, and de-solder the connections to the light meter sensor). Then I put the camera ontop of my stereo speakers and tuned in a techno pop/electronica station on my digital cable box and turned the bass to max. Even at low volume, this caused a constant, gentle agitation of the solvent, and gravity allowed the debris to drift to the bottom. I would exercise the shutter and aperture every know and then, and gently swab dry the shutter and aperture blades to loosen any remaining gunk, then repeat the process several times.

Once the shutter is clean, you will want to remove and clean the rear lens element as well.
 
Very clever contraption, or should I say gunktraption. Your information helps tremendously since at the moment I have the front and rear lens elements out and am attempting to flush the aperture diaphragm and consequently the shutter as well. Beautiful.
It seems that partial swabbing of the blades just doesn't cut the mustard.
I noticed the rear lens on the rear group is held in place with a retaining ring and much debris apparently accumulates in and around that ring, so again, excellent advice.
I'll work on the advance arm now that I know it just unscrews with friction.

Thanks for the help. I'm looking forward to the legendary Konica experience soon. My viewfinder is bright and clear as a bell but the RF horizontal is off just a smidge.

I'm finding these cameras locally at garage sales and thrift stores knowing they aren't quite right, but for me fixing them is half the fun; which is really kind of stupid since it leaves me with less time to actually take photographs. lol
 
Jack, if you use a thin piece of rubber, like from a dishwashing glove, you should be able to get enough grip to remove the knob on top of the advance arm.

I grab a rubber boot on this occasion! Daugther's is better as it's smaller than mine.
 
Well, I haven't yet had any luck removing the film advance arm. The rubber boot didn't get it and not even a pliers has budged this screw. I'm thinking about actually drilling two holes like most other cameras already have.

I was successful using a variation of Greyscales sonic immersion.

However, rather than using Bass vibration I put the cup bath wrapped in a plastic baggy right on top of a fan tilted straight up, since it vibrates at a smooth consistancy.
And it did work. Much crap came out and the shutter/aperture is running nice and snappy now.
Anyway, even if I don't pull the top off it's not terribly critical. The rangefinder is already bright and clean. It's just the horizontal is just a hair off which means it doesn't snap to focus quite as firmly as it could.
But I bet a thorough cleaning would make this Konica about the brightest rangefinder I've yet used.

One thing I don't care about with the Konica Auto S is that the meter sticks out of the upper right side of the body, right where a finger is naturally inclined to rest. And its got a sort of sharp edge on the protrusion.
Just kind of annoying.
 
Very interesting ... This reminded me of my problem with the Konica Auto S2. I really love this camera and the quality of the lens. But need to clean the viewfinder: I have tried to remove the top cover, but it's still stuck on the side of the frame counter, although I have unscrewed the two screws. Do you have any tips for removing the top cover and clean the viewfinder. Thanks in advance.
 
Very interesting ... This reminded me of my problem with the Konica Auto S2. I really love this camera and the quality of the lens. But need to clean the viewfinder: I have tried to remove the top cover, but it's still stuck on the side of the frame counter, although I have unscrewed the two screws. Do you have any tips for removing the top cover and clean the viewfinder. Thanks in advance.

Did you unscrew rewind shaft? Open film door, lock shaft inside and turn round upper part.
 
I just got through finally opening or removing the top on my KAS. The rubber friction pad I cut from and old rain galosh finally did the trick. Thanks btgc... That smooth top screw on the advance arm is a "#%@#!stupid" idea. Nevertheless it finally came loose. Beneath that "#$%&$#%!stupid" designer screw there are several little bits that need to be carefully lifted off along with the arm, and another spanner type nut at the very bottom of the advance arm. Once all that is finally removed, the other rewind side is gravy. Just open the back, slip a screwdriver in the slot of the crank and unscrew the top of the rewind knob. It should unscrew with nothing more than hand pressure. Hiding beneath that rewind crank is a little screw. Remove it and the top comes off.

There's a metal cover plate over the rangefinder. 'It's a big spacious well built looking affair. I cleaned mine but I really didn't need to. I probably introduced more crap than I removed.
I couldn't figure out what screw to turn to adjust the horizontal lines on the objects I'm focusing on. In other words the yellow patch sits just a smidge high. It lines up side to side ok.
Anyway, for the time being I left well enough alone, at least until I get some light seals in it and test drive it.
I also just gave it new rattlesnake leather, (vinyl) from a purse I found at Goodwill. Looks better than the purse did... on me. :p

KonicaAutoS.jpg
 
Oh, and to honor Greyscale's innovative vibrational cleaning method, I offer this photographic testimony of its efficacy.

_A155070.jpg
 
Thank you btgc. Yes, I unscrew first rewind knob and remove shaft, and then the cocking lever, but I have not yet managed to lift the top cover. I don't know where is the error...

Did you unscrew rewind shaft? Open film door, lock shaft inside and turn round upper part.
 
Jack, you can adjust the horizontal rf without removing the cover at all, I think. There is a tiny plug to the bottom right of the viewfinder on the rear of the camera, remove that to access the adjustment screw for the rf. Vertical adjustment would require removal of the top, though. Or maybe its vice-versa...
 
luiman, there is a screw beneath the rewind crank that needs to be removed, and also a small nut on the advance lever shaft that also needs to be removed (unscrew counter-clockwise).
 
Back
Top Bottom