Philip Whiteman
Old hand returning to the fray
My starting point was a camera with a broken shutter, frozen focus mount, foggy finder and lots of green corrosion where the chromed panels met the leather covering. It was so cheap that I thought I had nothing to lose, so I bought the Peter Tooke repair manual, read all I could find about Contax and Kiev repairs on the Rangefinder Forum, and launched into it.
I won't repeat the advice already given online and in the manual (just go buy a copy, I would say) but there are one or two things that are not mentioned in the book and some accepted online wisdom I would perhaps dispute.
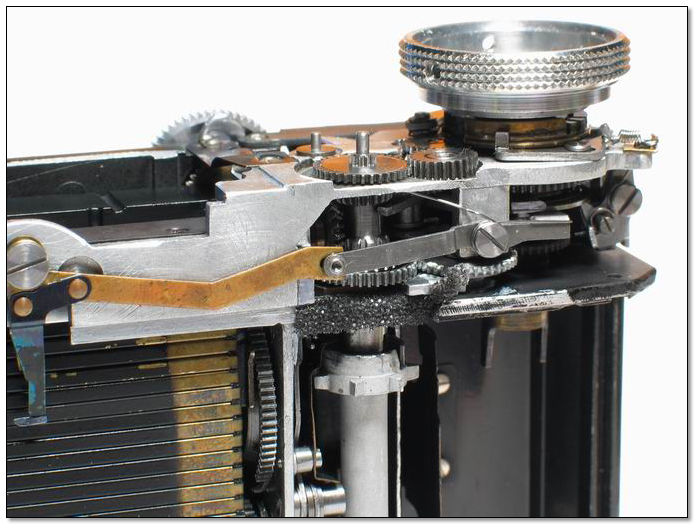
First, the importance of having or being able to produce the correct size screwdriver blades is worth emphasizing: I happened to have an el cheapo bench grinder that allowed me to thin down one blade to remove the large screw in the centre of the rewind knob without marking it, but - more critically - was also useful in reshaping one of my watchmakers screwdrivers to fit the narrow but wide slot in the shutter tensioning spindle.
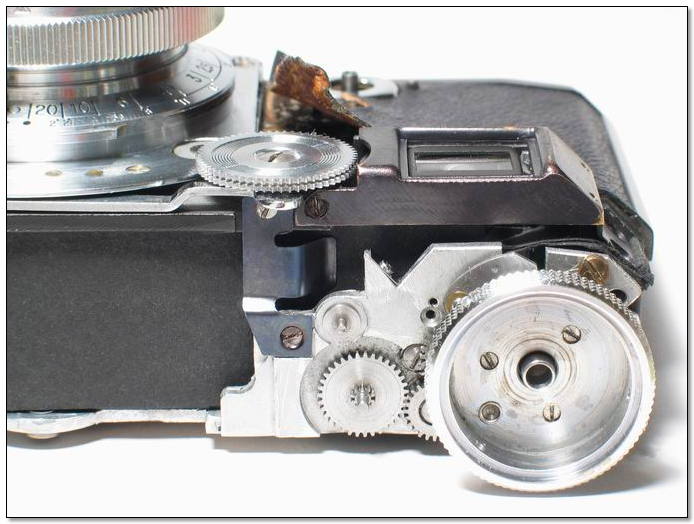
I thought fitting new tapes was the supreme test of my manual dexterity (the light bulb going on over head moment was realizing that sewing the ends of the tapes was actually easier than attempting to clamp or glue them together temporarily because the thread automatically aligns the join) but almost stalled with the difficulty in tensioning the shutter. Time and again I would wind up the tension only to have the screwdriver blade slip out of engagement and let the shutter unroll. It was only when someone else explained in a FSU RF thread how vital it was to use a correctly sized blade that the penny dropped. I ground back the tip of a driver that was the right width but otherwise too thin and that did the trick - suddenly it was possible!
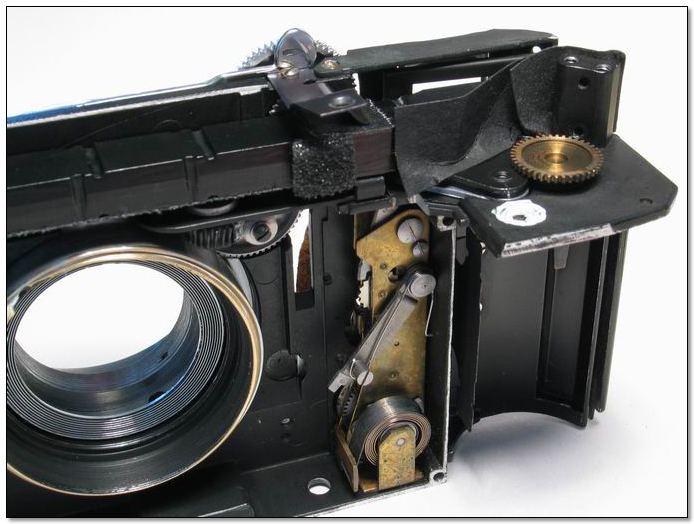
Neither the Tooke manual nor the various online instructions identify precisely how the low speed escapements operate. Beware that the mystery spring attached to the shutter tension latch controls one of these, and if this spring comes adrift (it wraps around a screw head you cannot access without removing the shutter crate from the body) you may suffer random engagement of one escapement and inconsistent shutter speed. In my camera this escapement was gummed up and it was only when I attempted to turn the screw that I found it was supposed to move bodily up and down, and I twigged what was wrong. Freeing up and lubricating this part of the mechanism was the final step in getting the shutter back to near normal operation.
Near normal? Having first over-tensioned the shutter to get the low speeds working, I found it was coming unlatched on one side due to the load on the pins. In the end, I settled for an empirical approach of winding up the tension in stages until the high speeds looked about right in a visual comparison with my Leica R4's electronically-controlled (and presumably dead accurate) shutter. This left the low speeds running sluggishly, which I think is the compromise you have to put up with if you are unable to completely dismantle and properly lubricate the escapements as the professionals are able to do.
Those same professionals would probably shudder in horror at the way I worked the focus mount loose with as much force as I dared apply and then, without dismantling it and disturbing the rangefinder alignment, applied to the exposed helix... er, grease from an espresso machine service kit. (In my defense, I would point out that this stuff doesn't creep and the ploy worked, because the focus action is now beautifully smooth and even.)
Removing the viewfinder optics and cleaning the glass is relatively easy and you get a very good result even without disturbing the moving rangefinder optic and risking it coming adrift and going out of alignment.
Proof of the pudding has just arrived with test film no.1 and a set of negatives and prints that show correct exposures at 125th to 1250th and my guesstimated 30th (50th setting) and 10th (25th setting). The frames were correctly spaced and there's no sign of any light leak.
According to some sources, this should not be: I used Aki-Asahi silk ribbons which some claim are too thin to provide the right friction to maintain the shutter slit width at the higher speed settings. The ribbons in the camera, possibly originals but there is no way of being sure of this, were 0.012" thick. The replacement ones are much thinner - 0.006" - but there's not the slightest sign of shutter tapering. I think that the more serious error would have been to fit Kiev ribbons, which are thicker and would slow the top curtain's travel at low speed settings. Whatever; the Aki-Asahi ribbon just seems to work.
So it can be done by an amateur, but take it from me; it's a steep learning curve, even with the manual to hand, and you are never going to get the perfect result a professional repairman would achieve. Having said that, for all the frustration along the way, there is huge satisfaction in having turned a piece of junk into a working camera.
I won't repeat the advice already given online and in the manual (just go buy a copy, I would say) but there are one or two things that are not mentioned in the book and some accepted online wisdom I would perhaps dispute.
First, the importance of having or being able to produce the correct size screwdriver blades is worth emphasizing: I happened to have an el cheapo bench grinder that allowed me to thin down one blade to remove the large screw in the centre of the rewind knob without marking it, but - more critically - was also useful in reshaping one of my watchmakers screwdrivers to fit the narrow but wide slot in the shutter tensioning spindle.
I thought fitting new tapes was the supreme test of my manual dexterity (the light bulb going on over head moment was realizing that sewing the ends of the tapes was actually easier than attempting to clamp or glue them together temporarily because the thread automatically aligns the join) but almost stalled with the difficulty in tensioning the shutter. Time and again I would wind up the tension only to have the screwdriver blade slip out of engagement and let the shutter unroll. It was only when someone else explained in a FSU RF thread how vital it was to use a correctly sized blade that the penny dropped. I ground back the tip of a driver that was the right width but otherwise too thin and that did the trick - suddenly it was possible!
Neither the Tooke manual nor the various online instructions identify precisely how the low speed escapements operate. Beware that the mystery spring attached to the shutter tension latch controls one of these, and if this spring comes adrift (it wraps around a screw head you cannot access without removing the shutter crate from the body) you may suffer random engagement of one escapement and inconsistent shutter speed. In my camera this escapement was gummed up and it was only when I attempted to turn the screw that I found it was supposed to move bodily up and down, and I twigged what was wrong. Freeing up and lubricating this part of the mechanism was the final step in getting the shutter back to near normal operation.
Near normal? Having first over-tensioned the shutter to get the low speeds working, I found it was coming unlatched on one side due to the load on the pins. In the end, I settled for an empirical approach of winding up the tension in stages until the high speeds looked about right in a visual comparison with my Leica R4's electronically-controlled (and presumably dead accurate) shutter. This left the low speeds running sluggishly, which I think is the compromise you have to put up with if you are unable to completely dismantle and properly lubricate the escapements as the professionals are able to do.
Those same professionals would probably shudder in horror at the way I worked the focus mount loose with as much force as I dared apply and then, without dismantling it and disturbing the rangefinder alignment, applied to the exposed helix... er, grease from an espresso machine service kit. (In my defense, I would point out that this stuff doesn't creep and the ploy worked, because the focus action is now beautifully smooth and even.)
Removing the viewfinder optics and cleaning the glass is relatively easy and you get a very good result even without disturbing the moving rangefinder optic and risking it coming adrift and going out of alignment.
Proof of the pudding has just arrived with test film no.1 and a set of negatives and prints that show correct exposures at 125th to 1250th and my guesstimated 30th (50th setting) and 10th (25th setting). The frames were correctly spaced and there's no sign of any light leak.
According to some sources, this should not be: I used Aki-Asahi silk ribbons which some claim are too thin to provide the right friction to maintain the shutter slit width at the higher speed settings. The ribbons in the camera, possibly originals but there is no way of being sure of this, were 0.012" thick. The replacement ones are much thinner - 0.006" - but there's not the slightest sign of shutter tapering. I think that the more serious error would have been to fit Kiev ribbons, which are thicker and would slow the top curtain's travel at low speed settings. Whatever; the Aki-Asahi ribbon just seems to work.
So it can be done by an amateur, but take it from me; it's a steep learning curve, even with the manual to hand, and you are never going to get the perfect result a professional repairman would achieve. Having said that, for all the frustration along the way, there is huge satisfaction in having turned a piece of junk into a working camera.