Chriscrawfordphoto
Real Men Shoot Film.
A handheld light meter is, I believe, the single most important accessory that a photographer can own. They provide more useful and accurate readings than the meters that are built in to cameras.
This tutorial is a basic introduction to handheld meters. Later tutorials will teach more advanced metering techniques.
There are two types of exposure meters. Reflected light meters, and incident light meters.

Some handheld Meters From My Collection
Reflected Light Meters
If you have ever used a camera with a built-in light meter, you have already used a reflected light meter. All of the meters built in to cameras that read the light coming in through the lens are reflected light meters. There are also handheld reflected light meters.
To use a reflected light meter, you stand at the camera position and point the meter toward the subject. As the name implies, a reflected light meter measures the light that reflects off of the subject. This is a serious disadvantage because the meter has no way of knowing if you are photographing something that should be rendered as a light tone (like a white building) or as a dark tone, or a middle tone. Because of this, the meters are calibrated to assume that you are photographing an "average" subject; one whose various parts will average out to a middle-gray tone.
If you only photograph such "average" scenes, then a reflected light meter will give you accurate results. In the real world, that is not often the case. As we'll see later in this tutorial, reflected light readings of a light-toned subject will produce an underexposed photograph, as the meter tries to render the light tones as a middle gray. A reflected light reading of a dark-toned subject will produce an overexposed photograph, as the meter tries to render the dark tones as a middle gray.

Two reflected light meters.
The Weston Master V is a classic meter from the 1960s, a development of the original handheld meters invented by Weston in the 1930s.
The Gossen Ultra-Pro is mainly designed as a reflected light meter, but includes a small incident light dome that can be slid over the front of the sensor.
Incident Light Meters
A handheld incident light meter ignores the subject and just measures the light that hits the subject. This might seem counter-intuitive, but it is actually superior to reflected light metering in most circumstances. Because it ignores the subject, it cannot be fooled into underexposing light tones and overexposing dark tones, as a reflected light meter does.
Incident light meters are instantly recognizable because they have a white dome covering the meter's sensor. To use the meter, you stand close to your subject, so that the meter will be in the same light as your subject, and point the white dome directly toward the camera.
The reason for the white dome over the sensor is that the three dimensional dome simulates a three dimensional subject. Light hits the subject from different directions, and the dome allows the meter to see light coming from the sides, from above or below, and from straight on.
The system isn't perfect. The dome cannot take into account backlighting, and they don't do well with extreme side-lighting. For those conditions, there are techniques for using an incident meter that I describe in my Duplex Method Tutorial.
Self-illuminated or trans-illuminated objects, such as stained glass windows and neon signs cannot be measured with an incident light meter. For those, a reflected light meter is required. Because an incident meter requires you to meter from the location of the subject, or in the same light as the subject, it cannot be used for inaccessible places like a theater stage during a play or concert.

A couple of incident light meters. These meters, though primarily designed as incident meters, are actually "System Meters." A wide variety of accessories were made for them that expanded their capabilities.
Along the top are the enlarging meter attachment (for darkroom work), the 40 degree reflected light attachment, and a flat incident light diffuser. The flat diffuser is for photographing flat subjects, like artwork. It is also used in studio work to take readings from individual lights to set lighting ratios.
The 5 degree viewfinder turns the meter into a reflected light meter with a smaller angle of view, allowing you to take readings from different parts of the scene.
Below are several examples of different types of subjects that I photographed using a reflected light meter and an incident light meter. You can see in the examples that the exposures determined with an incident light meter are very consistent, regardless of the subject matter. The exposures determined with a reflected light meter were often way off because of the meter's assumption that every subject is middle gray. Because of that, the only exposure from the reflected light meter that was good involved a scene that was mostly made up of middle tones.
Example: White Subject


In the first example, exposure determined with a reflected light meter. As you can see, this is about two stops underexposed!
In the second example, the reading from an incident light meter was used. The white church now looks white!
Example: Light Subject

Exposure determined with a reflected light meter. As you can see, this is about 1.5 stops underexposed!

Exposure determined with an incident light meter. The scene is rendered perfectly. The scene is lighter than the middle gray "average scene" that a reflected light meter is designed for, but is not white.
Example: Dark Subject

Exposure determined with a reflected light meter. As you can see, this is overexposed. These trash bins are supposed to be a dark gray-brown.

Exposure determined with an incident light meter. The scene is rendered perfectly. The dark gray trash bins render dark, but not so dark they lose detail.
Continued on the next post...
This tutorial is a basic introduction to handheld meters. Later tutorials will teach more advanced metering techniques.
There are two types of exposure meters. Reflected light meters, and incident light meters.
Some handheld Meters From My Collection
Reflected Light Meters
If you have ever used a camera with a built-in light meter, you have already used a reflected light meter. All of the meters built in to cameras that read the light coming in through the lens are reflected light meters. There are also handheld reflected light meters.
To use a reflected light meter, you stand at the camera position and point the meter toward the subject. As the name implies, a reflected light meter measures the light that reflects off of the subject. This is a serious disadvantage because the meter has no way of knowing if you are photographing something that should be rendered as a light tone (like a white building) or as a dark tone, or a middle tone. Because of this, the meters are calibrated to assume that you are photographing an "average" subject; one whose various parts will average out to a middle-gray tone.
If you only photograph such "average" scenes, then a reflected light meter will give you accurate results. In the real world, that is not often the case. As we'll see later in this tutorial, reflected light readings of a light-toned subject will produce an underexposed photograph, as the meter tries to render the light tones as a middle gray. A reflected light reading of a dark-toned subject will produce an overexposed photograph, as the meter tries to render the dark tones as a middle gray.
Two reflected light meters.
The Weston Master V is a classic meter from the 1960s, a development of the original handheld meters invented by Weston in the 1930s.
The Gossen Ultra-Pro is mainly designed as a reflected light meter, but includes a small incident light dome that can be slid over the front of the sensor.
Incident Light Meters
A handheld incident light meter ignores the subject and just measures the light that hits the subject. This might seem counter-intuitive, but it is actually superior to reflected light metering in most circumstances. Because it ignores the subject, it cannot be fooled into underexposing light tones and overexposing dark tones, as a reflected light meter does.
Incident light meters are instantly recognizable because they have a white dome covering the meter's sensor. To use the meter, you stand close to your subject, so that the meter will be in the same light as your subject, and point the white dome directly toward the camera.
The reason for the white dome over the sensor is that the three dimensional dome simulates a three dimensional subject. Light hits the subject from different directions, and the dome allows the meter to see light coming from the sides, from above or below, and from straight on.
The system isn't perfect. The dome cannot take into account backlighting, and they don't do well with extreme side-lighting. For those conditions, there are techniques for using an incident meter that I describe in my Duplex Method Tutorial.
Self-illuminated or trans-illuminated objects, such as stained glass windows and neon signs cannot be measured with an incident light meter. For those, a reflected light meter is required. Because an incident meter requires you to meter from the location of the subject, or in the same light as the subject, it cannot be used for inaccessible places like a theater stage during a play or concert.
A couple of incident light meters. These meters, though primarily designed as incident meters, are actually "System Meters." A wide variety of accessories were made for them that expanded their capabilities.
Along the top are the enlarging meter attachment (for darkroom work), the 40 degree reflected light attachment, and a flat incident light diffuser. The flat diffuser is for photographing flat subjects, like artwork. It is also used in studio work to take readings from individual lights to set lighting ratios.
The 5 degree viewfinder turns the meter into a reflected light meter with a smaller angle of view, allowing you to take readings from different parts of the scene.
Below are several examples of different types of subjects that I photographed using a reflected light meter and an incident light meter. You can see in the examples that the exposures determined with an incident light meter are very consistent, regardless of the subject matter. The exposures determined with a reflected light meter were often way off because of the meter's assumption that every subject is middle gray. Because of that, the only exposure from the reflected light meter that was good involved a scene that was mostly made up of middle tones.
Example: White Subject
In the first example, exposure determined with a reflected light meter. As you can see, this is about two stops underexposed!
In the second example, the reading from an incident light meter was used. The white church now looks white!
Example: Light Subject
Exposure determined with a reflected light meter. As you can see, this is about 1.5 stops underexposed!
Exposure determined with an incident light meter. The scene is rendered perfectly. The scene is lighter than the middle gray "average scene" that a reflected light meter is designed for, but is not white.
Example: Dark Subject
Exposure determined with a reflected light meter. As you can see, this is overexposed. These trash bins are supposed to be a dark gray-brown.
Exposure determined with an incident light meter. The scene is rendered perfectly. The dark gray trash bins render dark, but not so dark they lose detail.
Continued on the next post...
Chriscrawfordphoto
Real Men Shoot Film.
Example: Average Subject


The first example was metered with a reflected light meter, the second was done with an incident meter. They're nearly identical, since this is a scene consisting almost entirely of middle-toned subject matter.
Recommendations
What kind of light meter should you use? The answer depends on the kind of work that you do. Each type of meter has its strengths and weaknesses.
Based on what you have read so far, you have probably concluded that reflected light meters are useless, and that an incident meter is the only good choice. That is not entirely fair, as reflected light meters can be used successfully once you understand how they work; there are also some types of scenes that an incident meter cannot be used for.
Most meters sold today can do both incident and reflected light metering, though some require you to buy an attachment for reflected metering. So, let's talk about what each type is most suited to.
Exposure Requirements For Digital Photography
Digital camera sensors have very little overexposure lattitude. That means that it is important to give an exposure designed to keep the light tones in the image from going too light, where detail is lost.
In very high contrast light, this can mean that the dark tones will go too dark. That is not usually a problem, as RAW processing software like Adobe Lightroom can recover dark tones that have been pushed too low on the tone scale in order to ensure proper light-tone rendering. To some extent, you can also recover overexposed light tones; however, this capability is much more limited than the shadow-tone recovery. It is essential to ensure that the light tones are exposed correctly.
Incident Meters
An incident meter is the best choice for most digital work. The meter is calibrated to place the light tones at the proper exposure level. To use the meter, you stand by the subject and point the meter's white dome directly toward the camera. If you are photographing a subject with brightly lit areas and deeply shadowed areas (for example, a bright sunny day), then place the meter in the brightly lit area. If you meter in the shadowed areas, you'll get severely overexposed light tones.
There are a couple of things that incident meters do not work for. They cannot measure self-illuminated and trans-illuminated objects, such as stained glass windows. You'll need a reflected light meter for that. Incident meters also cannot take into account light that comes from behind the subject, as in backlit scenes where the sun is behind the subject, though there are techniques that get around that problem.
Reflected Light Meter
A reflected light meter can be used successfully for digital photography once you understand how the meter works. As I noted on the first page of this tutorial, a reflected meter assumes that whatever you point it at is a middle gray toned scene. Because it assumes that your subject is middle gray, it recommends an exposure that will render your subject as middle gray in your photograph. This is fine if your subject is a mid-toned object. Some examples include green grass, weathered wood, and tree trunks.
If your subject is not a mid-toned object, then you can still use a reflected light meter; but you'll have to put some thought into the readings it gives, and adjust them to match the subject.
In the examples, I noted that there was a two-stop difference between the incident light reading and the reflected light reading of the white church. You'll find that in most cases you can take a reflected light reading of a white surface, INCREASE the exposure by two stops, and end up with a perfectly exposed rendering of the white surface. This assumes that it is a textured or detail white where you want to retain full detail in the photo.
You can do this with dark toned subjects, too. If you're photographing a black object, and want full detail to be visible, you can take a reflected light reading of it and give two stops LESS exposure. Note that if there are any light tones things in the scene, you should probably base your exposure off of them to prevent them being overexposed. As I explained in the Incident Meter section above, if your dark tones go too dark, you can recover them later; this is harder to do with overexposed light tones.
Digital cameras have a lot of underexposure lattitude, but very little overexposure lattitude!
The Spotmeter
A spotmeter is a specialized type of reflected light meter, designed to have a one degree angle of view. The meter has a viewfinder and a lens. Inside the viewfinder is a small circle in the center of the view; this is the area that the meter measures from. This lets you easily measure different parts of the scene, and makes the method of using a reflected meter that I explained above much easier and more accurate. Spotmeters are calibrated for a middle gray tone, just like wide-area reflected light meters.
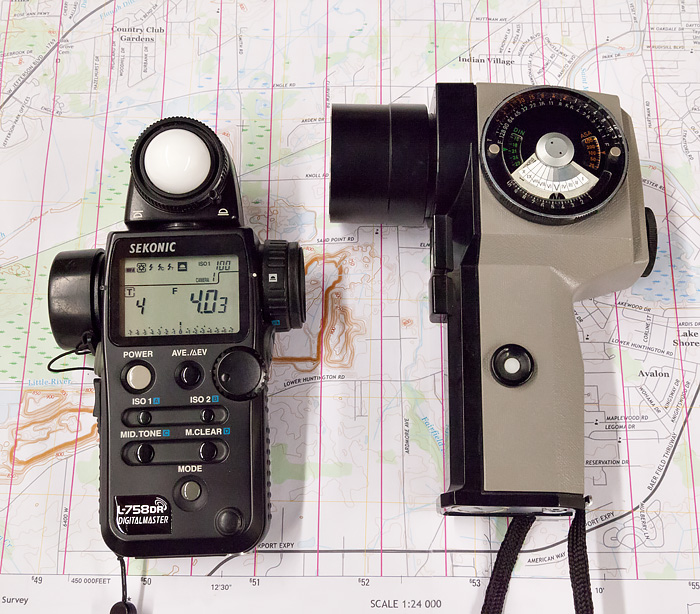
Two spotmeters. The meter on the right is a pure spotmeter, a Pentax Spotmeter V. It is an older model that has a moving needle in the viewfinder that points to a number that you must transfer to the calculator dial on the side to get your camera settings.
The meter on the left is a Sekonic L-758DR, a spot-incident combo meter. You can switch between incident light mode and a one degree spotmeter reflected light mode, which is very convenient. Sekonic has made a number of different combo meters in recent years. Others include the Gossen Starlight 2 and the Minolta Flash Meter VI.
Exposure meters were invented in the early 1930s. At first, all of them were reflected light meters (incident meters did not become common until the 1950s) and all were designed to measure a fairly wide angle of view. Most were made to match the angle of view of a standard lens; the idea being that the meter should see the same scene the lens sees. In reality, it made it hard to use a reflected light meter correctly (by measuring the subject close up and modifying the reading to render it the correct shade of gray). With a one degree spotmeter, you can do this from the camera position, without walking up close to the subject.
After incident light meters were introduced, most could also do reflected light readings. They stuck to the old and flawed idea of the reflected light meter reading the full area the lens sees. At the time, there really wasn't an option; the technology for making a narrow angle spot meter was not developed until the 1960s. It wasn't until the beginning of the 21st Century that someone finally built an incident meter whose reflected light mode was a true spot meter, though many manufacturers, beginning in the 1970s, introduced "spot" attachments for their meters like the one for Minolta that I showed on the first page of this tutorial. These were really not very useful, as most were 10 degree spots, which is actually quite wide.
So, what Should You Use?
If you can afford it, an incident-spot combo meter like the Sekonic L-758 or the Gossen Starlight 2 is the best. They give you an incident meter, which you'll use 90% of the time, and a good one degree spot meter for situations where you need or want a reflected light meter. These are top-of-the-line meters and typically cost $600+ new.
If the price of a combo meter is too much (and to be fair, it is more than many good DSLRs cost today!), then buy a good incident light meter. Most of them have a wide area reflected light mode too. A good incident meter is $200 - $300 new.
No one makes dedicated spot meters, like my ancient Pentax V, anymore. I wouldn't recommend one, as its been almost 20 years since anyone's made them, and many older meters need recalibrated or serviced and many cannot be repaired due to lack of parts. Modern combo meters are smaller, more capable, and are actually cheaper (when bought new) than the old spotmeters were.
The first example was metered with a reflected light meter, the second was done with an incident meter. They're nearly identical, since this is a scene consisting almost entirely of middle-toned subject matter.
Recommendations
What kind of light meter should you use? The answer depends on the kind of work that you do. Each type of meter has its strengths and weaknesses.
Based on what you have read so far, you have probably concluded that reflected light meters are useless, and that an incident meter is the only good choice. That is not entirely fair, as reflected light meters can be used successfully once you understand how they work; there are also some types of scenes that an incident meter cannot be used for.
Most meters sold today can do both incident and reflected light metering, though some require you to buy an attachment for reflected metering. So, let's talk about what each type is most suited to.
Exposure Requirements For Digital Photography
Digital camera sensors have very little overexposure lattitude. That means that it is important to give an exposure designed to keep the light tones in the image from going too light, where detail is lost.
In very high contrast light, this can mean that the dark tones will go too dark. That is not usually a problem, as RAW processing software like Adobe Lightroom can recover dark tones that have been pushed too low on the tone scale in order to ensure proper light-tone rendering. To some extent, you can also recover overexposed light tones; however, this capability is much more limited than the shadow-tone recovery. It is essential to ensure that the light tones are exposed correctly.
Incident Meters
An incident meter is the best choice for most digital work. The meter is calibrated to place the light tones at the proper exposure level. To use the meter, you stand by the subject and point the meter's white dome directly toward the camera. If you are photographing a subject with brightly lit areas and deeply shadowed areas (for example, a bright sunny day), then place the meter in the brightly lit area. If you meter in the shadowed areas, you'll get severely overexposed light tones.
There are a couple of things that incident meters do not work for. They cannot measure self-illuminated and trans-illuminated objects, such as stained glass windows. You'll need a reflected light meter for that. Incident meters also cannot take into account light that comes from behind the subject, as in backlit scenes where the sun is behind the subject, though there are techniques that get around that problem.
Reflected Light Meter
A reflected light meter can be used successfully for digital photography once you understand how the meter works. As I noted on the first page of this tutorial, a reflected meter assumes that whatever you point it at is a middle gray toned scene. Because it assumes that your subject is middle gray, it recommends an exposure that will render your subject as middle gray in your photograph. This is fine if your subject is a mid-toned object. Some examples include green grass, weathered wood, and tree trunks.
If your subject is not a mid-toned object, then you can still use a reflected light meter; but you'll have to put some thought into the readings it gives, and adjust them to match the subject.
In the examples, I noted that there was a two-stop difference between the incident light reading and the reflected light reading of the white church. You'll find that in most cases you can take a reflected light reading of a white surface, INCREASE the exposure by two stops, and end up with a perfectly exposed rendering of the white surface. This assumes that it is a textured or detail white where you want to retain full detail in the photo.
You can do this with dark toned subjects, too. If you're photographing a black object, and want full detail to be visible, you can take a reflected light reading of it and give two stops LESS exposure. Note that if there are any light tones things in the scene, you should probably base your exposure off of them to prevent them being overexposed. As I explained in the Incident Meter section above, if your dark tones go too dark, you can recover them later; this is harder to do with overexposed light tones.
Digital cameras have a lot of underexposure lattitude, but very little overexposure lattitude!
The Spotmeter
A spotmeter is a specialized type of reflected light meter, designed to have a one degree angle of view. The meter has a viewfinder and a lens. Inside the viewfinder is a small circle in the center of the view; this is the area that the meter measures from. This lets you easily measure different parts of the scene, and makes the method of using a reflected meter that I explained above much easier and more accurate. Spotmeters are calibrated for a middle gray tone, just like wide-area reflected light meters.
Two spotmeters. The meter on the right is a pure spotmeter, a Pentax Spotmeter V. It is an older model that has a moving needle in the viewfinder that points to a number that you must transfer to the calculator dial on the side to get your camera settings.
The meter on the left is a Sekonic L-758DR, a spot-incident combo meter. You can switch between incident light mode and a one degree spotmeter reflected light mode, which is very convenient. Sekonic has made a number of different combo meters in recent years. Others include the Gossen Starlight 2 and the Minolta Flash Meter VI.
Exposure meters were invented in the early 1930s. At first, all of them were reflected light meters (incident meters did not become common until the 1950s) and all were designed to measure a fairly wide angle of view. Most were made to match the angle of view of a standard lens; the idea being that the meter should see the same scene the lens sees. In reality, it made it hard to use a reflected light meter correctly (by measuring the subject close up and modifying the reading to render it the correct shade of gray). With a one degree spotmeter, you can do this from the camera position, without walking up close to the subject.
After incident light meters were introduced, most could also do reflected light readings. They stuck to the old and flawed idea of the reflected light meter reading the full area the lens sees. At the time, there really wasn't an option; the technology for making a narrow angle spot meter was not developed until the 1960s. It wasn't until the beginning of the 21st Century that someone finally built an incident meter whose reflected light mode was a true spot meter, though many manufacturers, beginning in the 1970s, introduced "spot" attachments for their meters like the one for Minolta that I showed on the first page of this tutorial. These were really not very useful, as most were 10 degree spots, which is actually quite wide.
So, what Should You Use?
If you can afford it, an incident-spot combo meter like the Sekonic L-758 or the Gossen Starlight 2 is the best. They give you an incident meter, which you'll use 90% of the time, and a good one degree spot meter for situations where you need or want a reflected light meter. These are top-of-the-line meters and typically cost $600+ new.
If the price of a combo meter is too much (and to be fair, it is more than many good DSLRs cost today!), then buy a good incident light meter. Most of them have a wide area reflected light mode too. A good incident meter is $200 - $300 new.
No one makes dedicated spot meters, like my ancient Pentax V, anymore. I wouldn't recommend one, as its been almost 20 years since anyone's made them, and many older meters need recalibrated or serviced and many cannot be repaired due to lack of parts. Modern combo meters are smaller, more capable, and are actually cheaper (when bought new) than the old spotmeters were.
Larry H-L
Well-known
Well done Chris.
Bill Clark
Veteran
Thanks Chris.
I’ll bet you’re an outstanding teacher. Lucky students.
Happy holidays.
I’ll bet you’re an outstanding teacher. Lucky students.
Happy holidays.
madNbad
Well-known
Nicely done short course in meters, how to meter and the results. Looking forward to more!
56 DIN
Newbie
good description, waiting for the follow up - thx.
The elder Gossen you showed in your post got a lot of attachments, like repro, tele, spot, etc adaptors, means if someone searches a spot meter 1°, he can look for one plus the optics.
The elder Gossen you showed in your post got a lot of attachments, like repro, tele, spot, etc adaptors, means if someone searches a spot meter 1°, he can look for one plus the optics.
Chriscrawfordphoto
Real Men Shoot Film.
good description, waiting for the follow up - thx.
The elder Gossen you showed in your post got a lot of attachments, like repro, tele, spot, etc adaptors, means if someone searches a spot meter 1°, he can look for one plus the optics.
Yeah, it was a neat system.
I have the fiber optic attachment, which can be used to read film densities (the meter has a densitometer mode to directly read out density numbers!). I also have the Luna-Sphere, which is an incident light attachment that gives the Ultra-Pro a large-size incident dome, like the Minolta and Sekonic meters, and a flat diffuser. Oh, and I also have the 7/15 degree spot attachment.
I didn't mention that stuff since this is just a basic intro to meters, and the Gossen accessories are pretty rare in the USA. It took me forever to find the Fiber-Optic attachment and the Luna-Sphere (and they cost me a lot of money!), though the spot attachment is actually pretty common and cheap. I don't have the 1 degree spot attachment for the Ultra-Pro. Every time I see one for sale, the price is outrageously high!
Minolta meters were a lot more popular among pros here than Gossen was, and the accessories, even really specialized ones, are easy to find and fairly cheap in the USA.
In my upcoming incident and spotmetering tutorials, I will show the Gossen Ultra-Pro with the Luna-Sphere and the Spot attachment.
ReeRay
Well-known
Excellent review. The only thing I would add is the WYSIWYG facility with mirrorless digital cameras. No guesswork there or metering inaccuracies.
Chriscrawfordphoto
Real Men Shoot Film.
Excellent review. The only thing I would add is the WYSIWYG facility with mirrorless digital cameras. No guesswork there or metering inaccuracies.
I don't have any experience with mirrorless digital cameras yet.
I know that the screen on my digital SLR, a Canon 5DmkII, is very inaccurate for judging either exposure or color. Even the histograms on it are way off. That's because the histograms are based on the image processed as a JPEG.
If you shoot RAW, like I always do, then the histograms will be different, and I suspect the same is true of the live view image and the image shown when you look at the stuff you've already shot.
kiemchacsu
Well-known
thank you; a complete tutorial about Light MEter.
ReeRay
Well-known
Keep 'em coming Chris. Everything I know about scanning came from your site. It's a permanent bookmark. Thanks a lot.
lynnb
Veteran
Compliments on your clear writing, Chris.
chipgreenberg
Well-known
Outstanding Chris. There has always been a quality to your work I really like. Your willingness to take time to give back is really unusual today.
If somebody wants to play with metering on the cheap, there are several smartfone apps out there. That's what I use. I shoot color neg files which is pretty forgiving, so I don't "need" to be within 1/4 stop as I did back in the day shooting chrome. It's a reflective meter, but I understand the process and always have my phone with me.
If somebody wants to play with metering on the cheap, there are several smartfone apps out there. That's what I use. I shoot color neg files which is pretty forgiving, so I don't "need" to be within 1/4 stop as I did back in the day shooting chrome. It's a reflective meter, but I understand the process and always have my phone with me.
Chriscrawfordphoto
Real Men Shoot Film.
Outstanding Chris. There has always been a quality to your work I really like. Your willingness to take time to give back is really unusual today.
If somebody wants to play with metering on the cheap, there are several smartfone apps out there. That's what I use. I shoot color neg files which is pretty forgiving, so I don't "need" to be within 1/4 stop as I did back in the day shooting chrome. It's a reflective meter, but I understand the process and always have my phone with me.
There are incident light attachments for smartphones; they're incident domes that clip over the phone's camera lens. I haven't tried one, since I don't have a smartphone, but they should work well.
charjohncarter
Veteran
Thanks Chris, I use my incident meter when I use digital for portraits at the theater I work for. That mixed lighting, with spots make my digital go crazy. An incident on the face and pointing to the camera is almost a 100% hit rate.
I'm ready for the second installment.
I'm ready for the second installment.
Richard G
Veteran
For stage shots of lecturers I’ve often talked with the lighting guy and asked how many setting he’ll use and metered with an incident meter for each of those on stage before the session. Trial and error with digital is OK but not an option with film.
One question: some incident meters have a hemisphere that can be screwed in or out to sit flush with the black collar, or protrude above it. What is the purpose of that?
One question: some incident meters have a hemisphere that can be screwed in or out to sit flush with the black collar, or protrude above it. What is the purpose of that?
Chriscrawfordphoto
Real Men Shoot Film.
For stage shots of lecturers I’ve often talked with the lighting guy and asked how many setting he’ll use and metered with an incident meter for each of those on stage before the session. Trial and error with digital is OK but not an option with film.
One question: some incident meters have a hemisphere that can be screwed in or out to sit flush with the black collar, or protrude above it. What is the purpose of that?
Meters with removable domes like the Minoltas and older Sekonics have accessories that can be put on in place of the dome. One of those accessories is a flat incident diffuser.
The newer meters that have a dome that can be raised or lowered don't need the separate flat diffuser; the lowered dome does the same thing.
There are several things the flat diffuser is used for:
1) Photographing flat objects, like works of art. The round diffuser simulates a three-dimensional subject. The flat diffuser simulates the way light hits a flat subject.
For photographing flat art, the flat diffuser does another thing. It lets you check evenness of illumination. When you photograph a work of art, the light must be PERFECTLY even over the entire piece. To check this, you use the flat diffuser and take readings holding the meter at each corner of the art and in the center. All five readings must match. If not, you adjust your lights.
2) Studio Lighting: In the studio, you use the flat diffuser to check lighting ratios. A flat diffuser is mostly sensitive to light coming from straight on, so if you point it at one light, it'll ignore the other lights and just tell you how bright that one light is.
3) The Duplex Method: This is a method for calculating exposure for backlit scenes using an incident meter. I'll post a tutorial on that soon.
Richard G
Veteran
Thanks Chris. Very helpful tun down.
Chriscrawfordphoto
Real Men Shoot Film.
The Spotmetering Tutorial is up now!
Moto-Uno
Moto-Uno
The pictures used as examples are "picture perfect" ") Peter
Peter
Thanks
PeterThanks
Share:
-
This site uses cookies to help personalise content, tailor your experience and to keep you logged in if you register.
By continuing to use this site, you are consenting to our use of cookies.