Modification of focus distance on a Horizon 202?

KMZ must still prove that they are reliable. Until now they do not drive consequences from their mistakes. unwillig offering these filters.
a) lens-quality-inferiour to 202-lens. at f16 its NOT SHARP anymore. Test it, check it but with very sharp subjects and the closeup-tips(film-rail-tape)
then take a 30x loupe and scan. best scanner is not needed. the difference is so obvious.

b) closeup-filters.
i have informations on two files-but have only prints-outs. will search my files
b1)"horizonfilter"
long informations from camprice.com¨making your own filters for the horizon panoramic camera
b2) "horizon202"
a certain oliver2 at kiew88 mailing list has deep makting informations e.g. sat, 26, jan. 2002 diopters very good solution... for horizon 202 and sun, 10 feb 2002, diopter....
he is communicating with robert monaghan.
the informations should be on his site. its a big site.
i will send you PM of his email, hopefully its working again.
or i will try myself. i already mentioned the problem getting the files in panoramiccamera-yahoo-list

pls tell me:
a) when scanner is ready should i use scan to pdf?
b) where to upload, i will certainly do to the panoramacamera-list

Jean-marc will get these two copies via friend here in europe and he will get it by the end of the month. I am sure i will find the files beforehand within next days.
 
Some details about building the lenses

Some details about building the lenses

a) go to normal optical shop to get diopter lenses. get resin plastic ones, you can get coated ones.
dont use glass, it will break when drilling holes.
b) mark the optical center with soft marker,
c) cut a square in the filter holder-dimension with dremel disk tool
d) sofly remove(open) the filter holder to quit(seperate) thge filter and the upper piece. so you have only a single piece with 4 pins.
e) drill 4 holes to perfct fit the piece of glass(plastic lens not glass) in place
clean well and put little drops of superglue.

f) test which diopter match best for e.g. f2.8, mark the holders.

DOF at f2.8( be aware overall best lens quality starts at 5.6/8)
+1 diopter sharp at 1m
+0.5 sharp focus at 2m
+0.25 real 4m
dymotape is exactly 0.25mm
there is a selfadhesive material to repair lamps. unfortunately white but has better glue.
I cannot tryout, i have only one 202 at he moment. and s3pro has changed lens posistion adding tape will further go to closeup.
Closeup lenses are better because you can then use whatever depths more easily. stronger and weaker diopters. if middle version is built-in its difficult to get a specific result. e.g 0.25 + 0.25= 0.5 but 0.25 + 0.125 is needed. 0.125 is difficult to get. maybe from zeiss?
Most important is: Which diopters allows sharp infinity? at least at 5.6/8 upwards.in my opinion by using + 0.25.

dymotape-0.25mm its international standard
just checked the 202.
one must prolong the tape over the start of the metallic rail to avoid easy blocking the film when loading. it is still a bit delicate since i didnt yet find a glue for perfect sit of tape-end. its is quite stiff. bend the tape beforehand exactly where the rails begin. keep in mind: at the end, where film-takeup spool is: tape must be cut at 1mm from the end of the rail, if not film will be blocked. at the beginning-left side where film is loading, tape starts about 3-4mm from the rails.
the mentioned lamps-repAir-material is much more flexible. It comes on rolls and has red square protection.but its white. adding a thin black layer would increase distance. at the beginning of my close-up-carreer i constructed multiple layers.
Maybe you can use that white material and add silver repair material.
its about O.05mm resulting in 0.3mm. thats interesting.
maybe infinity is sharp at f11. f8 and f11 are the best apertures. also f16 but 202 only.
These are all instruction i have from the files.
oliver is describing his shooting of animals on the galapagos.

NEW/OLD CAMERA-CASE(the one from old metallic horizont)

on ebay one can get new(old version) of Horizont-camera-cases. Its a genious robust/leather case where one can leave the pistol grip. at 50 usd not chaep but worth every money.
 
europanorama, thank you very much for the precise information.

i'd really appreciate it if you could upload the pdf files when you have time. i'll pm you later my email address.

in my case, i need to bring down the focus distance to about 2m, and i don't mind at all losing the infinity focus ability, which i'd use f16 to cover as much as possible. (or i'll buy another stock camera for that purpose)

i think i'll try first the dymotape solution. if i have understood correctly, i need to tape the upside and downside rails TWICE (0.25mm + 0.25mm) to fix the focus at about 2m. but i'm afraid i'm not completely sure about when you said cut the tape 1mm from the end of the rail in order to not block the film.

1) is it possible to see a picture of it?
2) in that case, will the focus of the 1mm film (at infinity) be different from the rest of the film (at 2m)?

as to the glue, have you thought about the sugru :

http://sugru.com/about

one last question:

3) how did you change the lens position of your s3pro? by adding a close-up lens?
 
Thanks a lot for sharing these infos, it is sincerely appreciated !

I'll let you know when I have done any progress myself with the resin diopters.

Best regards,
Jean-Marc.

a) go to normal optical shop to get diopter lenses. get resin plastic ones, you can get coated ones.
dont use glass, it will break when drilling holes.
b) mark the optical center with soft marker,
c) cut a square in the filter holder-dimension with dremel disk tool
d) sofly remove(open) the filter holder to quit(seperate) thge filter and the upper piece. so you have only a single piece with 4 pins.
e) drill 4 holes to perfct fit the piece of glass(plastic lens not glass) in place
clean well and put little drops of superglue.

f) test which diopter match best for e.g. f2.8, mark the holders.

DOF at f2.8( be aware overall best lens quality starts at 5.6/8)
+1 diopter sharp at 1m
+0.5 sharp focus at 2m
+0.25 real 4m
dymotape is exactly 0.25mm
there is a selfadhesive material to repair lamps. unfortunately white but has better glue.
I cannot tryout, i have only one 202 at he moment. and s3pro has changed lens posistion adding tape will further go to closeup.
Closeup lenses are better because you can then use whatever depths more easily. stronger and weaker diopters. if middle version is built-in its difficult to get a specific result. e.g 0.25 + 0.25= 0.5 but 0.25 + 0.125 is needed. 0.125 is difficult to get. maybe from zeiss?
Most important is: Which diopters allows sharp infinity? at least at 5.6/8 upwards.in my opinion by using + 0.25.

dymotape-0.25mm its international standard
just checked the 202.
one must prolong the tape over the start of the metallic rail to avoid easy blocking the film when loading. it is still a bit delicate since i didnt yet find a glue for perfect sit of tape-end. its is quite stiff. bend the tape beforehand exactly where the rails begin. keep in mind: at the end, where film-takeup spool is: tape must be cut at 1mm from the end of the rail, if not film will be blocked. at the beginning-left side where film is loading, tape starts about 3-4mm from the rails.
the mentioned lamps-repAir-material is much more flexible. It comes on rolls and has red square protection.but its white. adding a thin black layer would increase distance. at the beginning of my close-up-carreer i constructed multiple layers.
Maybe you can use that white material and add silver repair material.
its about O.05mm resulting in 0.3mm. thats interesting.
maybe infinity is sharp at f11. f8 and f11 are the best apertures. also f16 but 202 only.
These are all instruction i have from the files.
oliver is describing his shooting of animals on the galapagos.

NEW/OLD CAMERA-CASE(the one from old metallic horizont)

on ebay one can get new(old version) of Horizont-camera-cases. Its a genious robust/leather case where one can leave the pistol grip. at 50 usd not chaep but worth every money.
 
Horizon Filter-Making a new system

Horizon Filter-Making a new system

Here is following an information from an article i copied from the internet. No name of the author. It is condensed but still precise.
Its about constructing a filter-holder to replace filters. I would rather make one holder for every filter. Info will be uploaded to panoramic camera yahoo-tech-group-files. incl. new images later. all informations about horizon filters/closeup filter are now out no need to send you copies.
------------------------
Making your own Filters for Horizon Panoramic Camera
Michael Przewrocki
resume of an article camprice.com. by someone from HK having daughter Kelly.

I was using my Horizon 202 the other day and wanted deep red filter. But there were only ND, light green and UV.
Modifying would mean taking a knife and take the filter apart. (Old horizont had other filter-technology. Glass was attached by a spring. So easy replacing was possible.)
The new filters have four parts. I name them the Bottom(1), the Top(4), the Metal part(2) and the Filter insert(3).(He mentions images showing these-but i dont have these, only have two showing the finished product. will show them someday.)
The Bottom has four stems which penetrate the Metal Part and trap the filter Insert before ending in the Top where they are peended/melted over to secure the entire assembly.
Before starting, it is wise to gather all the supplies and tools and accessory to make the modification. Here are some suggestions:
1. a sharp bladed knife(Exacto or other, I used my Swiss Army Knife)
2. File (fingernal file will do)
3. a 2mm drill bit or other method of making a clean hole in the new filter material. I used a combination of a heated pin held in a pin vice, and a 2mm tap.
4. four x 5mm screws, depending the thickness of the filter material
5. Cokin filter
6. A Plastics cutting knife. This has a deep "V" shaped blade and is the only method short of actual sawing that I have found works on the hard acrylic of the Cokin filters.
7. Needle of Pin which you can heat and hold for making holes.

Here are the steps I followed to arrive at my finished filter. I cut the Green filter apart by slipping the knife blade gently between the Bottom and Metal part and severing the stems. The filter fell apart. I then pushed the resulting plugs(5) out of the Top and threw them away. I also threw the filter away because I couldnt think of a use for it.
I measured the width and lenght of the Top and Bottom (17mm) and used the Plastic cutting knife to core the Cokin filter. Be sure to bend the filter away from the cut you have made. It will snap smoothly. I didnt the first time and I ended up with a very ragged edge. After the first cut I had a piece of Deep Red filter material 17mm wide and more than 50mm long. I had to make another score to end up with a square of 17mm on a side. I ran the edges of the cut piece a couple of times over the flat side of the file, just to get rid of the sharp ridges. Using the holes in the corners of the Metal Part as a template, I made small pricks with a very hot needle in the center of each hole. I used the 2mm tap to enlarge these pricks but 1.5/2mm drill would do just as well. Avoid pressing too hard on the drill, or you may shatter the filter material and have to cut another piece to begin again.

I trimmed the excess "stem" material from the Bottom which my knife and used the Metal part and heated needle again as a pattern to make starter holes for the screws at each coner. A word of caution here. The black plastic of the Top and Bottom are very soft. Too much heat on the pin and you will send it right through and possibly make a hole that is too big, thereby messing up any chance of the screw holding. Its better to make your first attempt too small than to end up with a hole too big. This is the extent of the hard work. The assembly was very fast and the resulting filter looked so good that I wner right out and bought and Orange Cokin Filter to cut up to replace the ND filer which I never use.

Because the only screws I could find were chrome, I darkened the heads with a Black Magic Marker, just for cosmetic purposes.
I thought about darkening the threads too, but I dont think there is any chance of flare coming in that direction.
My friend Tony Lo reported this morning that he found a 0.5+ diopter which he thinks can be adapted to allow closer focussing than the Horizon 202 is setup for.
.........
(Click on the picture to see an enlarged view of my daughter Kelly on the deck of the USS Independence during the ships visit to HK)
(I dont have this picture-the Coauthor)
Febr 4, 2013-Michael Przewrocki-MPA
www.3dreal.ch/www.stereopan.org)
 
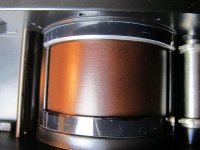
Dynotape-Images

Dynotape-Images

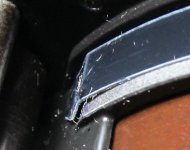
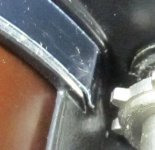
left side is critical. my ends are not firmly attached. maybe superglue is needed.
when loading film leader must be pulled out to the left side, around the roller until full 35mm width is out of the box, then loading the normal way.
why is upper tape smaller? when i started with lover tape i have recognized that it is only in contact with the camera on the small rail. I didnt trust, so upper tape was smaller to fit in the tunnel. better doing it the other way round. foreground is on the upper side of the image. tape being thicker there and not below.
I will not change it, only when i have a second camera. results are good. sharp also at infinity from f8. like if diopter 0.25 used. dymotape 6.3 x0.25mm there are matt and glossy ones. i used/had only glossy. it seems no problem.
See the new perfect drum my repairman constructed. Its most perfect against flare. for roundshot and wideluy we constructed sunshades in the form of lens-caps with slit. also for noblex 612. maybe for horizon it would also help. Not easy making it so small and not vignet the image. On noblex(not 35mm) we simply used UV filter covering both ends with black tape-leaving out a slit in center.
 

Attachments

  • IMG_1286horizon_tapes.jpg
    IMG_1286horizon_tapes.jpg
    32.4 KB · Views: 0
  • IMG_1299horizon_tape_upperleft.jpg
    IMG_1299horizon_tape_upperleft.jpg
    27.8 KB · Views: 0
  • IMG_1303horizon_upperrighttapeend.jpg
    IMG_1303horizon_upperrighttapeend.jpg
    60.2 KB · Views: 0
There may be some similar information in amongst all the information posted but just to be sure:

In using supplemetary (macro) lenses on prime lenses, I found that the distance from the back of the supplementary to the front of the prime lens was not critical, at least not over a few mm, and did not affect focus or magnification.
 
with layers sharpness in foreground is improved

with layers sharpness in foreground is improved

At what distance are your subjects? Shoot at 5m wiht 8, 11 and 16. 202 only not newer generations horizons
if using s3pro, forget it. that lens is not sharp at f16.
use f8 and f11 instead for testing.
then very sharp subject-with a lot of small details-i put a poster on my wall. tripod and cable-release if interior. no superscanner needed. or simply use a 30x loupe.
if you dont see sharpness-differences using 0.2 or 0.25mm layers then your eyesight must be checked.
 
Back
Top Bottom