My first prints... EVER!

Ryan1938

Established
Local time
3:24 PM
Joined
Aug 16, 2010
Messages
117
Well, I finally got a makeshift darkroom together and made my first prints ever. A couple of things I learned:

1. I need a better safe light. My tiny light just isn't cutting it. I can't see the prints in the trays at all.

2. I need more practice... But at least it's fun!

Anyway, here's a bad iPhone shot of them:
 

Attachments

  • photo.jpg
    photo.jpg
    50.6 KB · Views: 0
Embarrassingly, I haven't yet figured out how to use the stock Leitz Focomat 1c easel to get the images centered on the paper.... And I screwed up a good 2 or 3 test strips, but you do have to start somewhere.
 
Wish my first prints had come out that good...lol

What are you using for a paper/developer combo?
 
Paper is Ilford MGIV RC Deluxe.

Here's what I did:

1. Kodak Dektol - 90 seconds

2. Ilford Stop Bath - 20 seconds

3. Kodak Fixer - 2 minutes

4. Wash - under the sink like mad for about 2 minutes.

The images were shot on my Leica M7 using either Tri-X 400 or Ilford 3200.
 
Embarrassingly, I haven't yet figured out how to use the stock Leitz Focomat 1c easel to get the images centered on the paper.... And I screwed up a good 2 or 3 test strips, but you do have to start somewhere.

Stock Leitz easel is wood with two blades. Control the border width by moving the top and left border set tabs to max. Then set the bottom and right.

If you have the later white, you are lucky as it is a 4 blade and you move the blades inward. I drew out a 5x7 on 8x10 paper and saved it . It is a guide for setting all future from that format.

In a pinch, get a mat board and mask down the paper to a fixed size.

Get a 11x14 Saunders Universal with 1" high base. It has 4 blades independently set. Make up format masks as described above to easily make repeatable settings.

You do not make prints by pulling from developer when they look right.
Develop RC paper 75 sec and fiber 150 sec. Adjust exposure as required. Early pulls give weak blacks and you over exposed. Remake.
Warm tone papers are different.


Properly exposed negs will print at a standard exposure. Say 30 sec at F8 for a given paper. All you need is a 1x8 strip put across the critical area of the print. Say across the eyes in a portrait. Make one strip, check, repeat. You don`t need 10 with 9 bad ones.

Start with a contact sheet with enlarger set for 8x10 prints. You will see
which are over and which are under and adjust test strip from there.
The contact is same exposure a real 8x10 except you need 7% more for the glass.

3.5x, 5x, 8x,11x, 16x each are one stop apart in exposure. Go by where enlarger head is set, not cropped area. F stop are accurate. Time is not because of reciprocity failure, the failure to change density in a linear manner with time. Film does it too. An enlarging meter is nice because you can find proper times for 5x7 test, reset to 11x14, open the lens with meter in place to get the same exposure. Saves time and paper. You will find it is 2 stops if the meter cell is exactly at the the paper plane.
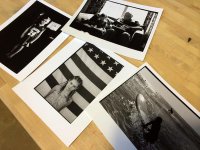
Good first trys.

Learn to expose properly in camera and darkroom times are MUCH more productive because you are not chasing the correct exposures. Don`t stint on chemicals as you get crappy prints and you can not figure what is wrong. It is a waste of time and materials.

Oh the exposure steps above are for 35mm only. Larger formats are different.
 
Nice work!

I am also in the midst of building my darkroom (got everything I need now but the table to put the enlarger on). I've been taking a B&W darkroom class and absolutely love it. I like it so much I'm holding a bit of regret for getting a b&w head and not a chromahead. I know it is a lot more work, but after seeing my B&W enlargements, and knowing how much I love shooting Porta 400, I'm thinking I'd love to try RA-4 prints.

Oh well, I'll save that dream for a darkroom that isn't setup in a phone-booth of a bathroom.
 
Congratulations. That's a big step. Wait till you make fiber prints. Big difference, to me anyway. There's just something timeless about fiber B&W prints. I agree w/ Ronald, simply get you a thick matt board for the margins and keeping the image straight. I print to the edge, so I simply made a jig by cutting a hole in my matt board that is just a tiny bit larger than the paper, and fasten it to the enlarger's base. When it's time to print I drop it into that cutout and it's automatically straight. There are a million ways to do print registration, just find one that suits you. Try and keep a stronger safelight 4' from where you are. I use a fairly large and bright old style Kodak bullet amber safelight, but its bounced off the wall and ceiling to lower the illumination where I print. I would go by set times to judge development, not by looking at them.
 
Nice, keep it up, it's a great skill to accomplish.

I would learn to live with the bare minimum of a safelight and minimize its use. Even though I tested my safelight and paper I was unhappy with the whites and contrast and thought it must be due to some fogging. When I used a much smaller safelight and used it only when absolutely necessary, the prints have been greatly improved. And since you should keep your prints in the developer for a set time and not pull them out after you see the image form, as recommended by someone else, you really don't the safelight on when in the developer.
 
http://www.rangefinderforum.com/forums/showthread.php?t=140713

http://www.rangefinderforum.com/forums/showthread.php?t=140713

The prints seen not "good" but excellent.
Welcome to The Dark Side.
As an old photographer, maybe try other chemicals.
The Kodak Dektol and Fixer. Way too toxic.
Ilford's Chemicals way nicer and less gas.
Make sure you are well ventilated.
I have breathing problems from darkroom..
Get or make a larger safelight.
again congrats.
 
Back
Top Bottom