laskadog
Member
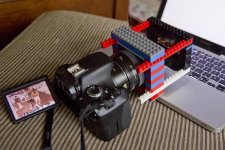
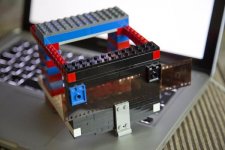
I recently decided to go back to film from digital. Unfortunately I sold my film scanner years ago and just don't feel like buying a new one. They're painfully slow anyways. So I decided to make a negative scanner out of LEGOs.
I originally used my 5DIII and a 24-105mm + extension tube. The fit was absolutely perfect, unfortunately the 24-105mm wasn't sharp enough. I then switched to the 50mm f1.4 + Ext. tube. That was much sharper, but the resolution is only about 6MP because I have to crop a bit. The final result is my T3i and the 50mm. The neg fills the frame, so I get 16MP files.
I use a blank page on my laptop as a light source and since the rig is very stable when leaning against the lens, I can shoot for 1/2s easy.
Just a word of advice when converting negs to positives in PS. Set your white balance by clicking the edge of the film strip (RAW files of course). Then convert it and cmd-I and auto levels. Just make sure you crop before otherwise the Auto Levels won't work well.
The result is sharp hi-res files.
Attachments
malthusiantrap
Established
Two of my loves - Lego and photography! Thanks for the idea. I might modify your design to accommodate a tablet to be used as a lightsource.
wintoid
Back to film
Haha I love it
wintoid
Back to film
Can we see an example scan please? 
laskadog
Member
Sample
Sample
Not a great example but here you go. Just scan, convert to JPG, Invert and auto levels. I'd fine tune the color a little though. I had a real hard time getting nice results until i figured out the eyedropper on the film strip trick. Most tutorials have you do that on the JPG.
Sample
Not a great example but here you go. Just scan, convert to JPG, Invert and auto levels. I'd fine tune the color a little though. I had a real hard time getting nice results until i figured out the eyedropper on the film strip trick. Most tutorials have you do that on the JPG.
Attachments

laskadog
Member


wintoid
Back to film
Not bad at all. My own results in the past were much worse, and I gave up and went back to scanning. Mine were BW film though.
muser53
MUSER53
Legography not Lomgraphy!
Cesium
Member
Brilliant idea. I've been toying with "scanning" some slides with my 5D2 lately, and having a box of old legos somewhere around the house, I may just have to try this.
f16sunshine
Moderator
Brilliant idea !
robert blu
quiet photographer
I love special ideas!
robert
robert
konicaman
konicaman
That is so cool!
BCMielke
Member
I have been thinking of this very same thing recently, but hadn't put anything together. Nicely done!
Sid836
Well-known
Brilliant!
krötenblender
Well-known
Another one...
Another one...
My setup is quite similar. I made it a few months ago, while waiting for a new camera…
It is made to hold e 6x6 film frame in front of a iPad 3 with a complete white screen. The film is gently pressed between two stripes of rubber foam. The camera is a Leica M with an adapted Olympus 50mm f3.5 Macro lens. Before I finally got my finger on that lens, I used a Olympus OMD with the unbeatable 60mm Macro, but I find the 50mm Olympus easier to handle for this setup.
Before that I had build a similar thing for 35mm film and before that one for 35mm dia frames.
I'd like to build one for all with a changeable format-holder and a special holder for the iPad, but I currently do not have the right Lego-parts.
The example is just half an hour old, made it quickly to show it to you. See, what can be done with a few plastic bricks… No need for a big scanner.
shadowfox
Darkroom printing lives
I recently decided to go back to film from digital. Unfortunately I sold my film scanner years ago and just don't feel like buying a new one. They're painfully slow anyways. So I decided to make a negative scanner out of LEGOs.
I originally used my 5DIII and a 24-105mm + extension tube. The fit was absolutely perfect, unfortunately the 24-105mm wasn't sharp enough. I then switched to the 50mm f1.4 + Ext. tube. That was much sharper, but the resolution is only about 6MP because I have to crop a bit. The final result is my T3i and the 50mm. The neg fills the frame, so I get 16MP files.
I use a blank page on my laptop as a light source and since the rig is very stable when leaning against the lens, I can shoot for 1/2s easy.
Just a word of advice when converting negs to positives in PS. Set your white balance by clicking the edge of the film strip (RAW files of course). Then convert it and cmd-I and auto levels. Just make sure you crop before otherwise the Auto Levels won't work well.
The result is sharp hi-res files.
Brilliant.
Have you tried shielding the stray light between film and the lens using black cloth (or black lego pieces)?
Would that not improve the exposure?
krötenblender
Well-known
Brilliant.
Have you tried shielding the stray light between film and the lens using black cloth (or black lego pieces)?
Would that not improve the exposure?
I tried that with my first Lego scanner using a tunnel of black stones. But the Lego bricks reflect the light like mirrors, total desaster... I think, black cloth might work, but the iPad-back-light works pretty good, because it is very bright.
johannielscom
Snorting silver salts
Hm. I've been giving it some thought (re-shooting my negatives with a DSLR) lately, recently I acquired a Nikon D600 and have some Tamron Adaptall lenses that are real sweet in macro mode
Never occured to me to use Lego:bang: and now that I see this in action, I might give it a try someday soon! Question: would the sharpness not be enhanced with the use of ANR glass to flatten the negative with?
Never occured to me to use Lego:bang: and now that I see this in action, I might give it a try someday soon! Question: would the sharpness not be enhanced with the use of ANR glass to flatten the negative with?
laskadog
Member
I also tried using a flash instead of the computer but can't say I saw any difference. Don't think the ambiant light was a factor for me.
krötenblender
Well-known
Question: would the sharpness not be enhanced with the use of ANR glass to flatten the negative with?
I have not tried it, yet, but I bought a package of 6x6 dia frames with ANR glass a few weeks ago to do exactly that. I already managed to carve one of the plastic frames so that I can clip a three-image-film-stripe into it. But during the summer weeks, I am more out with a camera to shoot, and all those little projects are on hold.
But this thread is very inspiring, so thanks to laskadog, I might work on it a little bit.
Obviously there are more people, who build Lego-scanners. Maybe we should try to share, how to build them, to help each other coming up with a good construction?
Share:
-
This site uses cookies to help personalise content, tailor your experience and to keep you logged in if you register.
By continuing to use this site, you are consenting to our use of cookies.