lukitas
second hand noob
Just got a bit of film developed, so if you should care to take a gander at my gallery...
In the mean time, I decided to dress up my m2 (which will be going in for shutter repair and possible rangefinder adjustment in march)
And I did it all wrong. I decided to go for a 2mm thick rawhide. So I had to start shaving the back of the leather wherever it had to be the regulation 0,5mm thick : around the edges, the buttons, the screws, the lugs. Luckily, mine doesn't have a self-timer. But, because of the thickness in between the shaven spots, the leather has to be stretched a little to reach the edges, and it's actually a good idea to add half a mm or so to each of the edges touching the back door. Here's my first try :
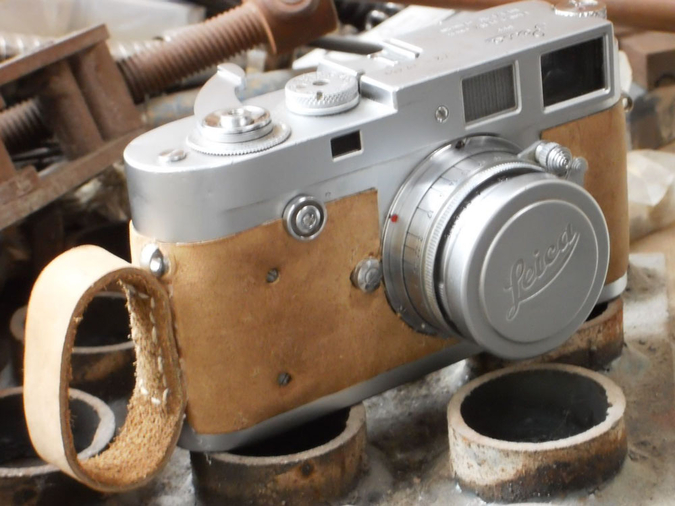
The loop I stitched on the side was actually quite comfortable, but I didn't really feel at ease with the camera irreversibly stuck to my hand. I imagine some people would like that, so if you do decide to stitch a strap to your camera covering, angle it a little bit forward, so the middle of the top points to the lug, and the rear at the bottom comes in front of the bump on the bottom plate. And it works best with ring finger and pinkie. The major fail on this was that the lens release button refused to budge.
This is my second go. I am a lot happier about this:
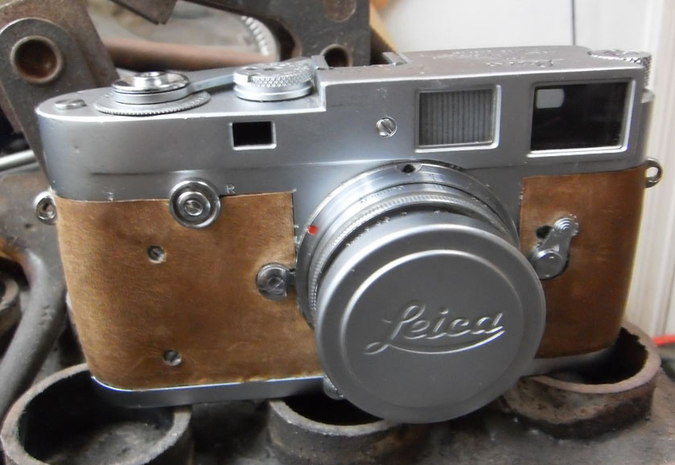
I first tried to glue this one with double-sided tape, but it doesn't stick well enough to support the tension I needed to apply to parts of the leather. I's thick, so, when going around a bend, the outside stretches while the inside tends to shrink. The best way, I found, is to use contact glue, but to do it in consecutive strips : first the flat part on the right, under the frame lever. Then the flat part on the left of the bayonet. The round bits and the back flats can be glued in one go, but you'll have to push and pull and stretch to get it over the lug and the flash mount and then round to the back. and remember the thick parts need a lot more stretching than the thin edges.It's best to be precise about masking the parts you are going to glue. Don't worry about reversibility, the glue will come off the body easily enough.
In conclusion, there is no way to make this into a commercially viable business. The shaving of the leather alone took two days of work. Positioning the leather is a delicate job that requires large(-ish) amounts of force. But it does feel great to handle, my middle and ring finger fall naturally in the indents for the screws. And I like the well-fed look my camera got now. As the leather is close in tone to the chrome of the body, there is a sort of reverse stealth effect, which I find quite appealing.
thanks for letting me ramble on.
In the mean time, I decided to dress up my m2 (which will be going in for shutter repair and possible rangefinder adjustment in march)
And I did it all wrong. I decided to go for a 2mm thick rawhide. So I had to start shaving the back of the leather wherever it had to be the regulation 0,5mm thick : around the edges, the buttons, the screws, the lugs. Luckily, mine doesn't have a self-timer. But, because of the thickness in between the shaven spots, the leather has to be stretched a little to reach the edges, and it's actually a good idea to add half a mm or so to each of the edges touching the back door. Here's my first try :
The loop I stitched on the side was actually quite comfortable, but I didn't really feel at ease with the camera irreversibly stuck to my hand. I imagine some people would like that, so if you do decide to stitch a strap to your camera covering, angle it a little bit forward, so the middle of the top points to the lug, and the rear at the bottom comes in front of the bump on the bottom plate. And it works best with ring finger and pinkie. The major fail on this was that the lens release button refused to budge.
This is my second go. I am a lot happier about this:
I first tried to glue this one with double-sided tape, but it doesn't stick well enough to support the tension I needed to apply to parts of the leather. I's thick, so, when going around a bend, the outside stretches while the inside tends to shrink. The best way, I found, is to use contact glue, but to do it in consecutive strips : first the flat part on the right, under the frame lever. Then the flat part on the left of the bayonet. The round bits and the back flats can be glued in one go, but you'll have to push and pull and stretch to get it over the lug and the flash mount and then round to the back. and remember the thick parts need a lot more stretching than the thin edges.It's best to be precise about masking the parts you are going to glue. Don't worry about reversibility, the glue will come off the body easily enough.
In conclusion, there is no way to make this into a commercially viable business. The shaving of the leather alone took two days of work. Positioning the leather is a delicate job that requires large(-ish) amounts of force. But it does feel great to handle, my middle and ring finger fall naturally in the indents for the screws. And I like the well-fed look my camera got now. As the leather is close in tone to the chrome of the body, there is a sort of reverse stealth effect, which I find quite appealing.
thanks for letting me ramble on.