New CN inversion action/macro for PS and Affinity Photo

adriang

Member
Local time
12:34 AM
Joined
Feb 8, 2018
Messages
16
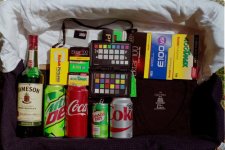
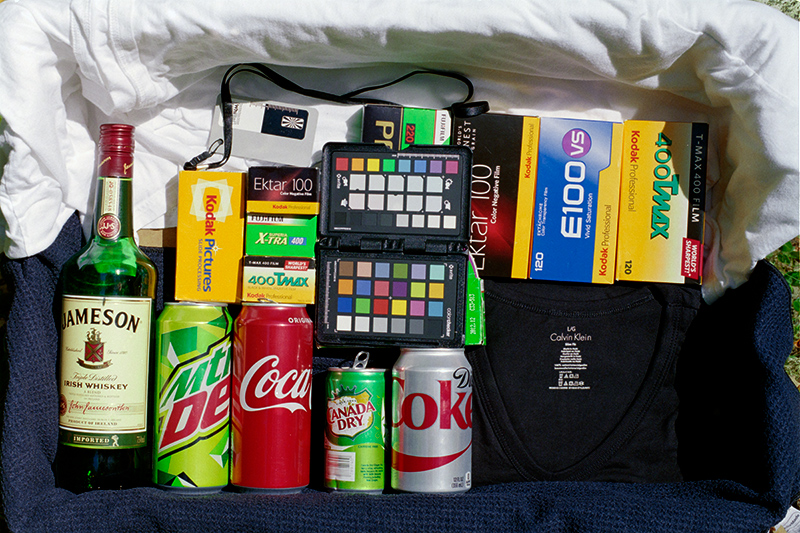
I've recently developed a new method for color negative inversion using operations and blending modes directly in Photoshop or Affinity Photo.

This method works similar to software in scanners like the Fuji Frontier.

The only requirements for perfect inversions are the sampling of the film base and a linear raw scan (preferably 16bit).

The method works much better than any of the software solutions available, or much more expensive tools that fail to deliver on their promises. It does this simply and without doing any unwanted interpretation of the scene

You can find it and read about how to use it at my website.

If you want me to test it on your scans to see it in action, please send me links to your files and I'll gladly invert them.
 
Thanks for this. Was thinking I might have a go with the hasselblad and some ‘scanning’ once I get my m adapter in.
 
How does your action compare with ColorPerfect? See, for example, posts 22 + 30 in this thread.

I have no direct comparisons of that, there are other users on a different forum who made comparisons. Personally, I prefer my method, although I might be biased :)

If you can send me a .tiff you usually invert with CP (and have trouble with getting a good result), then I can demonstrate this better than with words.
 

Attachments

  • mws_0017-afpsat.jpg
    mws_0017-afpsat.jpg
    39.4 KB · Views: 0
  • mws_0017-afp.jpg
    mws_0017-afp.jpg
    37.4 KB · Views: 0
  • mws_0017-ps.jpg
    mws_0017-ps.jpg
    43.3 KB · Views: 0
@adriang, thanks for posting. Here's my test image from this recent thread.

http://2under.net/images/171004-TestBox-Fuji200-SonyNoFilter-DSC9558.ARW

The file is a Sony A7 raw capture, 5500°K illumination (electronic flash), Fuji 200 film. Known colors. Doesn't include film rebate, but the shadow area lower right is damn close. If you can get the Coke red, the Kodak yellow/orange, and Fuji green right, you have a winner.

Looking at conversions with several methods, it was clear that simple "Invert" in photoshop was way off, something non-linear is necessary, ColorPerfect does a pretty good job.

Can you say more about what's in your program?

DSLR scans are somewhat hit or miss, here's a result with some playing with the Y and M adjustment layers. I went by the middle grey in the chart.

I couldn't really tell you about what's in it, if you look at it you'll see there's no secret sauce, it's just a method that works and is fast!
 

Attachments

  • 171004-TestBox-Fuji200-SonyNoFilter-DSC9558.jpg
    171004-TestBox-Fuji200-SonyNoFilter-DSC9558.jpg
    41.8 KB · Views: 0
Thanks Adrian, the middle grey is a good place to start. That conversion could be good; would take a little more tweeking. You've set a reasonable price for this PS action; I'll go buy it now.

You said you like to start from a linear raw scan; how are you getting this?
 
Here you go, I made three variants: One with the PS action, one in Affinity Photo and another with extra saturation.

Also, here's a video I made that goes over the process quickly.

I will definitely check this out when I get home.
I have had success with my own profiles but could not crack Ektar.
All my efforts resulted in a cyan image.
I use a DSLR to scan my film.
 
I couldn't really tell you about what's in it, if you look at it you'll see there's no secret sauce, it's just a method that works and is fast!

Your inversions that you posted here and at Photrio look really nice.

I haven't bought your PS action yet but in PS I would basically do:

- duplicate background layer
- increase gamma to 2.2 on that layer
- sample orange mask from that layer and create a new solid color layer with that colour (set blending mode to 'difference')
- merge layers
- do levels adjustment or do some sort of auto tone/contrast/color
- if you want to constrain yourself to a system similar to wet colour printing you could then add magenta and yellow layer and play with blending mode and opacity to "simulate" the effect of the color pack (it's a gimmick, though, as you got rid of orange mask in step 3 and there are better tools for that in PS)
- add a layer to adjust contrast and brightness

The problem with that approach is that the orange mask removal + inversion step works best when you have a scan that has a clear/unexposed part of the negative included and the auto levels stuff works best when you don't have clear and/or totally opaque (from negative holder) part included in the picture.

As I said I haven't bought your PS action (so you might be doing things differently), but I will buy it (more like a donation) if Huss' scans improve (such lovely subjects, but with horrible casts and skin tones as if they came from Mars) ;)

The problem with DSLR scans will be that raw files need to be developed into linear tiffs for this process to work (the inversion you did on ColSebastianMoran's file is very bad, the others from linear scans are very good) and this has to be done outside PS.

I've started work on small and simple standalone app that could do all that (inversion process still a bit more elaborate), but then I got myself Noritsu LS-600 scanner and my motivation just... evaporated ;)

You said you like to start from a linear raw scan; how are you getting this?

That's easy with scanners and also not that difficult with DSLR scans (it's been shown in your thread).

Is LightRoom supported or just PS and AffinityPhoto?

Lightroom doesn't support layers.
 
Y
As I said I haven't bought your PS action (so you might be doing things differently), but I will buy it (more like a donation) if Huss' scans improve (such lovely subjects, but with horrible casts and skin tones as if they came from Mars) ;)

My Martian friends thank you!

D750 scan of Rolleiflex image.


Friends, this CN conversion issue is difficult, please no name-calling.

We know we can invert, apply "auto" corrections and then fix what's wrong with manual adjustments. My quest is to find an fully automated process that gets "close enough" from a camera-scan for routine work. As close as we used to get from taking our films to the mini-lab. As you may have seen in my other thread, we have some contenders, but all could be better.

I now have Adrian's action, and will see how close it gets on my test-box frame.

I'm focused on camera-scan because I do believe that commercial software and film-scanners can meet my criteria, a fully auto process that's about as good as the mini-labs. Using a Pakon probably also passes the test. Can we do it with a camera-scan?
 
I have Adrian's CN Inversion action. He applied it to the test image, a Sony Camera-raw file, with results posted above #10.

I have run his action on the file, and I get a result I think is really excellent, better I think that what Adrian posted. My only quibble now is that the Coke red is a bit dark in value and low in sat. Overall, this is an excellent automatic conversion. I will now mention this action in my other thread.

This result by opening the .ARW file in Photoshop, using Adobe Camera Raw. The only manual elements are a) in Camera Raw, set black/white to hold the histogram away from the edges, b) sample the film rebate, and c) crop to the true image area.

When I try the action on a linear tiff (specifically, the output of MakeTiff), the automatic result is not good).

Thanks, Adrian, for the action.

Here's my result from the .ARW file:
171004-TestBox-Fuji200-NoFilter-DSC9558-GaborCNInversion.jpg
 
I have Adrian's CN Inversion action. He applied it to the test image, a Sony Camera-raw file, with results posted above #10.

I have run his action on the file, and I get a result I think is really excellent, better I think that what Adrian posted. My only quibble now is that the Coke red is a bit dark in value and low in sat. Overall, this is an excellent automatic conversion. I will now mention this action in my other thread.

I'm really glad it is working well for you!

What do you think of the overall gamma from a straight one click conversion?
 
Just a quick update.
I'm currently working on having much more accurate gamma straight after a one click inversion. This should be ready in a new version sometime next week!

This will be helpful in assessing images much quicker, and getting a very good starting point.
 
I'm really glad it is working well for you!

What do you think of the overall gamma from a straight one click conversion?

Adrian, as I posted, I think this is an excellent fully automatic conversion.

I am curious why my conversion looks better than your's from the same .ARW file. Perhaps it's the choices at the camera-raw stage. I've found it help to make sure there's room at either end of the histogram.

EDIT: Looking again, the biggest difference is that your's is darker, maybe the color quality is the same.

Looking forward to your next release.
 
Back
Top Bottom