
You are using an out of date browser. It may not display this or other websites correctly.
You should upgrade or use an alternative browser.
You should upgrade or use an alternative browser.
Not the world's sharpest Collapsible Summicron
- Thread starter former member
- Start date
- Latest activity Latest activity:
- Replies 24
- Views 4K

Sonnar Brian
Established


Sonnar Brian
Established
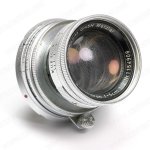
But this is made from left-overs. I bought a collapsible Summicron with an almost opaque front element. I put a very clean front element from a different lens that had some internal coating issues. That lens is now near-perfect.
The front element was almost opaque when I got it.
So I polished it down with some 0.3micron paper used for fiber optic connectors.
Then I recoated it with an eye-glass repair kit.
Not bad for $70, and the other lens came out with a really nice set of glass.
The front element was almost opaque when I got it.
So I polished it down with some 0.3micron paper used for fiber optic connectors.
Then I recoated it with an eye-glass repair kit.
Not bad for $70, and the other lens came out with a really nice set of glass.
Attachments


clintock
Galleryless Gearhead
Tell all about this eyeglass coating repair kit! I've got a nearly opaque summi myself..
with sentimental value, otherwise I'd make a fishing lure with it.
with sentimental value, otherwise I'd make a fishing lure with it.
Sonnar Brian
Established
This is the kit that I used.
http://www.seenontvproducts.net/lensdoctor/index.html
It took me a couple of tried to get it "right". Learned to put it on quickly, and lightly. Also found that you do not revisit an area after applying the coating, otherwise "flakes" form in the coating.
I'll try to get some pictures of the lens up later this week. I went to do some of this and some other hacked lenses, but the batteries died on the DSLR.
Additionally, you will need to buff out the damage to the front element. Cerium Oxide powder or polishing sheets are one way to go.
http://search.ebay.com/search/searc...ftrt=1&ftrv=1&saprclo=&saprchi=&fsop=1&fsoo=1
Last edited by a moderator:
payasam
a.k.a. Mukul Dube
Brian, please translate: "Even maintains focus throughout the whole range."
Might it be possible to spray on the coating?
Might it be possible to spray on the coating?
Sonnar Brian
Established
I went through an iteration of combining the two lenses to make a near-perfect one, and this one with left-over parts. I swapped the front elements between the two lenses, and then used the now-perfect front module on the lens shown here. It's rear section is perfect, and it was cosmetically better. The "resulting lens" was the wrong focal length to work properly. It was great at 5ft. So I ended up swapping only the front element between the two lenses. There are not any shims for the front module, it simply screws in. So I am guessing it is machined to work properly.
ChrisN
Striving
Nice work Brian. This (polishing) might be the trick for that acid-etched 50/1.2 lens I still have languishing in the back of the cupboard. How do you apply the polish - same as polishing the car?
Ronald M
Veteran
Leitz measured the actual resulting focal lengths and mated them with focusing mounts made to those specifications.
Their focal lengths did not come out to marked usually, but varied over a small range, say 50 to 52mm.
I once a had a whole batch of 50 2.8 Elmars and was asked to match a pair for stereo. I made photos from each all from the same place of the same subject and englarged all the resulting images and measured a critical distance on the frame. Every one was different and I must have had 12samples.
At that time, the lenses were not marked with the actual focal lengths like was done in the Rigid series.
clintock
Galleryless Gearhead
Man, you had me all excited that you found a do it yourself AR coating kit.
I think you might have better results if you get that scratch lacquer back off the lens-
I got pitch and cerium oxide powder from gotgrit.com, but have not tried it yet on my lens.
I spoke on the phone to the owner/operator of this place :
http://www.thinfilmcoating.com/ about coating individual lens elements for just what you are doing. He was keen to try, but did remind me that the prices on the web page were more for job lots than one at a time lenses..
However he said he'll give it a shot, as long as the glass is all polished and ready to go. They do the final cleaning..
Another coating option I've been wanting to somehow manage is to sweet talk or otherwise get interested an optometrist, so the lens elements can get one of those zeiss multi layer with hard topping coatings that they push on you when getting eyeglasses. That realm is an information protected field, sort of like real-estate used to be, trying to keep the optometrist in the loop as middleman I get the feeling.. the charge is in the hundreds sometimes for eyeglass coatings.. but if the right tech is bribed.. just maybe..
V
varjag
Guest
Brian, did you use that Lens Doctor as a filler after polishing, or does it also serve as coating?
Sonnar Brian
Established
The lens Doctor worked as a coating, and I believe as a filler for the residual scratches. I did spend hours polishing the glass. The trick for the coating was to use thin strokes and let the lens sit upright for 24 hours. I put a lens vented hood with cap on the lens to allow it to dry without dust getting on it.
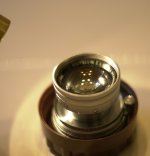
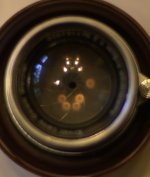
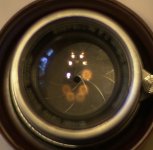
Here are the "Before" pictures, posted in the ad. The seller was very honest about the lens, and showed a very fuzzy image taken with it.
I tried the lens after polishing and without the coating. It is definitely better with the "cheeze-wiz-coating".
Here are the "Before" pictures, posted in the ad. The seller was very honest about the lens, and showed a very fuzzy image taken with it.
I tried the lens after polishing and without the coating. It is definitely better with the "cheeze-wiz-coating".
Attachments
Sonnar Brian
Established
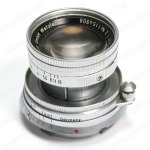
And these are the after shots. Just got my DSLR battery charged up, 50/1.4 lens on the D1.
This coating was the third attempt, I took the first two off with 99% Isopropyl Alchohol. I "revisited" spots on the bad attempts, and flakes got into the coating. On this application, I applied once and let the coating flow into place. I'm not goig to touch it again! These shots are with the DSLR, 50mm F1.4 wide-open. Holding the DSLR in one hand and the mag-lite in the other. The aperture blades are just outside of the DOF. Looking at the lens, this "Lens Doctor" appears to function as a lens coating.
The photographs above came out better than I expected, and I re-checked the labeling on the roll of film to verify this is the lens used.
Just to add, sending the lens to Arax or Focalpoint will be much better than this. This is cheaper, and I did it as an experiment with the "left-over" optics after making a first-rate lens using the other front element. Results from THAT lens are here:
http://www.rangefinderforum.com/forums/showthread.php?t=40386&highlight=collapsible+summicron
Attachments
Last edited by a moderator:
Sonnar Brian
Established
Chris: for this lens I used a polishing sheet. It is plastic and like extremely fine sand paper. One of the optical engineers at work uses them, as well as Cerium Oxide powder. And it is pretty much like polishing a car, but you must use smoother, more even, circular motions.
I did try the polishing sheet on a severely-etched/contaminated Canon front element. The glass was "cloudy", and the damage was too deep to get rid of. But you will never know unless you try. On this lens, I figured it was left over parts after making the good one. I could not justify the expense of FocalPoint for this lens. If it had not come out anywhere near usable, it would have gone to Arax.
I did try the polishing sheet on a severely-etched/contaminated Canon front element. The glass was "cloudy", and the damage was too deep to get rid of. But you will never know unless you try. On this lens, I figured it was left over parts after making the good one. I could not justify the expense of FocalPoint for this lens. If it had not come out anywhere near usable, it would have gone to Arax.
Last edited by a moderator:
V
varjag
Guest
Very cool Brian, I'm most impressed. Should try the trick on some of my scratched lenses..
Gabriel M.A.
My Red Dot Glows For You
Oh, the humanity!Brian Sweeney said:I tried the lens after polishing and without the coating. It is definitely better with the "cheeze-wiz-coating".
Nice work, Brian. That flare looks rather pleasing, though; most certainly a special application lens wide open. I don't know if I could be so adventurous, though.
Sonnar Brian
Established
After having good luck with a Nikkor 5cm f2 with a damaged front element, and the Dr RX eyeglass repair kit- I revisited this Summicron. I diluted the liquid of the repair kit before applying it to the Nikkor, and it went on more evenly than it did without diluting.
So I took the coating off of the Summicron, diluted the Eyeglass repair fluid in Isopropyl alchohol, and re-applied. Let it dry slowly, put the lens cap on. The coating looks thinner, more even. It fills in the scratches, acts like a coating. Think of it as the drip coating used by Leica.
Wide-Open at F2, on the Leica M8:

100% crop.

So I took the coating off of the Summicron, diluted the Eyeglass repair fluid in Isopropyl alchohol, and re-applied. Let it dry slowly, put the lens cap on. The coating looks thinner, more even. It fills in the scratches, acts like a coating. Think of it as the drip coating used by Leica.
Wide-Open at F2, on the Leica M8:
100% crop.
Sonnar Brian
Established
Color, backlit leaves.
at F2:

100% crop, F2

At F4:

100% crop,

at F2:
100% crop, F2
At F4:
100% crop,
Sonnar Brian
Established
Strong Backlighting, F2:

And at F4:

This lens was bought several years ago for parts- I had another summicron with a perfect front element and a bad inner front group. One lens got the "best of the best", and this lens got the left-overs. The front element was almost opaque, as shown in the Ebay pictures. Polished the front element using 3M polishing sheets designed for fiber optic connectors. Cerium Oxide would be better.
This lens will be nice for portraits.
And at F4:
This lens was bought several years ago for parts- I had another summicron with a perfect front element and a bad inner front group. One lens got the "best of the best", and this lens got the left-overs. The front element was almost opaque, as shown in the Ebay pictures. Polished the front element using 3M polishing sheets designed for fiber optic connectors. Cerium Oxide would be better.
This lens will be nice for portraits.
Last edited by a moderator:
Sonnar Brian
Established
One more at F2, Sun behind the camera and open sky in the shot.

I'm going to try this on a Summar with a lot of scratches on the front element. I also have a near perfect Summar to compare with.
Fall is a good time for lens tests.
I'm going to try this on a Summar with a lot of scratches on the front element. I also have a near perfect Summar to compare with.
Fall is a good time for lens tests.
Last edited by a moderator:
Similar threads
- Replies
- 1
- Views
- 281
- Replies
- 4
- Views
- 224
- Replies
- 16
- Views
- 502
- Replies
- 9
- Views
- 1K