PhotoRaw 1.21 interpolation comparo

PhotoRaw 1.21 interpolation comparo

  • The one in the center

    Votes: 11 61.1%
  • The one on the right

    Votes: 7 38.9%

  • Total voters
    18
  • Poll closed .

jlw

Rangefinder camera pedant
Local time
10:48 PM
Joined
Aug 27, 2004
Messages
3,262
One of the stated features of Epson's PhotoRaw 1.21 (now available for download from European Epson sites, but not yet from Epson USA as far as I know) is that it can interpolate the R-D 1's 6-megapixel raw files to a larger size -- 3000 pixels wide rather than 2000. Epson claims that its special technique produces a sharper-looking result than regular bicubic interpolation as used in Adobe Photoshop.

I've got the 1.21 download and decided to test this. I've attached a simple comparison frame (saved as maximum-quality JPEG) so you can see the results for yourself.

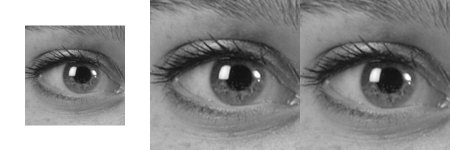
The test images were crops of one eye from a headshot (full frame version at reduced size attached separately.) In the comparison image, the original uninterpolated eye is shown at left, then the two versions enlarged with PhotoRaw and Photoshop.

But just for fun, I'm NOT going to tell you which is which! I'm interested in seeing whether anyone can actually see a difference in a "blind" comparison. So, post your picks and we'll see how we do!
 

Attachments

  • interpolation test.jpg
    interpolation test.jpg
    80.5 KB · Views: 0
  • example-full.jpg
    example-full.jpg
    9 KB · Views: 0
I guess what I really should have asked in the poll was, "Which version of the interpolation do you think shows more detail?" But it appears as if there's no way to edit a poll question once you've posted it...?
 
I voted for the one on the right. Actually it may show very marginally less detail, but I think I see a few more artifacts in the centre one. Most noticable on the centre of the eyelid.
 
To me, the left images resembles the uninterpolated image best. Slightly more noise reduction and less contrast would perhaps make it look very much the same. Usually I don't interpolate images when up-scaling, there are other and better ways producing large images from small negatives or small files for fine-art printing. I'm more concerned with the look when printed.
 
ulrik said:
Usually I don't interpolate images when up-scaling, there are other and better ways producing large images from small negatives or small files for fine-art printing. I'm more concerned with the look when printed.

Hmmm, interesting. Could you go into more detail? (no pun intended!)

Given that the only ways of making a bigger image from a digital original are to print the pixels bigger or to generate more pixels somehow (interpolation) I'm curious about what procedure you use.
 
I like the center image. I think I could make it look like the right image, not sure I could go the other way.

On the other hand, in isolation I don't think it makes a lot of difference to a viewer.
 
Well with 11 results in so far it looks like a pretty even split with regard to preference. I'm now not suprised as I have now had the chance to look at them on three different calibrate screens; 24" TFT at 1600 x 1920, 15" Laptop TFT at 1024 x768, 20" CRT at 1600 x 1200 (the two larger screens are Spyder calibrated) and I don't show a consistant preference. Clearly it's close on screen, maybe it will show more in a print. I haven't downloaded this version yet, but I will and give it a try.

JLW Just to clarify were your crops 100% of the pixels?
 
jlw said:
Hmmm, interesting. Could you go into more detail? (no pun intended!)

Yes, it's not a secret, very simple and works for digital analog prints. I have used this method for many years when I need large exhibition print from 35mm, even extreme enlargements from 8x11mm negatives (minox) to 3x4 meters.
First I make a perfect print to the size just about where the grain starts to "open". I then copy the print to a 4x5" chrome or negative and make an enlargement or scan from that.
The method maintains the look if the original format, it of course does not make a video-still look like a 35mm or 35mm look like mediumformat.
Print size and viewing distance is very inportant factors when printing, especially digital printing. If you apply sharpening accordingly to the size, distance and resolution, in the right places and to the right colors, you can print at much lower resolutions than you would usually think possible.
 
ulrik said:
First I make a perfect print to the size just about where the grain starts to "open". I then copy the print to a 4x5" chrome or negative and make an enlargement or scan from that.

If it works for you, that's great. But I think I'd prefer to avoid the additional analog generational losses (not to mention the bother and expense of buying a 4x5 camera!) It's the generational loss that prevents the pixels (or grain) from becoming intrusive, but there's no way to throw away that information without throwing a way a certain amount of image information as well.
 
The loss of information is imbedded in the medium of photography itself. I prefer not to interpolate and size prints according to the subject of the image with the pixels I have available. It is only my choise of aestetics and the test is a hard copy - how it looks in print.
 
The one in the middle was done by PhotoRaw, the one on the right by Photoshop. I'd call the poll results "inconclusive" considering the small sample size -- although anecdotally, it seems that people who were looking for "crispness" seemed to prefer the PhotoRaw version, while people who were looking for "smoothness" preferred the Photoshop version.
 
Thanks for that... very interesting. I was one of those who went for the PS version, as the EPR version looked a bit over-sharpened. I tend to find PhotoRaw slightly over sharpens by default anyway, so if you knock that back a bit, I wonder if there would be any noticeable difference between the two?
 
Back
Top Bottom