Photos of P.O.D Replacement from Top

Michael W

Member
Local time
3:30 PM
Joined
Apr 25, 2005
Messages
39
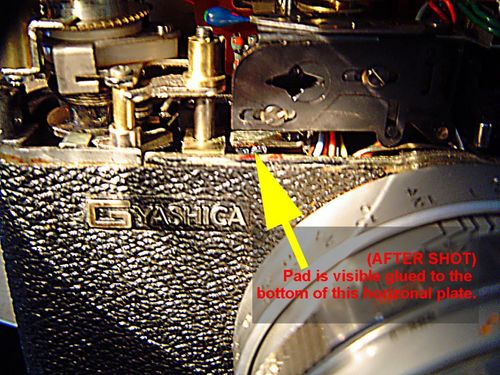
Here are the before and after photos of the P.O.D replacement from my Yashica Electro. Was very doable using a pin to hold the new pad in place while the cyanoacrylate (crazy glue) dried. Worked like a charm afterwords!

U1940I1126126412.SEQ.0.jpg

U1940I1126126418.SEQ.0.jpg


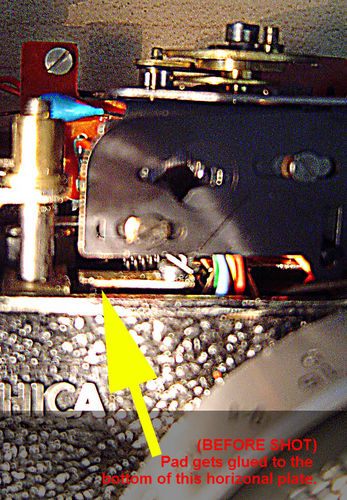
Sorry that the photos aren't a bit sharper, they're from an old digital camera.

All the best,

Michael
 
Thanks for the pictures Michael! I have been gathering up enough courage to do this POD replacement, and your pictures sure helped. I will attemp a POD replacement this weekend on my GS. I will let you know what happens.

Regards.

John
 
John,

Surely you are going to make it with no problem. I did mine 2 months ago and it was my very first to attempt fixing any camera in my life. It took me about 2 hours with lots of pre-reading on the internet.

My tip for anyone attempting the chagne is to make sure you test and ensure the material and glue that you are going to use work well together to stick to the metal surface (stongly) if not, change the glue or the material unitl you find the perfect match.

Good luck !

SH
 
Material that I used came from an old squash ball.

Just cut the ball in half then you have many many pads. (I think the thickness of the ball is actually okay to be used without any need to cutting, I didn't anyway)

I was that thinking these balls are manufactured for the purpose of getting hit against a wall, then the material must be good to be used as the pad as it gets hit a lot too. ;)
 
Back
Top Bottom