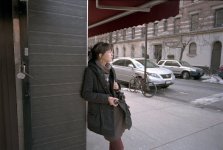
Problem with flat colors in negative scan?

Redseele

Established
Local time
5:49 PM
Joined
May 18, 2013
Messages
161
Hi all,

I just got back a roll of Fuji Pro 400H which I overexposed by two stops (shot it as if it were 100 ISO). I scanned them in my new Proscan 7200 but all pictures came out with a brownish and muted colors. Is that normal for overexposing this film? The day was bright and I shot it with a Voigtlander 25mm f4 Color Skopar, so it should be very contrasty, so I was very surprised at the results. IN the past black and white negatives are always flat when first scanned, but I'm not very experienced with color negatives, therein my doubts.

As I said, this is the first time I've shot 400H overexposed like this, so I was wondering if anyone thinks I may have done something wrong. For my scanning method I used Colorperfect with the guide provided here:

http://www.l-camera-forum.com/leica...r-negative-scanning-vuescan-colorperfect.html


scan0019 by Mahler_seele, on Flickr

Any help or comments would be appreciated :)
 
Don't use colorperfect? I found it unusable, others differ. Great tones in your picture.

Pulled the red channel midtone down in curves.
 

Attachments

  • 12808553663_46df6dd05e_ccopy.JPG
    12808553663_46df6dd05e_ccopy.JPG
    60.5 KB · Views: 0
I agree CP is a misnomer it overcomplicates a simple process YMMV as they say. Like Ranchu says above just tweak the colour as it is straight red, over exposure of two stops isn't a big ask for C41 film although it will flatten contrast a little.

The colours look quite nice once you take out red...
 
I'm glad that I'm not the only one that finds CP to be chasing your tale. Sometimes it's magic, others.... not so much. There may be some magical setting that I'm missing, but just the layout and controls of it doesn't make any sense to me at all.

Can we assume that you're using Vuescan? If so, what do the scans look like if you set the Media to Negative Film and the Color Balance to None? If they're over or under exposed at that point I'd get a handle on that first. I've been finding Vuescan does a poor job of setting the scanner's exposure level's and that sets everything else off. But maybe you're not having this problem at all.
 
I recently also intentionally seriously overexposed Fuji Pro 400H (120 format) and got this. My results were pretty much what I expected.


I too use the "broken" ColorPerfect.
 
Yes, you are doing something wrong somewhere. When you take it from CP back into PS there should be no clipping. I wrote that thread you posted and I would recommend you ignore the CP section of it. This is a simpler guide:

http://www.l-camera-forum.com/leica-forum/film-forum/172106-colorperfect.html#post1644435

Once I've taken it back into PS I "ctrl M" and "options* then choose the best algorithm for colour.

I often need to boost saturation.

Pete

12808553663_46df6dd05e_c.jpg
 
You'll also need to add some contrast back in, usually in the form of an S curve on the tone curve, for most scans.

For C-41 inversion, I've found it useful to do Invert first in Photoshop (Cmd-I or Ctrl-I), and then using the Curves image adjustment, pick an unexposed part of the frame as the black point, and adjust to taste (by moving the black and white points of the individual R G, B curves) from there. I pull the global tone curve down with a point somewhere in the middle, so it bows down --- this approximates the density inversion as well as the gamma factor. If there's enough contrast, I leave it alone, otherwise I add more with the S-curve.
 
I recently also intentionally seriously overexposed Fuji Pro 400H (120 format) and got this. My results were pretty much what I expected.


I too use the "broken" ColorPerfect.

That's the exact color effect i was looking for. As suggested above i played with the curves (reducing the reds in midtones mostly) and got much better results, but not as the ones presented above.

Also, in ColorPerfect i forgot to clarify that in the picture I only applied the preset for Fuji 400H. I did not play with black point, whites or any other film subtypes so maybe I shouldn't have expected it was going to be perfect just with the preset?
 
I'm glad that I'm not the only one that finds CP to be chasing your tale. Sometimes it's magic, others.... not so much. There may be some magical setting that I'm missing, but just the layout and controls of it doesn't make any sense to me at all.

Can we assume that you're using Vuescan? If so, what do the scans look like if you set the Media to Negative Film and the Color Balance to None? If they're over or under exposed at that point I'd get a handle on that first. I've been finding Vuescan does a poor job of setting the scanner's exposure level's and that sets everything else off. But maybe you're not having this problem at all.

I agree, I think that there's something to the Vuescan settings. I always Use Raw as my output for linear scans (as per the guide I mentioned in my first post) but I am always doubtful of the exposure level settings. Can anyone recommend what they should be like, or how should one calculate what they should be?

By the way, thank you all so far for helping me with this. I hope others will also benefit from reading this thread in the future.
 
Also, in ColorPerfect i forgot to clarify that in the picture I only applied the preset for Fuji 400H. I did not play with black point, whites or any other film subtypes so maybe I shouldn't have expected it was going to be perfect just with the preset?

For me, the "secret" setting in CP is to use NO settings/presets. I only set neutral point and adjust black/white so I have 0% clippings. Absolutely nothing else. This is what I typically get out of CP (I assign AdobeRGB profile to my RAW scan prior to inverting in CP):

6tJuqcwyo6HLLrlNNjUh3K


I finish the photo in Lightroom, basic contrast, higlights/shadows and exposure manipulation. No individual curves adjustments, no individual colour saturation/luminance/hue adjustments, no split toning, typically no vibrancy/saturation adjustment. You COULD finish the photo in CP (and get better results, too) but for me Lightroom is good enough and much easier and faster.

I agree, I think that there's something to the Vuescan settings. I always Use Raw as my output for linear scans (as per the guide I mentioned in my first post) but I am always doubtful of the exposure level settings. Can anyone recommend what they should be like, or how should one calculate what they should be?

By the way, thank you all so far for helping me with this. I hope others will also benefit from reading this thread in the future.

I don't think that Vuescan will be so far off at guessing the correct exposure to make a mess of general colour balance in C-41. At worst you will get a bit more noise in shadows or highlights. You still can lock exposure in Vuescan with your scanner, right? With that you get consistency in your workflow.
 
After using the new CP method Pete B recommended, and playing a little with curves to reduce the reds and greens, this is a newly colored version. I think it is a LOT better. Thank you so much everyone for your advice! Scanning negatives continues to be such a pain, but at least I know my way now :)


New Colors! by Mahler_seele, on Flickr
 
I think it still looks milky and red, you could go further. This is a 2 second fix in PS, just levels grey picker and pick the road near the front of the car, then slight mid point adjustment.
154654705.jpg


You might not like it and you know the colour of the girl's jacket is it green or warm grey?
 
Back
Top Bottom