Prontor SV re-assy aperture blades help

AGChicago

Newbie
Local time
8:11 PM
Joined
Jul 21, 2013
Messages
7
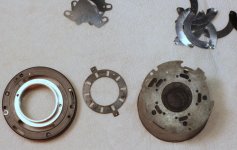
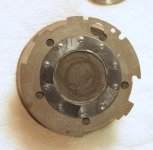
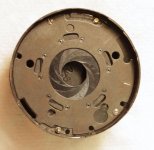
I'm working on a Weltaflex with a Prontor SV shutter. A few of the aperture blades (it's the 10 blade version) were skipped out of their holes on the retaining plate. While carefully removing the retaining plate, I bumped the bottom housing, causing all the blades to end up in a pile (it didn't take much)! I've gone over the rest of the shutter and lenses, and they're now clean as a whistle and working really beautifully. I figured if there was any issues with shutter, I wouldn't bother with the aperture. So...I've searching high and low, and can't find a picture of the order of the blades, or any helpful tricks to reassemble them. I've given it a go for a few hours, and it's a really big PITA. A picture with with the retaining plate off would be immensely helpful.
 
FYI, aperture blades aren't like shutter blades. They usually don't need a specific starting point. I bet if you posted images of the retaining pins ring and such and the blades, someone here could give directions?
 
There are good tips here.

I start off the way shown in the last picture in the link. It helps to put something round, of appropriate diameter and with a bit of weight to it, to lie symmetrically on the pivoting ends of the blades as you fold them in.

The most recent time that I did it, it was, as it happens, a Prontor SV, and it was, as you found, difficult to keep together. I managed it by first greasing the blades with Vaseline which helped them to stick together. Then, when assembled in the housing, but before, of course, adding the shutter blades and assembly, cleaned off the grease with cotton buds and solvent (e.g. methylated spirit or IsoPropylAlcohol). Take care, when exercising the blades, not to force them, so that they don't bind as then they would distort.

ADDITIONAL: I've uploaded a picture for illustration. (For the final stage prior to assembly it would help to change to a smaller diameter disc to get the diameter correct for assembly to the control plate.)
 
Wow, great answers! I have used Daniel Mitchell's website for years, but never noticed that general info page on apertures. I appreciate the pictures, and I think I will try your "large round thing" trick to hold the pivot end down. That should help. Every time I got to around the 7th blade, it was impossible to keep them from moving around.
 
Done, can't believe how easy it was (not really)

Done, can't believe how easy it was (not really)

I used the "upside-down" method, and actually placing the blades wasn't too bad. It's definitely easier for me when the fixed pivot end is facing down. I found it best to put the blade free end almost all the way to the outer edge of the plate, to make sure the remaining holes weren't covered. It took a few minutes to nudge them into a closed aperture, using a small screwdriver and sharp point probe to hold down the pivot end. Before starting, I lined up the base, retaining plate, and aperture moving plate and made a pencil mark at the moving plate screw hole to line them up afterwards (at 11 o'clock position in first picture, all three parts lined up ready to get to it). Worked fine and the entire shutter is re-assembled.
 

Attachments

  • _MG_2469-001.jpg
    _MG_2469-001.jpg
    27.4 KB · Views: 0
  • _MG_2473-001.jpg
    _MG_2473-001.jpg
    32.5 KB · Views: 0
  • _MG_2475-001.jpg
    _MG_2475-001.jpg
    34.5 KB · Views: 0
Back
Top Bottom