You are using an out of date browser. It may not display this or other websites correctly.
You should upgrade or use an alternative browser.
You should upgrade or use an alternative browser.
R-D1 stingray
- Thread starter laptoprob
- Start date
- Latest activity Latest activity:
- Replies 13
- Views 2K
laptoprob
back to basics
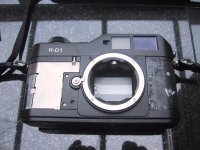
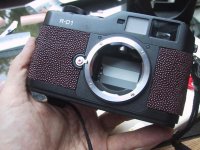
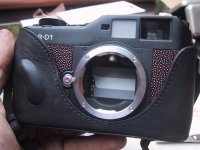
Then, after cutting the stingray leather. This material is very difficult to cut straight. It is like leather with hard beads attached. The thickness is not exactly like the rubber but hey, it is a natural material.
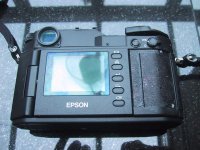
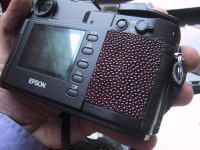
Colour is burgundy red. I like it a lot better than the rubber.
Colour is burgundy red. I like it a lot better than the rubber.
Attachments
back alley
IMAGES
do you miss the hump?
laptoprob
back to basics
Well Joe, the hump never fitted well inside the halfcase. And the stingray is nice and grippy. But the grip is far superior for holding than the flat material, even if it is stingray.
But inside the halfcase it is no problem.
But inside the halfcase it is no problem.
back alley
IMAGES
that makes sense rob. i'm not a fan of the half case except in cold weather so i think it make more sense for me to keep the grip, despite liking the griptac cover so much.
thanks.
btw, your rd1 looks great.
joe
thanks.
btw, your rd1 looks great.
joe
ampguy
Veteran
nice photos, did the original covering need any solvents to come off cleanly?
laptoprob
back to basics
The rubber comes off easily. Without ripping or tearing. But the glue underneath is a nightmare. I didn't get that off at all. I tried carefully with the most powerful resolvent I know (thinner), but that didn't work. It doesn't matter really. The doublesided tape on the front right part comes off easily. This has to be easy since this part must come off for top removal.
Bill58
Native Texan
Beautiful! I remember reading somewhere that when stitching stingray skin, you can experience many broken needles--tough stuff, indeed!
ampguy
Veteran
Thanks Rob
Thanks Rob
great info.
Thanks Rob
great info.
The rubber comes off easily. Without ripping or tearing. But the glue underneath is a nightmare. I didn't get that off at all. I tried carefully with the most powerful resolvent I know (thinner), but that didn't work. It doesn't matter really. The doublesided tape on the front right part comes off easily. This has to be easy since this part must come off for top removal.
laptoprob
back to basics
stitching
stitching
In stitching you would have to aim between the 'beads'. There is no way sticking a needle through one. I used a new scalpel surgical blade to cut the material. If you insist, you can cut through the bigger beads. This material is coloured, dyed. The natural material must be almost white, at least the leather and beads of my bit were very light inside. So I blackened the cut sides with a permanent marker.
Main problem with stingray skin is cutting a straight line. Almost impossible.
stitching
Beautiful! I remember reading somewhere that when stitching stingray skin, you can experience many broken needles--tough stuff, indeed!
In stitching you would have to aim between the 'beads'. There is no way sticking a needle through one. I used a new scalpel surgical blade to cut the material. If you insist, you can cut through the bigger beads. This material is coloured, dyed. The natural material must be almost white, at least the leather and beads of my bit were very light inside. So I blackened the cut sides with a permanent marker.
Main problem with stingray skin is cutting a straight line. Almost impossible.
jmkelly
rangefinder user
Rob: IIRC it was one of your earlier posts that led to this:


Sanded stingray. I was able to sand it further inside and out to get the thickness at the edges I wanted. Impossible to cut straight, yes - but the edges can be sanded too.
Compared to other camera coverings this stuff is a LOT of work. But I love the look and feel.
Sanded stingray. I was able to sand it further inside and out to get the thickness at the edges I wanted. Impossible to cut straight, yes - but the edges can be sanded too.
Compared to other camera coverings this stuff is a LOT of work. But I love the look and feel.
laptoprob
back to basics
Yeah, after I saw your PEN I tried the sanding effect, but I didn't get the clarity and contrast like yours, so I left the skin with the beads. Maybe mine got a different dye.
jmkelly
rangefinder user
I bought the skin sanded from the supplier - they must use some serious industrial heavy-duty equipment to take the beads down so far. I just went after it with an orbital finish sander and 250 grit to smooth and thin where necessary. Still time-consuming
jke
Well-known
The sanded stingray (and shark skin too) was used originally on art deco furniture. You can get it from some furniture restoration suppliers if they specialize in art deco restorations. I am sure there are other (cheaper) suppliers though. I think it is called shagreen in the trade.
Similar threads
- Replies
- 2
- Views
- 2K
- Replies
- 24
- Views
- 2K
- Replies
- 7
- Views
- 1K
- Replies
- 2
- Views
- 147