efkbl
Established
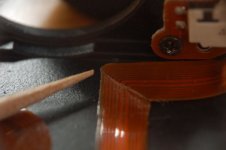
I recently purchased a dead R-D1 on ebay. The cause of the problem was clearly mentioned in the auction: on of the two ribbon cables connectiong the top plate to the body was partially ripped.
The damaged cable was the one with a connector at its end, connecting the jog dial and all switches to the body (on/off, wb/qual and AE lock). Of course, as the on/off switch was not connected to the body, the camera did not work at all. The other (undamaged) cable connects the needle gauges to the body.
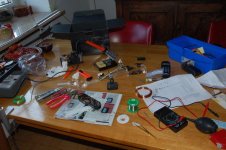
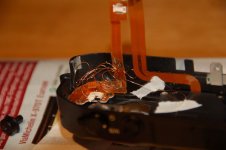
It turned out that 9 out of the 10 tracks were broken, in the angle of the ribbon cable. After quite a long job with a thin soldering iron and some 0.2mm enameled cable, I was able to bring back the camera to life. If it happens to one of you, here are some advice for the repair:
- follow the instructions on http://www.richcutler.co.uk/r-d1/r-d1_18.htm in order to remove the plate.
- use a soldering iron as thin as you can find. The tracks are 0.1 or 0.2mm wide.
- gently scrape the ribbon cable using a small and very sharp utility knife. It can take a few minutes until you get to the track, you will notice its silver color instead of the orange isolating layer.
- process each track after one other. Do not scrape all tracks at the same place, but alternate between at least two places before and after the rip. Soldering cables on two adjacent tracks can be really tedious.
- do not tin more than 1mm at the tips of the enameled wire. Quickly tin the track on the ribbon cable in order to avoid damaging it. The wire should not have a diameter >0.2mm
- when you have reconnected all tracks, use a mutlimeter to check if none of them has a short circuit with its neighbours. It is easier to check on the connector. Counting from the bottom track to the upper when the top plate is placed on the body, only tracks #1 and #5 should be connected. Other tracks are connected when some of the switches ore activated (for example, tracks #1 and #2 are connected when AE lock is pushed).
- use some tape to cover and isolate the solderings. The tape should be as less adhesive as possible in case you need to remove it later. Use the tape also to flatten the cables and fix the ribbon cable to the inside of the top plate, it will be easier to put the plate back in place this way.
- test all functions of the camera. I had to reopen the camera because AE lock was always on. In AE mode, chaging aperture or pointing at a differently illuminated place, the camera would not adjust exposure...
After the repair, I also had to recalibrate the rangefinder, which I did through the hot shoe using the method described on Rich Cutler's page.
The whole repair job took me about 10 hours, but I didn't work in an optimal way at the beginning.
I wanted to try a digital rangefinder camera since a long time, but could not afford to buy one at the actual prices. Once repaired, I bought a Voigtländer nokton 40mm f/1.4 which I find very nice to use. After using a DSLR, using a rangefinder is a nice change, and the lens is really as smooth and nicely built (if not better) as the ones I had on my old OM SLR back before the digital age. I hope this post will be helpful if you ever need to do a similar repair to your camera!
The damaged cable was the one with a connector at its end, connecting the jog dial and all switches to the body (on/off, wb/qual and AE lock). Of course, as the on/off switch was not connected to the body, the camera did not work at all. The other (undamaged) cable connects the needle gauges to the body.
It turned out that 9 out of the 10 tracks were broken, in the angle of the ribbon cable. After quite a long job with a thin soldering iron and some 0.2mm enameled cable, I was able to bring back the camera to life. If it happens to one of you, here are some advice for the repair:
- follow the instructions on http://www.richcutler.co.uk/r-d1/r-d1_18.htm in order to remove the plate.
- use a soldering iron as thin as you can find. The tracks are 0.1 or 0.2mm wide.
- gently scrape the ribbon cable using a small and very sharp utility knife. It can take a few minutes until you get to the track, you will notice its silver color instead of the orange isolating layer.
- process each track after one other. Do not scrape all tracks at the same place, but alternate between at least two places before and after the rip. Soldering cables on two adjacent tracks can be really tedious.
- do not tin more than 1mm at the tips of the enameled wire. Quickly tin the track on the ribbon cable in order to avoid damaging it. The wire should not have a diameter >0.2mm
- when you have reconnected all tracks, use a mutlimeter to check if none of them has a short circuit with its neighbours. It is easier to check on the connector. Counting from the bottom track to the upper when the top plate is placed on the body, only tracks #1 and #5 should be connected. Other tracks are connected when some of the switches ore activated (for example, tracks #1 and #2 are connected when AE lock is pushed).
- use some tape to cover and isolate the solderings. The tape should be as less adhesive as possible in case you need to remove it later. Use the tape also to flatten the cables and fix the ribbon cable to the inside of the top plate, it will be easier to put the plate back in place this way.
- test all functions of the camera. I had to reopen the camera because AE lock was always on. In AE mode, chaging aperture or pointing at a differently illuminated place, the camera would not adjust exposure...
After the repair, I also had to recalibrate the rangefinder, which I did through the hot shoe using the method described on Rich Cutler's page.
The whole repair job took me about 10 hours, but I didn't work in an optimal way at the beginning.
I wanted to try a digital rangefinder camera since a long time, but could not afford to buy one at the actual prices. Once repaired, I bought a Voigtländer nokton 40mm f/1.4 which I find very nice to use. After using a DSLR, using a rangefinder is a nice change, and the lens is really as smooth and nicely built (if not better) as the ones I had on my old OM SLR back before the digital age. I hope this post will be helpful if you ever need to do a similar repair to your camera!