Nokton48
Veteran
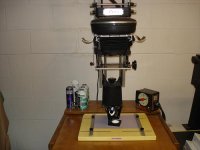
Twenty years ago I used this Omega D-2 to print B&W 16x20's from 4x5 negs. I had a nice darkroom in my apartment at the time, which was in a very large walk-in closet/storage space. I used the 180mm Rodagon lens and the Omegalite head to make the Kodak Ektalure prints. My brother in law built for me this custom made enlarging bench, from plans in Peterson's Photographic magazine. It's fantastic with a built-in paper safe and drops down enough to print 20x24.
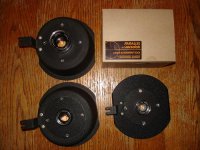
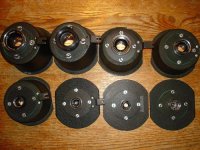
I'm interested in getting this going again, so I started reading up on it. And I just purchased a Versalab (Laser) Enlarging Alignment tool, for speedy and accurate aligning of all three image planes. Here's my enlarger (darkroom is now in my basement). I use the Peak/Omega Focusing Magnifier to examine the grain in the negatives. It will be fun to get this going again. It's very dusty. Next project is to add thumbscrews to the lens cones, so the lenses can be easily aligned.
Attachments
Nokton48
Veteran
Here is my set of Enlarging Lenses. 50 F4 Componon, 80mm F5.6 Componon, 105mm F5.6 Componon, 135mm F5.6 Componon, 150mm F5.6 Componon, and 180mm Rodagon. The Componons are all new to me. I also intend to use the longer Componons on my three Plaubel Makiflexes.
The Rodagon I used to print the 4x5 negs. Super sharp were the 16x20 Ektalures.
I have a lot of Ektalure paper in the freezer. I stocked up on it when it was being discontinued.
The Rodagon I used to print the 4x5 negs. Super sharp were the 16x20 Ektalures.
I have a lot of Ektalure paper in the freezer. I stocked up on it when it was being discontinued.
Attachments
zuikologist
.........................
This looks like an interesting project. What prompted the reboot?
Ronald M
Veteran
congratulations. I used tape to shim each cone individually and they are all different.
So much for Omega quality. My neighbor had an Omega rep align his and the man bent the flanges on the cones.
I would level the entire bench and then level the drop down guides individually.
So much for Omega quality. My neighbor had an Omega rep align his and the man bent the flanges on the cones.
I would level the entire bench and then level the drop down guides individually.
MrFujicaman
Well-known
Hey Nokton,
Not to hijack your thread, but if anybody wants the plans for the enlarging bench, I've got them scanned and will email them to anybody who wants them.
Nokton48
Veteran
This looks like an interesting project. What prompted the reboot?
The joy of working with my hands. The mods are easy to do and work great.
Also twenty years worth of negatives that need printing.
That should keep me busy when I eventually retire.
Nokton48
Veteran
OK, This is what I am talking about. The first lensboard (for the 50mm Componon) is done. Notice the four thumbscrews. You can raise or lower the four corners of the lens plate. My intention is to do this alignment each time I raise or lower the enlarger. The Versalab laser makes it quick and easy to do so. With the film plane, lens stage, and paper all precisely parallel, the only quality factor should be the lenses. I am confident that these old silver Componons will deliver the level of quality I am looking for. I have taken out the lens groups in each and cleaned them.
I've learned how to drill and tap metal today. And I have made a lot of metal shavings in the darkroom enlarger area of the basement.
The D2 is now absolutely rock solid and super easy to adjust into precise alignment quickly.
I've learned how to drill and tap metal today. And I have made a lot of metal shavings in the darkroom enlarger area of the basement.
The D2 is now absolutely rock solid and super easy to adjust into precise alignment quickly.
Attachments
oftheherd
Veteran
I remember using Omegas when I was in Korea in the mid-70s, at the Army Craft shop. We had several brands, Omegas, Besslers, and a couple of others. I almost bought an Omega D3 from a camera store in Kansas City when I returned, but it was just more than I wanted to spend.
Looks like you are getting set up nicely.
Nokton48
Veteran
Last weekend I finished the second modified lensboard (for the most part).
50mm f4 Schneider Componon on the left (for 35mm), and the 80mm f5.6 Schneider Componon on the right (for 6x6cm).
From Ebay I have ordered three 9x12x.25" rubber mousepads, which are trimmed down, and go between the lens plate and the lensboard.
I will have to wait to finish my other lensboards, until my order for steel thumbscrews arrives from McMaster-Carr.
Pack of fifty 10-24 Steel 1/2" long Thumbscrews for $13.18. Much cheaper than the local hardware store!
Guess I will have a few extras.....
And my Versalab Parallel Enlarger Aligning Tool is on it's way to me.
Attachments
Nokton48
Veteran
Here I've modified three of my lensboards with the thumbscrews. I bought a box of 50 screws for McMaster-Carr so I am set forever. And you can see I have my Versalab Laser now. I unpacked it to check that the glass is OK (mine is) and the laser fires up so I am good to go.
Need to clean and dust the enlarger (including all the new metal frags I have created) and see how all of this is going to work. I'm also cutting out some custom sized D2 neg carriers, right now working one one for the full-frame Plaubel Makiflex. This is 9x12cm film with an unusual sized footprint on the neg.
I am pleased.
Attachments
FrankS
Registered User
The Omega D5 that I have has an extra long lens stage bellows, so cones aren't required.
I already have a Beseler 4x5, so the omega is surplus.
Nokton48
Veteran
Here I have taken an old Omega D 3.25"x4.25" Negative carrier (homemade but very nice metalworking!) and "opened it up" to hold a full-frame Plaubel Makiflex Negative, with a bit of border all around. This would be on 9x12cm sheet film in single sheet film holders. Actual image size full gate is 90mmx82mm from the Makiflexes.
This will be perfect for making "full frame" silver prints from my Makiflex negs.
Attachments
Nokton48
Veteran
OK I am done with the "lens bank" phase of this project. Everything is now finished and ready to use. From the back left, the 180mm F5.6 Componon , my old 180mm f5.6 Rodenstock Rodagon (well used by me), the 150mm f5.6 Componon, the 135mm F5.6 Componon, From the front left, the 105mm F5.6 Componon, the 80mm f5.6 Componon, the 60mm f5.6 Componon, and the 50mm F4 Componon. I'm confident these Componons will do the job for me, from 35mm film to 4x5".
Notice that each of these have the four thumbscrews, which will allow lens board alignment to the film carrier and paper, by using the laser. I have yet to start playing with it but now I am ready for it.
Attachments
Share:
-
This site uses cookies to help personalise content, tailor your experience and to keep you logged in if you register.
By continuing to use this site, you are consenting to our use of cookies.