Scanners

Bill Pierce

Well-known
Local time
2:38 PM
Joined
Sep 26, 2007
Messages
1,407
As you know, most of the journalistic photographers have little choice but to be digital. Still, all but youngest of us have a backlog of work in film. Many have chosen to give up the wet darkroom and make inkjet prints of their negs from scans. Indeed, many say that they can make better prints with their computer than with the wet darkroom. And museums and galleries are becoming more accepting of pigment inkjets, especially b&w, that are properly prepared.

But that means a good print depends on a good scanner. I wondered how many shooting silver are using a scanner instead of an enlarger. And, probably more important, what scanner. And have you found any techniques away from the standard ones particularly helpful?

Bill
 
I have used a variety of scanners: Canon 4000FS, Epson 2450, Epson 4490, Nikon Coolscan 5000, and Nikon Coolscan 9000.

If I were to do it all over again, I'd get both Nikon Coolscan 5000 and 9000. The main reason is: speed. The Coolscan 5000 is much faster with 35mm film, and significantly smaller and compact. The Coolscan 9000 is, I believe, the best scanner that has ever been built under a $1800 price tag for 35mm and 120 film.

As far as techniques go, some very simple rules:

1) Always dust/spot your film first. And use gloves when handling your film.
2) Color-calibrate your monitor with color-calibration hardware such as EyeOne
3) If you can afford it, buy Silverfast's AI. If you can't, VueScan is good enough for most people's needs.
4) Turn Auto Brightness off; I can't stress that enough.
5) Know how (and when) to use ICE. It is a long and arduous process at first, but try all the settings you can think of, until it fits your needs.
6) Buy two huge capacity (>= 250GB) hard drives; one should be the mirror of the other. Trust me, hours of scanning will require a good backup in order to preserve your sanity (the day will come when you know what day that is).
7) Have fun. Not having fun is very unhelpful.
 
Bill

I use a Nikon 5000 ED scanner. The quality I get is superb. I print only digitally these days. I use Photoshop Elements and then print on an HP printer with Vivera inks. The inks I use are dye based but last over 100 years under UV glass or 200 years in darkness...way more than color ever did using darkroom processes. The newer Vivera pigment HP printers double the longevity above...which means they even come close or match traditional silver b&w printing.

For color, I consider this digital process, starting with scanning, to be superior to anything I ever got in a traditional darkroom. For B&W, I have gotten the digital process to be very good indeed, but it does not quite match what I used to get with fiber based paper in the darkroom. Very close though.

Some methods I use for scanning:
- I never use ICE. I spot using Photoshop's spot healing brush.
- I set the scanner to do 4 passes, and I scan in 16 bit (even though PhotoShop Elements downgrades to 8 bit...the full Photoshop can use 16 bit).
- I scan B&W negatives as RGB. When I get them into Photoshop I use the Hue/Saturate layer function to get the tone right. You can't tone if you are working in grayscale...that's why I scan in RGB. I can pretty much match the neutral/cool tone I like from traditional fibre prints. Warm tone and other tones are no problem either. I have even worked out a procedure recently to match the affects of traditional lith printing.
- Generally speaking I don't do much adjusting when scanning. I do it later in Photoshop. I will occasionally mess around with RGB curves when scanning if it is clear that the ends are being clipped in the scanning process.
- Neither the Scanning Manual nor the Photoshop manual were written to help people with experience in traditional methods to move to digital. They are written "feature/function" instead of being centered around the words and affects you want as a photographer. So there is a learning curve...I keep a running "workflow" document that makes it easy to pick up where I left off and has helped me bridge the gap.

I think the process of using film with my Leica and then scanning and printing digitally is just great. The results look like film only better - very sharp, infinite flexibility, fabulous all the way around. Although I will admit I do from time to time miss the traditional darkroom for black and white...I have never seen a digitally black and white print that matches that...but as I said I am getting very close now.

Unfortunately I don't think the Nikon scanner is available anymore...but go to Amazon and type "film scanner" and run a search. Dedicated scanners are still being made and there are reviews of many models on the net.

Hope this helps. Good luck.
 
This is what I do - scanning on whatever scanner I can get my hands on. I used a Coolscan 9000 recently and am impressed - esp in comparrison with a badly opped Noritsu. One or two still need rescanning but I think this is because the film was slightly fogged by BFO x-rays at Heathrow and Bangkok - my Hama lead bag is pretty thin.

I digress, Bill, as a professional with a considerable archive and, presumably, a budget more favourable than ours (mine!) simply as you would be able to write equipment off against tax, what option(s) have you plumped for?
 
I have used a Minolta Multi Pro year about 4-5 years now. Previously I used a Minolta Scan Dual II but found I needed a real film scanner for MF negs.

If my Multi Pro went up in smoke tonight, I'd start searching E-Bay for an exact replacement. I would not contend that it's better than a Nikon 9000 but it is as good. Most importantly I know how to make it work well with Vuescan.

I was looking to build another wet darkroom in our current house. Once I got started scanning and outputting digitally I never looked back. I have regular access to a good wet darkroom but having made use of the opportunity for several years. BTW, I still develop film at home, loading in a bag.

In the beginning I used to take offense at those who referred to digital prints as something less than "the real thing". Now I just smile and move on.
 
Bill,

I print 8x10 fb prints, and scan them into the computer. I use an Epson 590 something or other. This way I don't need to spend hours in front of the computer trying figure out how to adjust the image. I scan the print and I'm done. I will print a few variations just in case the final print does not look the way I expected it to--i usually have to print them a bit lighter.

Also, just curious, I can't find any links to your work. Do you have website? If so can you post a link.

Thanks
 
I started scanning my film close to a decade ago, starting with a second-hand Nikon LS-10, and printing with the first decent 13x19" printer available (Epson SP 1200) shortly after that. Since I'd decided a handful of years back that film was going to be my principal medium for quite some time, and also decided that digital post-production was going to be the "way forward" for me, getting a setup that worked really well, from scanner to computer to printer (and a few points in-between, like reliable hard disks and stable CD/DVD media) was paramount.

For the last several years, scanning has been with a Minolta 5400 (first version), which I can't say enough good things about. Suffice to say that this scanner "gets it down", and I've yet to throw an emulsion at it that it couldn't handle. When I need enlarged contact sheets, I scan entire rolls with a UMAX 2100XL tabloid-size flatbed scanner, and print my "contacts" up to 11x17", sometimes 13x19".

Printing is with an HP 8750 13x19" printer, which uses archival dye-based inks. I emphasize this because I haven't been too happy with the results I've gotten with the pigment-based printers I've used in the past (last one was an Epson 2200...yes, I know things have moved on a bit since then), and while I have tried third-party-based solutions, I tired of some of the tedium involved with their use rather quickly. My current printer offers up artifact-free prints, both color and black-and-white, together with longevity numbers that are within striking distance of your typical pigment-based print. Works for me. (I think this is the printer hansformat mentions a handful of posts back.)

This "hybrid' system brings out the best in film- and digital-based methods for me


- Barrett
 
Bill,
I used to struggle with scanning all the time. Finally, I learned that you just let the scanner do the walking. I have an Epson 4990 and Minolta Dimage Scan Elite 5400. Although the Minolta is supposed to be the cats meow, I actually like the Epson flat bed much better and use it exclusively now.

Here's the trick I learned that made scanning a pleasure for me. Just let the scanner do its thing. Don't fight it. It really does know better than you. With 35mm film, I just lay out six strips of 6 on the Epson provided film holder, put the scanner on auto pilot, and let it scan the entire tray. 60 minutes later I come back and have perfect scans. (Sounds like Betty Crocker, doesn't it?) I usually scan 35mm at 4800 dpi, although I have no idea if that scanner is really capable of that resolution. In any case, I really like the results and have no trouble printing at 13x19, the largest my Epson R1800 can handle. I always blow my negatives thoroughly with compressed air, and find that makes the biggest difference about not having to spot in post processing. I never use Digital Ice any more. It's so slow that I am sure the heat death of the universe would occur before it finished scanning a tray of 36 negs. I also never wear cotton gloves any more. How annoying to have to keep adjusting them! And I've never seen a fingerprint on any negative. Just handle them by the sides and make sure your hands are washed/clean.

I used to use the Really Right Scanning negative holders, but have found that the stock Epson ones, although much flimsier and cheaper feeling, work better. I rarely have to do much post processing to my scans. In fact, being very heavy handed usually gives bad results. I also use stock scanner software, with both the Minolta (when I used it) and the Epson. Works great, short learning curve, highly automated options.

Printing is done on my Epson R1800. I love it for color but it tends to color-cast B&W on occasion. I may get an R2400 to deal with this (or not).

In any case, I have basically found that going against the accepted scanner wisdom works better for me. Surprisingly, everything just comes out fine. Why? I don't know. It's a mystery. But I sure am happy about it.

/T
 
Last edited:
I'm using Nikon CS 8000 ED
Scanning BW silver films I'm
- trying to get rid of dust to avoid white spots with the squirrel brush rubbed against some clean cloth to make it "charged". The best way to minimize the amount of dust is to scan immediately after film is dry
- no bells and wistles in scanning programms (I use Nikon Scan or VueScan)
- for sepia tones I scan like a coloured negative in RGB
- for normal BW - monochrome and Grayscale
- 4000 dpi 14 bit (sometimes I put the figures in cm for the output print and scanner counts dpi itself, it's faster)
- 4x or 8x passing


This is the one of the recent results (Acros/D76 1:3/ 17 min), I was testing a new party of Acros bought . So no art in it, just test

7158885-md.jpg
 
Last edited:
I have the Nikon 5000ED and 9000ED. In my experience these are the two best scanners this side of an Imacon. The Imacon 343 (discontinued?) may be a touch better (also twice as expensive), but the difference is minimal. I wish these scanners would be able to generate a file in log space. The Cineon format was developed specifically with film in mind. The data is stored in log format (non linear) so it has as toe and shoulder just like film.

I would prefer to be able to make wet prints, but simply don't have the time to become a master printer. I'm pretty good at making a straight print, but once it involves split printing and complicated dodging and burning I'm out of the running.

So, unless it is a straight forward print I follow the current pipeline.

1) Scan - Sometimes I'll do multiple passes and assemble an HDR if I am losing shadow or highlight detail. But I don't make HDR images.

2) Dodge / Burn / dustbust / crop in Photoshop or Nuke. I limit myself to what can be done in the darkroom. That means no cloning, removal or addition of objects etc. I adhere to the same rules that a journalist should.

3) From the digital file I either generate a new negative containing all of the adjustments on a Rhino LVT, that is then printed wet. Or the digital file is sent directly to a Fuji Lightjet. Ilford is now selling a traditional glossy fiber paper that can be used in these machines and the results are impressive.

This process works quite well and allows me to make the prints I want. I'm never going to become a master printer in the wet darkroom. It takes an awful lot of practice and I would rather be outside shooting.
 
Last edited:
nikon 9000

nikon 9000

I use the nikon 9000 it seems to minimize dust that the 5000 does not. I guess the light sorce is different and helps. I was wondering if anyone has compared the minota 5400 and the nikon 9000 for b&w 35 mm negs . I am now printing on a hp z3100 great b&w digital printer.Thanks David
 
I've used a hybrid film/digital approach using scanners since I started shooting seriously in around 2000. I learned traditional darkroom techniques, but digital was already taking over & I lacked space for a darkroom; I also found that I enjoyed the convenience & consistency of digital printing. Currently I use a Konica-Minolta Dimage Scan Multi Pro for medium format & a Nikon Super Coolscan 5000 for 35mm.

Why both? Originally, I had only the K-M & used it for everything, but it died & I got the 5000 to use while I searched for a repair/replacement (this was right after K-M was acquired by Sony & took months). Once I had 2 working scanners, I discovered what Gabriel noted in his post (i.e., that the 5000 is faster for 35mm) & also decided to save wear & tear on the K-M to forestall another breakdown.

I have nothing to add re: tips & techniques, but do note that in my experience, scanners (@ least those below the Imacon level) have an easier time w/slightly underexposed negatives/overexposed slides & a more difficult time w/scratches as compared to wet darkroom printing/projection.
 
What Barrett said about the Minolta 5400, raw/.tiff scan, minimum possible Photoshop, and print on an Agfa d-lab 2, is the best route I’ve found so far.

And what Gabriel said about calibration, but that’s a real pain

now that's what ya call a printer :D
2162705568_d9b3bfdef1.jpg
 
I have a big Imacon and a little Epson. The difference in price between the two is almost $10,000. Guess which one does the best scans? What's amazing is how little the difference is when you use both well.

I have a friend who uses the Epson 750, the same as my little scanner, for the great majority of his film work. His secret is that he shoots medium and large format. And the lower priced scanner works very well with those formats. Often, with 35, he makes prints and scans them with the 750. There's no question that when you put the same 35mm neg on the Epson and the Imacon, the Imacon is "sharper." But there are ways of minimizing the difference.

I do no sharpening with the Epson scanner (I do with the Imacon.). I sharpen the "master" scan with a Photoshop add-on called PhotoKit Sharpener. When I resize a copy of the master scan to make a specific sized print, I do additional sharpening with PhotoKit Sharpener. After examining the final results I may add just a touch more sharpening, overall and local, with Photoshop itself.

That and intelligent tonal manipulation (realizing that losing a little of the shadow detail in the scan probably brings the final print closer to what you can do on silver paper with the original negative) can get a good print out of the more economical scanner. The smaller the print, the less difference between the results from the Epson and the Imacon. There is a definite, but not overwhelming, difference in prints with an image of 12x18. I've heard incredible things about the Minolta scanners. Imacon is the gold standard. But I've really come to feel the skill of the person operating the scanner and their skill in using Photoshop or some other program to print the scan is incredibly important. Of course, the same thing can be said about enlargers and the wet darkroom.

Bill
 
Bill: Couldn't agree more. Skill and experience are paramount. The fact that most everyone here is getting the results they desire with a fairly wide range of scanning gear would seem to bear this out. And, however much I know now, I'm learning more all the time.


- Barrett
 
I have a Minolta 5400 scanner. Several keys to good work are:

Flat film. Reverse curl it emulsion out for long enough. Wet mount, or use some form of glassbacking. Weight in a plastic sleeve under a book for 48 hours. The older the negs, the harder they are to get flat. A drum scan solves the flatness problem at hugh cost.
Epson V series flat beds can wet scan with good enough quality to make at least 8x10. This is no different than an enlarger.


I don`t tinker with the scan too much in the scanner. I capture the shadows and lighlights with a setting I save for that film. Color needs to be balanced if you are doing color film. Recall those settings for the next frame. Minolta and Nikon and Epson software all will do it.

Photoshop will set contrast and curve shape easier and faster than the scanner with no quality loss and you have the option to change your mind later if you save the original scans. The scan also goes faster.

Make a sharpness setting test in a FINAL size like you made an exposure test strip in the dark . Settings vary with size of print and paper. So save the final .psd file and return to it for retrials and different size prints.

Make small prints to see if everything is set up right before commiting to a larger one. They scale up better than a wet darkroom print does.

I never thought 40 years ago I would be writing advice to you. How things change. It is an honor.
 
One thing I’d love to hear people’s comments on:

Of late I’ve started scamming at the printers output resolution, 5400 on the neg giving 402 on the print at a little over 12x18 print size.

Doing that I don’t have to re-size at all in Photoshop. The resulting prints look a bit crisper to me, but I’m not sure if I’m fooling myself

Anybody else tried that??
 
I know the people here are biased toward traditional methods -- and I admit I am too -- but the one thing that the "digital darkroom" gives me is the ability to print at home, something I do not have the skill for or the room for when considering traditional wet printing. This is especially true when considering the fact that I shoot color almost exclusively.

Yes, I've wet printed B&W at times, in college and with friends' darkrooms, but there's no way I could get the results I get with any kind of a home wet darkroom set-up.

And, probably more important, what scanner. And have you found any techniques away from the standard ones particularly helpful?

I've had great luck with the K-M SD IV, the one that became an orphan shortly after I got it! :( I've actually done some rather stunning 12x18 prints from scans I did on it.

As far as technique, I've found that attention to detail all around is the most important thing there is when scanning and printing, everything from being sure the negative or slide is clean, to being sure there's no reflection from the window in the monitor when editing, to being sure you feed the printer what it wants to eat. :)

A couple things that work for me is to always scan at max resolution, 16 bits, multiple passes, when intending to do a show-off print. You can always re-size or re-res later. Another thing I do is use the scanner software only for scanning, maybe some minor levels and such, then do all of the real editing in Photoshop after the scan is done.

My new printer (HP 9180) is very tolerant of taking almost anything and giving a great print. My older one (a HP 720, a hand-me-down from my ex) was more picky, and for a long time I thought it was not capable of a show-off print. Then a local guy here gave me a test image file they use to check the Fuji Frontier and told me to print it exactly as is, don't re-size or re-res and I was AMAZED at the quality. The trick is, you send it EXACTLY 300 dpi, EXACTLY the size you want, and the results are amazing. If you let the printer and software re-size or re-res, you get those jaggedy lines and such.
 
What dmr said. (BTW, how are you liking that 9180?)

Sparrow: unless I'm absolutely, positively certain that I have no high aspirations for a given image, I always scan "full-stop" (max. resolution, 16 bit, single- or (rarely) multi-pass as required. Save as a "master". From there, you can do anything, from a gallery print to a shot-glass-sized file for use online or in a database, all without the tedium of re-scanning for a particular purpose.

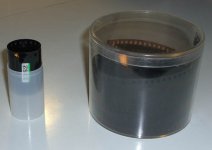
And, yes, flat negs are better-scanning negs, regardless of how iron-clad you think your neg holder is, especially with 35mm film. Home-processed film usually dries flat for me (It might just be luck on my part, but having a hanging electric film dryer helps a bit); lab-processed C41 is often a different story. If I'm in a hurry, I snugly (but gently) "b'wind" a roll and place it halfway down a film canister (image left), which is just as effective as sticking it all the way in, but a lot easier to remove without harming the film. Usual "flattening" time is ten to twenty minutes, depending on the season. :)

attachment.php


In the event that you have a lot of rolls to b-wind at once, something like the container on the right (origin unknown) will work just fine. Bulk-film cans and empty CD/DVD spools also work.


- Barrett
 

Attachments

  • bwindpair.jpg
    bwindpair.jpg
    51.9 KB · Views: 0
Back
Top Bottom