Scanning dense BW negatives with Vuescan/Coolscan 8000

brothernature

Established
Local time
12:46 AM
Joined
Oct 2, 2018
Messages
148
Hello!

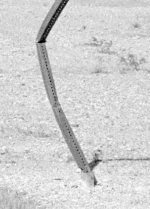
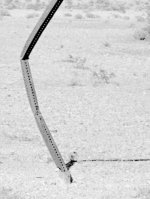
I'm trying to scan some slightly dense negatives with my Coolscan 8000. I have no trouble getting shadow detail out of these negs in the darkroom, but in the scans the darkest shadow areas are totally crushed. Here's what I've tried so far:

  • Setting the Curve low and high to the smallest values
  • All the unexposed parts of the negative are cropped out during scan
  • I've tried scanning as a slide
  • Setting "Multi exposure"
  • Increasing the number of samples (I tried 3)
  • Setting lock exposure
  • Scanning as 64bit RGBi

I've attached what the raw TIFF file looks like inverted in ColorPerfect and what the preview area shows in VueScan (which looks slightly better).

Anyone have any ideas? Feel like I've tried so many combinations that I'm going crazy.
 

Attachments

  • Screen Shot 2018-10-29 at 5.48.36 PM.jpg
    Screen Shot 2018-10-29 at 5.48.36 PM.jpg
    33.8 KB · Views: 0
  • Screen Shot 2018-10-29 at 5.47.19 PM.jpg
    Screen Shot 2018-10-29 at 5.47.19 PM.jpg
    30.9 KB · Views: 0
Wait, they're dense and you talk about shadow detail? I don't understand.
In any case almost all the information is there in the left one, only a few small spots of pure white. I don't know about your scanner but could it be that it just needs post processing? Can't expect the scanner driver to do everything... just spread the values out and it looks decent.

I misspoke, the negative is overdeveloped, the shadow areas are very contrasty. As you can see in the second pic, the shadow of the pole is completely black, so increasing the brightness of the image even a little causes the edges to be very jagged. In my darkroom print, the shadow has detail.
 
The curve values should stay relatively where they are. I sometimes bump them to .3 and .7 to get a little more contrast, but changing them past that significantly won't do you any favors.

The lock exposure setting is supposed to be set on the space between the neg, not on the neg itself. That may be throwing your exposure off if you aren't doing it right. Make a crop between the negs and then lock the exposure. You can then re-preview the neg and re-crop for your image.

Set the Black Point % under the Color tab to 0. If that doesn't do it, you will have to back off the exposure until you get what you are looking for.

The multiple exposure setting is for highlight values, not shadow values.

The number of samples is to reduce noise. It won't have any affect on the exposure.

Hope that helps you.

Thanks for the help!

I found that adjusting the black point in ColorPerfect allowed me to get more detail out of the shadows, from there I could bring back contrast with adjustment layers. This seems to be working pretty well. Thanks again.
 
Back
Top Bottom