mooge
Well-known
It's out there, and cheaply enough if you avoid the big medical/lab suppliers...here's a link to an ebay listing (in Canada, of course). Enough to do dozens of prisms.
Cheers,
Brett
that's exactly what I bought. in the description, they mention xylene and it's a little misguiding-- there's no xylene required. It's good straight out of the bottle.
Good enough for dozens of prisms and presumably you can eat it too if you believe their description! it also sticks to your fingers like nobody's business. At least your fingers will smell nice though. (I can't get over how nice it smells, really).
Rick--
I started tinkering when I started photography; it was part of the appeal for sure. I guess I was 15? Started with a Pentax ME super (which still doesn't work) and Tomosy's book, which I found in the local library. Good stuff. The ME super only worked for a little while and the sticky bumper issue came back...
Thanks everyone for the comments! I really appreciate it.
Rotarysmp
Established
Ron (Netherlands)
Well-known
great work, thanks for posting...
maybe an alternative or short cut for a M3 beamsplitter: to use a halfmirror of a Z4...of course dimensions have to be checked...
mooge
Well-known
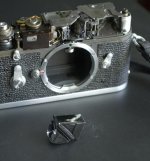
My M2 looks like this (sort of, anyways):

That was taken right after I messed up the aluminum semi-silvering. Pulled the RF out of the chassis, covered the holes with Polaroid darkslide cardboard and masking tape (because that's how it's done) and stuck with the 12mm for a while.
Recent changes include some stickers and possible corrosion... and since the front side is the good side, it doesn't really look that bad.
Note the shoelace strap with two knots (I learned my lesson)!
I'm pretty sure a semi-silvered mirror can't be used-- you can't just glue that in between the beamsplitter prisms and not change the optical path.
tomtofa
Well-known
Great work and write up, very clear - except for the alignment test in #10. I understand the real world test of tripping over a tent to check the prism's stability, but just how big a tent did you use? I'd hate to try this resilvering procedure and screw up at that point ;-)
Tom
Tom
R
rick oleson
Guest
If you don't have a suitable tent, you can make a usable substitute by laying a tarp over a rope stretched out at about mid-calf height.
marzipan
Member
Epoxy
Epoxy
Great work! And it is not only you who is this crazy. Let me explain.
While travelling, my M2 fell off a table in Amsterdam. When I arrived in Paris the prism fell apart, leaving me with a black finder.
Back home I investigated my options (and my wallet) and decided for yet another DIY repair. I cleaned the 2 halves of the prism in an acetone bath, careful not to touch the silvering. I had no access to real materials (and I was in a hurry) so since it seemed that the real UV curing cement is really a kind of epoxy, I got some clear Araldite from the hardware store (2 part epoxy glue). Tested my theory by glueing glass pieces together, and since it looked completely clear if I used only a thin layer, I went ahead and did the prism. It worked! No bubbles, no dimming, no worse than before. The old silvering was not as good as on a new Leica but usable enough. This was in 2007 and I still use this M2 a lot. Having compared its finder to newish cameras in the store, I must say that it is quite OK but not perfect. But when possible, I would eventually like to replace the prism with a proper one to get that last inch of amazing clarity that good Leicas have.
But for a 0-budget DIY job it worked well
Attachments
John Shriver
Well-known
I believe Leica does not sell piece parts for the M rangefinder assembly, they will only provide the entire assembly on an exchange basis (send the broken one back).
kinoglass
Established
Canadian basalm is dangerous to handle
Please read safety precautions when handling Canadian balsam. It is no joke!
:angel:
Canadian basalm is dangerous to handle
Please read safety precautions when handling Canadian balsam. It is no joke!
:angel:
goat2017
Newbie
A Japanese camera service company (Kanto Camera) is providing the re-silvering service. But I believe many companies in US are able to do this simple job. My guess the main prism on Leica M2/M3 is in regular shape and could be easily made through reverse engineering. Someone with access to a lab should start a Kickstarter project for making the main prism.
shawn
Veteran
Old thread but good writeup. This site has another writeup on tackling this on a M3.
https://garbugli.wordpress.com/2018/06/07/resilvering-the-leica-m3-beamsplitter/
Anyone else tried this?
Shawn
https://garbugli.wordpress.com/2018/06/07/resilvering-the-leica-m3-beamsplitter/
Anyone else tried this?
Shawn
Share:
-
This site uses cookies to help personalise content, tailor your experience and to keep you logged in if you register.
By continuing to use this site, you are consenting to our use of cookies.