SP rangefinder patch, again

Fred R.

Established
Local time
3:14 PM
Joined
Oct 16, 2005
Messages
114
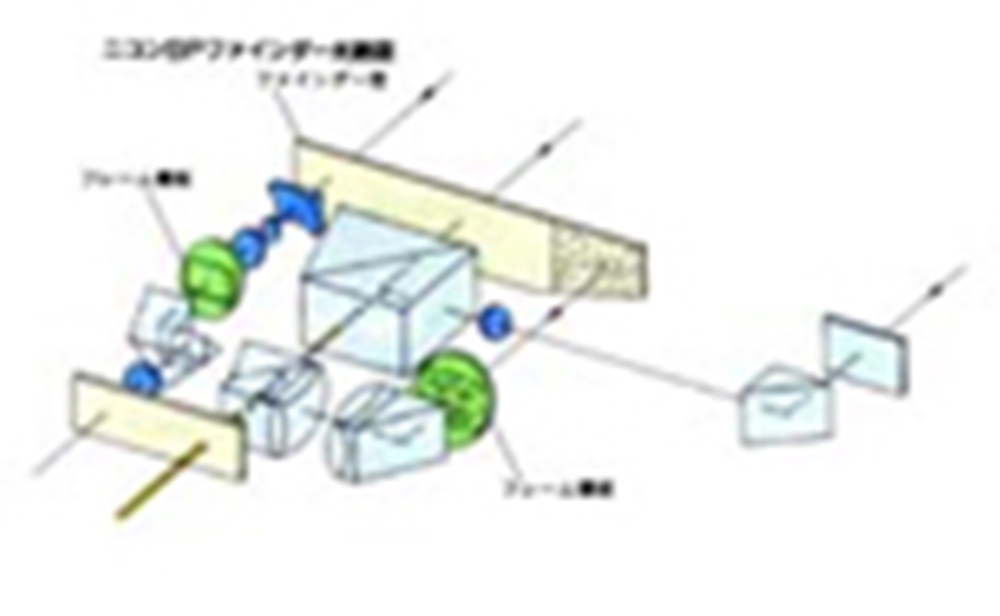
Recently I've come across a beautiful SP with a very faint rangefinder patch. I've read numerous pages of opinions on what to do about that and am left with the impressions that, 1) it's a coin toss as to whether it will improve with cleaning, 2) you have to pay first to find out, and don't hold your breath for a positive outcome.

Is this still the common thinking about the effort to make these cameras usable?

Fred
 
As a wise old dealer once told me, the really beautiful vintage SPs are often beautiful because they had faint patches so didn't get much use, while the beaters are beaters because they had/have strong patches which made them useable.
If you are a shooter and not a worshipper, its better to find a camera whose cosmetics are a 6 and mechanics & optics are a 9 than vice versa. Thats what I've always done with any used camera I've ever bought. Mine may look like crap but they work like champs.
 
Vick: I tried coloured gels. No help at all in this instance. I wouldn't have the cojones to try the cleaning myself.

rbsinto: Haha, do you mean the SP from new could have had a weak patch? Yep, I'm a user, so your advice is sound. . . though it lets all the "looks like new" GAS escape.
 
That is why the wise photographer stuck to the Nikon S2 in the 1950s, as these models had a pretty good and contrasty RF patch, even if he had to take 3 bodies along because of its simplistic viewfinder ;- ))

Picture3-5.png
 
Vick: I tried coloured gels. No help at all in this instance. I wouldn't have the cojones to try the cleaning myself.

rbsinto: Haha, do you mean the SP from new could have had a weak patch? Yep, I'm a user, so your advice is sound. . . though it lets all the "looks like new" GAS escape.

I have no idea either how long or under what conditions the patches fade, so I can't speak to that issue. And as for the "looks like new" business, it's not something I've ever concerned myself with. My cameras are tools for making pictures, and nothing more. I never spend time fondling or worshipping them as some others do, so their cosmetics are of no importance to me. As long as they are optically and mechanically sound, I'm a happy camper.
 
That is why the wise photographer stuck to the Nikon S2 in the 1950s, as these models had a pretty good and contrasty RF patch, even if he had to take 3 bodies along because of its simplistic viewfinder ;- ))

Picture3-5.png

Wonder if this lad ever complained of a sore neck...

;)
 
I have cleaned an SP finder (actually several and a few S2s too) with a very weak focus patch and brought it back to life. I wonder how many others posting in this thread can say that???

A friend asked me to clean the finder in his SP a few years back. The focus patch was so weak it was unusable and he was ready to toss the camera into the ocean (his exact words).

Well, I got the camera, pulled the finder out, and cleaned every nook and cranny of the finder I could access. The thing that made a HUGE difference was cleaning behind the half mirror. When I cleaned there, the focus patch went from being almost invisible to 95% as good as the focus patch in a new Nikon SP 2005 reissue.

Here is a photo of that finder. The half mirror is that little piece of glass way over on the far left. The gap behind the half mirror is very small so I had to use lens cleaning tissues to clean behind it. Most repair guys won't bother cleaning there because its fiddly and time consuming. But if you don't clean there, any other cleaning is basically a waste of time because it won't make much difference.

4367538388_eeecdf0cdb_o.jpg
 
Hmmm. Thanks for the information Jon. The optical diagram shows the element to the far left is a 45 degree prism. Are you saying clean the entry face and exit face of that prism?

159a.jpg


The prism (half mirror) is the far right on the optical drawing.
 
Hmmm. Thanks for the information Jon. The optical diagram shows the element to the far left is a 45 degree prism. Are you saying clean the entry face and exit face of that prism?

159a.jpg


The prism (half mirror) is the far right on the optical drawing.

Hi Vick, no I'm saying you have to clean the third surface (45 degree angled surface) at the back of the glass block. Cleaning the entry and exit surfaces is a good idea too, of course.

The techs at Kiitos Camera Repair (Nikon specialist in Japan) use bamboo paper to clean in behind there as its thin but also rigid. I made do with lens cleaning tissue folded into several layers and dampened with a few drops of lens cleaning fluid.
 
I just dug up an old photo I took while cleaning the half mirror out of an S2. Unlike the SP, the half mirror in an S2 is not part of the main finder assembly so can be removed and cleaned separately (which makes cleaning a lot easier). After cleaning, the focus patch of this particular S2 went from being fairly good but not great to as good as or better than an SP 2005.

11142993463_c11a4af2a1_c.jpg
 
Years ago, I purchased a SP with a very weak patch. I had it cleaned but still weak so I had it resilvered. Even then, it is nowhere as bright as my S2 patch.
 
holy ^)&*&!!! :eek::eek::eek:

I just read this now! I just finished cleaning my SP's half mirror and i wish I saw this earlier! :bang:

by the way, i was prepared to cut a glass filter for my S3 last month or so and I read something here about using gel instead. by coincidence I have a blue 20 fujifilm gel that I use for C41 digitisation, that advise came in handy and it saved me a lot of time! which thread was it? hoped I bookmarked it,
my wide finder has a healthy growth of fungus in it, I will have to sit on it on golden week because simply looking at the repair diagram somebody gave me I can say that it looks like a bloody mess to work with!

good thing the shutter is accurate so far according to my handy shutter tester!
 
my wide finder has a healthy growth of fungus in it, I will have to sit on it on golden week because simply looking at the repair diagram somebody gave me I can say that it looks like a bloody mess to work with!!

The wide finder is a very delicate thing indeed.

Cleaning the fancy little prism at the rear of the assembly is a bitch of a job. Chances are, that it will break when you either take it off or put it back. Also, it's glued in place...

Cleaning the Galileo finder at the front of the assembly is safer but do never ever clean the rear side of that finder (on which are the etched and black painted 28-35 frames) with some optics cleaning fluid nor alcohol at the risk of immediatly wiping the frames off !

In any case you will want to remove and replace all the black foam pieces and small frames within the assembly if they have turned into sticky goo which deposits on the optics. Again, this is not very easy...
 
Back
Top Bottom