Response to Looks Amazing / portillagee
Response to Looks Amazing / portillagee
Hi portillagee!
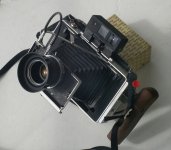
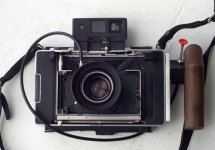
Well, attaching the graflok back was not that difficult. The first step involved placing wood blocks cut down to size on each end of the camera where the back originally mounted. Now you will have to drill/cut out the excess plastic on each side to give the wood clearance to fit. The right side of the camera has more plastic to grind out (use a Dermel tool or get a cheap one for $9 at Harbor Freight Tools like I did) due to the battery chamber. I then used epoxy to glue the wood into the camera. If you noticed, there is a grip on the left side. This was taken from an old Stoboframe bracket that I cut down to size. There are screws that hold the Stroboframe hand grip to the side. These screws also screw into the wood in the old battery chamber, hence providing an even more secure attachment point to the camera. Now the Graflok back had to be shaved down a bit on top and bottom to make room for the viewfinder (1/2 inch or so. About to where the Graflok and ground glass locking pin is on the back. Do not cut past the pin or you will not be able to attach your ground glass!!!) . Durhams water putty (Rocky Sayz Rock Hard!!! I love this stuff!!! I use it for everything around the house!!!) was used to fill in gaps where the wood blocks were inserted. This gives a nice smooth professional look after painting satin black. The next step is to drill extra holes on each side of the Graflok (3 on each side). Make sure you countersink a bit and use flat head screws so when you slide the back in. it goes in smoothly instead of getting caught on an exposed screw head. You then need to get some scrap mat or museum board (4 ply)and space the back for infinity focus. You only need two pieces verticle on each side of the Graflok back. You then screw in the back on each side (place the museum board in front of the screw holes. The screws will go through the mat board and into the wood block, attaching it to the camera. Make sure that before you attach the back, open up the lens and check to see if the ground glass is in the right position. You then have to seal the back to make it light tight. Just smear in some Durhams Water Putty, and smooth it out with a knife to give a nice streight edge angled toward the inside of the bellows. When dry, lightly sand, and paint flat black. The spacer for the rangefinder was made of cut hardwood (cherry) so the entire rangefinder housing can be elevated up so just the eye piece clears the Graflok back (use epoxy to glue the entire rangefinder onto the hard wood. The hard wood was glued onto the top of the camera with epoxy. To connect the rangefinder pin to the focus lever attached to the camera body, I used some scrap metal that had an L shape. I drilled 3 holes. Two on each end of the scrap metal, and one on the end of the focus lever. A piece of plastic was used on the end of the l shaped scrap metal so the pin on the rangefinder would engage without moving back. All of this was bolted on with small sized brass screws. The lens was attached by first removing the old lens, the electronics and parts. you then have to grind some of the metal that may obstruct the new lens, both the flat areas in the front, and the lens opening itsef (it must be wider to accomidate the new lens).
your 135mm lens should be similar to my 127mm, although you may need to space it a little more for infinity, so have some thinner mat board handy . When you focus with this thing, you must adjust the rangefinder pin by bending it slightly to your right for the distance range you are using. So for closer photos, adjust the connecting arm so the area of focus will be sharp in that zone of focus. then for objects farther away, zone focus by using the right f stop to get the depth of feild you want. Once you practice a bit, this thing handles like a 4x5 Leica!!!