Using Photoshop to adjust brightness and contrast

SciAggie

Well-known
Local time
12:18 PM
Joined
Dec 22, 2010
Messages
541
It seems that many of us who shoot film scan our negatives and process our images in a digital work flow. Most of my images require some form of adjustment for contrast and levels, maybe even brightness.

I was wondering how many people use the layers blending modes as well as the layer adjustments for levels and contrast. I found a nice tutorial related to layers (it even uses B&W in the examples) that has expanded my options for my images. http://www.photoshopessentials.com/photo-editing/layer-blend-modes/

I guess I am curious as to what workflow others have, particularly their use of layers and blending.

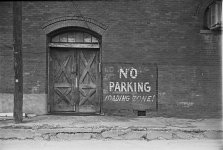
I'll throw in a couple of images for discussion:
unaltered scan:
p908851267-3.jpg


after editing using layer blending:
p996073517-3.jpg
 
My first action is "threshold" which gives me the absolute white/black points. Then curves to adjust contrast.
 
i very rarely use curves or blending. Usually use levels, brighness/contrast and very often select areas and create new layers to work on specific areas without affecting rest of image.
Barely any noticeable difference from your version unless you put them side by side.

attachment.php

View attachment 87520
 
Last edited:
In the darkroom brightness and contrast were adjusted, contrast with filters and brightness with of the exposure to the paper....So goes with a scanned B&W neg. Use adj layers to achieve the same thing with even more control on the image....

Marko
 
I use curves instead; they stop detail falling off the end of the histogram. My scanner tends to give results that are too light and low-contrast although all the detail is there. It is amazing how much shadow detail Neopan Acros gets even at its box speed.
 
I find adding contrast with blend modes problematic because the highlights and shadows are too extreme for my taste when the mids aren't how I want them. In your example, the highlights are brighter than I would want them, I used curves to pull them down, and added a little s curve. Obviously it's a matter of what you want aesthetically, but I do prefer the direct control of curves.

edit: and it looks much greyer now than it did in DPP, huh!
 

Attachments

  • p908851267-3edit.JPG
    p908851267-3edit.JPG
    186.2 KB · Views: 0
Last edited:
I find adding contrast with blend modes problematic because the highlights and shadows are too extreme for my taste when the mids aren't how I want them. In your example, the highlights are brighter than I would want them, I used curves to pull them down, and added a little s curve. Obviously it's a matter of what you want aesthetically, but I do prefer the direct control of curves.

edit: and it looks much greyer now than it did in DPP, huh!

I see your point. I am just now learning how to use the blending modes - I guess I am looking at them now as another tool I have available to me. I agree I cooked things too much in my example. I seem to always overdo things at first; then I learn more control and am able to apply tools more effectively.
 
when I used PS7 for 8 years, before I switched to Lightroom, I used curves for most of my contrast and brightness adjustments. I rarely used layers for anything (though I see when it can be useful).
 
Don't get me wrong, I've seen some cool stuff in books (Real World Photoshop, I think?), but when I experimented it seemed to be required that you paint the blend mode in on certain areas that you wanted it, rather than a global edit. That's just not my thing!

:)
 
I made a decision some time ago that it is perfectly acceptable to clip some shadows for effect. Often trying to retain the deepest darkest detail just doesn't work for the whole image. There is a limit though. Really depends on just what you have in the neg and what is important. People get hung up on shadow detail too much sometimes. Clipping shadow detail can increase local contrast throughout the image which is no bad thing.
 
I use levels and curves as adjustment layers.

I'm toying with saving my scans as Tiffs and then bringing into Lightroom as DNGs and working on them there instead of photoshop.
 
I have no clue how to use layers, so thank you for the link to the tutorial!
I've been using brightness/contrast and levels to make adjustments globally to the whole image. Need to check out curves too.
 
The only editing I do in photoshop is contrast/levels, sometimes brightness. And occasionally I'll use the cloning tool to get rid of dusk that I missed.

The level tool is really useful for me. That tends to be what I use most, and usually all I need to set
 
Back
Top Bottom