philipus
ʎɐpɹəʇɥƃı&
Maybe one of you scan wizards could help me figure this one out ")
When I scan reversal film (Velvia 100 below), I find that there are rather large discrepancies in brightness between:
Let me explain.
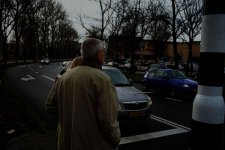
Image 1 (from left to right) is a screenshot from Vuescan's preview. It's rather flat looking but quite bright.
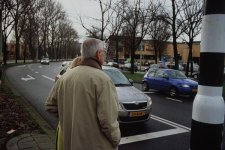
Image 2 is the same image when first opened in Photoshop. I did not make any adjustments but only saved as JPEG. It is considerably darker than what Vuescan saw in the preview.
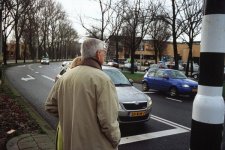
Image 3 was opened in ColorPerfect's TouchUp mode and I pressed the "G" button next to the TouchUp/ColorNeg/ColorPos toggle to switch to "L" for linear scans. This brightens the image a lot.
to be continued in the next post with the fourth image...
When I scan reversal film (Velvia 100 below), I find that there are rather large discrepancies in brightness between:
- what I see in Vuescan
- what appears in Photoshop upon first opening of a scan
- what ColorPerfect produces in TouchUp mode and
- what ColorPerfect produces when Blacks have zeroed out highlight clipping.
Let me explain.
Image 1 (from left to right) is a screenshot from Vuescan's preview. It's rather flat looking but quite bright.
Image 2 is the same image when first opened in Photoshop. I did not make any adjustments but only saved as JPEG. It is considerably darker than what Vuescan saw in the preview.
Image 3 was opened in ColorPerfect's TouchUp mode and I pressed the "G" button next to the TouchUp/ColorNeg/ColorPos toggle to switch to "L" for linear scans. This brightens the image a lot.
to be continued in the next post with the fourth image...
Attachments

philipus
ʎɐpɹəʇɥƃı&
Image 4 is even brighter. Here I have moved ColorPerfect's Blacks slider until the Highlight: Clip box moves just above 0,00 and then back to 0,00. I find with all my reversals that I can move Blacks up a lot before the Clip box starts moving above 0,00. This brightens the image quite a bit before highlights clip.
So my two questions are:
1. why doesn't Photoshop see the same bright image Vuescan sees
2. (though it is possibly answered by the first question) why is there so much latitude in the Blacks slider before highlight clipping occurs.
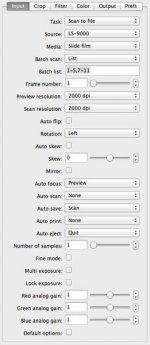
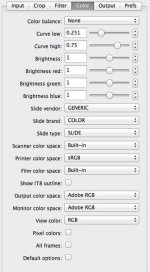
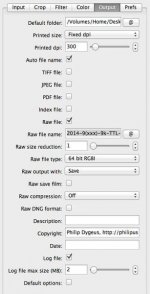
Now the settings in Vuescan.
So my two questions are:
1. why doesn't Photoshop see the same bright image Vuescan sees
2. (though it is possibly answered by the first question) why is there so much latitude in the Blacks slider before highlight clipping occurs.
Now the settings in Vuescan.
Attachments
philipus
ʎɐpɹəʇɥƃı&
brbo
Well-known
You are scanning to RAW. RAW file is linear, no gamma curve applied.
philipus
ʎɐpɹəʇɥƃı&
Thanks Borut. Is it really that simple? I was thinking this too but couldn't understand why also Vuescan's preview wouldn't reflect the lower brightness.
brbo
Well-known
Yes, it's only that.
Vuescan will, AFAIK, always display gamma encoded preview. At least I don't know how to set it up otherwise. You can get a RAW histogram, though.
Vuescan will, AFAIK, always display gamma encoded preview. At least I don't know how to set it up otherwise. You can get a RAW histogram, though.
max Trader
Newbie
I agree that the raw output (linear gamma) is the major discrepancy -- but note two other error sources: the monitor color space is very unlikely to be Adobe RGB (use SRGB as the default unless you have profiled your display -- in which case you point Vuescan to the profile created); further the Vuescan preview uses data from the prescan (always at nominal exposure values unless set to exposure lock) rather than the final scan (exposure values are calculated from prescan results but are interpolated to appear as similar as possible to final scan). Of course there is a selection for viewing the final scan as well (and this would reflect selected color space --Adobe RGB -- and color balance, even if the file you actually output -- raw-- does not).
Richard
Richard
philipus
ʎɐpɹəʇɥƃı&
Apologies for the delay in replying. Thank you for the further insights. I learn something new every day, great.
Thank you Richard. Oddly I am not able to select my monitor colour space (which is Adobe RGB-based) in Vuescan. It's greyed out and can't be selected. That's why I picked the generic Adobe RGB. This is obviously not great if one wants proper colour management but I don't know how else to select the monitor colour space.
The selection for viewing the final scan, where do I find that?
Cheers
Philip
the monitor color space is very unlikely to be Adobe RGB (use SRGB as the default unless you have profiled your display -- in which case you point Vuescan to the profile created);
...
Of course there is a selection for viewing the final scan as well (and this would reflect selected color space --Adobe RGB -- and color balance, even if the file you actually output -- raw-- does not).
Richard
Thank you Richard. Oddly I am not able to select my monitor colour space (which is Adobe RGB-based) in Vuescan. It's greyed out and can't be selected. That's why I picked the generic Adobe RGB. This is obviously not great if one wants proper colour management but I don't know how else to select the monitor colour space.
The selection for viewing the final scan, where do I find that?
Cheers
Philip
max Trader
Newbie
If you choose "Profile" under Monitor Color Space, is your desired choice available as a .icc or .icm selection? (If I remember correctly, there's only a slight format difference between them, but it might be enough for your system to interpret it as corrupted).
Above the Window to the right of the "Option" Pane you posted, tabs should allow selection of Preview or Scan.
In the Preferences list, you can find a check box for "Display Raw while scanning."
Richard
Above the Window to the right of the "Option" Pane you posted, tabs should allow selection of Preview or Scan.
In the Preferences list, you can find a check box for "Display Raw while scanning."
Richard
Rangefinder 35
Well-known
Congrats: whether intentionally, or by accident you stumbled into RAW scanning of your transparencies. If you're doing everything correctly, they initially look like s..t when opened in Photoshop. Now is the time to change their profile ( I use Adobe 1998, as my monitor is calibrated to that; it's fairly large color space ), crop, and after cleaning to apply curves layer, which will make them look normal. I save resulting image as psd file. Because curves is a separate adjustment layer, you can always come back to it in future and change it. This is your archive file. If you want to print it you have to flatten the layers, change psd to tiff file, and change profile and size it to the needed print size requirements. And you're right there...
Last edited:
philipus
ʎɐpɹəʇɥƃı&
Vuescan will, AFAIK, always display gamma encoded preview.
A very delayed follow-up question on this very helpful thread.
How can I find out by how much the gamma differs between the gamma-encoded view which Vuescan displays and the image as it looks in Photoshop? Of course I can play around with Photoshop's Gamma tool but I am seeking to create an action to do this automatically.
Many thanks in advance
Philip
Particular
a.k.a. CNNY, disassembler
The gamma of the raw file with no profile attached will be 1.0. Vuescan probably uses 2.2 which is the default gamma for most monitors. The vuescan manual says it is not an accurate representation of the file, and should not be treated as more than a preview.
philipus
ʎɐpɹəʇɥƃı&
Great thanks a lot, much appreciated.
philip
philip
Share:
-
This site uses cookies to help personalise content, tailor your experience and to keep you logged in if you register.
By continuing to use this site, you are consenting to our use of cookies.