What height is your Doug Fisher MF holder set to?

TJV

Well-known
Local time
11:47 PM
Joined
Nov 27, 2006
Messages
595
Location
Cloud Nine
Hey all.
I just received my DF MF holder / neg mask for my Epson V700 and have been trying to set it up. It seems best set to sit at 1.6mm heigher than flat, eg at 4.1mm total as opposed to 3.5mm as Epson's mask allows max. Is this a "normal" variation? It seems pretty high, doesn't it?

I'm a bit surprized at the holder itself. Although it is a lot more rigid than the Epson holder it's pretty fidley to use. Does anyone have any in the know tips on how to handle it for quick opperation. Doug's site suggests placing the first t-lock at the end of the holder first, pulling the film gently tight and placing the middle lock. Is this how you're all doing it?

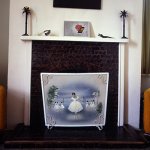
Here's a 100% crop of a scan, originally at 2000dpi. Does it look as expected? I'm used to a Nikon 5000 so I'm not sure what detail to expect from a flatbed. There's no sharpening applied and I used Vuescan.

Tim
 

Attachments

  • cropped-test.jpg
    cropped-test.jpg
    299.4 KB · Views: 0
  • full-frame-test.jpg
    full-frame-test.jpg
    141.5 KB · Views: 0
TJV
The thing to do, is to set up the height first - I did it in the following manner:
1 - I put a metal ruler against the points where the screws come out, and I started turning the screws. till I could establish by inspection, that the tip was just touching the ruler without making it separate from the holder- i.e. I've established the "ground level"
2- I placed a piece of film in the holder (I used the glass insert to keep it flat) , I suggest you simply place the film, insert the t locks in the most logical manner to keep the film flat, and then you select an area of the film next to one of the two extremes of the holder and about half way between the edge and center of the frame - this is the "average" film height in my opinion
3- I started making scans, the first one with the "zero level" holder, and then each time, after making a FULL TURN of each screw - this will probably make you do 5 or 6 scans before it starts feeling too high
4- I enlarged the crops to observe where the optimal results were placed
5- I went back and did the scanning in steps again, this time in a QUARTER TURN increments around the "sweet spot" to fine tune the result

MAKE SURE that the holder is placed correctly at the edge of the glass bed without it going over the edge, as this will send your scanner into confusion and will not produce a desired output.

The scanning should be done at a high DPI - I suggest 6400 DPI BINNED IN 2, otherwise it will be difficult to make sense of the differences.
In reality this scanner has a max optical resolution of about 2200-2400dpi, which is only reachable if you scan at the nominal 6400 dpi. Binning makes sense, because this way you obtain the highest optical resolution possible, but with a more manageable file size and less artifacts.
To get the best out of this scanner, you have to use high nominal dpi and sharpen a lot. With the best technique, you might be able to get a decent 8x enlargement, although at 5-6 times you are safer.
Fot taming really curly film, do get the glasss inserts.
Ciao.
Marek
 
Last edited:
Keith
If you go to the Output tab in Vuescan, you have the option for a Tiff file reduction, where you can set the reduction factor. The same can be done later in PS, but this way you avoid handling the large files resulting from a high dpi scanning in Epson. As far as I remember, a 6400 dpi RGB file from a 6x6 film results in a 700meg file.
Since 6400 dpi is the "native" Epson V700 resolution, it makes sense scanning at multiples or halves, quarters of this number, so 400,800,1600,3200,6400dpi should be the preferred settings.
 
Great reply, thanks! I had no idea that scanning at 3200dpi etc made more sense, but now that I think about it in relation to how a computer screen resamples to fit a massive image, and that you only really see the pixels at 100% on screen, it certainly seems logical.

I might repeat the steps of setup with the glass insert I got with the holder. Does the result I've posted seem within the limits of the scanner though?

I really appreciate your great answer!

As far as comparing to scans I made on a coolscan 8000ED, is can see the Nikon really has bite in the grain in comparison to the Epson but the difference isn't great, definatly not $4000NZ better than the Epson.
 
TJV, it is difficult to judge the results on screen. In my opinion, a flatbed like Epson V700 with respect to a dedicated film scanner, sets you back one format, so you get the same quality from a 6x4,5 as you would from a well scanned 24x36mm capture.
Here's the real point - if you shoot 6x7 you will still be ahead, and all the more so with 4'x5', but the smaller you go, the more you risk to be ridiculed by a digicam...

There's a truth worth stating over and over again: the final quality of your image depends the most on your worst element in the chain, because, to simplify, your final MTF is a result of multiplications of values smaller than 1.
In my opinion, buying expensive lenses for your camera, and cheap lenses for your scanner does not make sense - you'll do better with cheaper lenses and a good scanner.
A V700 will let you enlarge with top results 4-6x, the Nikon 8-12x, it is up to you to decide if this is sufficient.
 
Back
Top Bottom