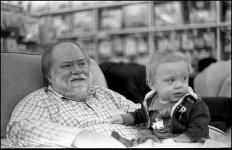
When everything is gray....

anitasanger

Well-known
Local time
1:06 AM
Joined
Dec 10, 2010
Messages
358
How is it that sometimes an image looks properly exposed, yet everything looks grayish, especially skin tones. I know that a camera's meter wants to turn everything gray, and in this case it has. I just don't know or understand why. I've recently purchased the Ansel Adams how-to trio and hope to learn the zone system intimately. However, I just don't understand how sometimes everything is relatively exposed in a proper manner, but everything is gray, when a shot is taken on the same roll where Caucasian skin tones look white as they should. It's perplexing and here are 2 examples from the same roll. The first photo has gray skin tones, and well...everything really. And the second depicts a more accurate portrayal of a properly colored skin tone. It can be downright maddening. The shots were from the same roll with, Tri-X exposed at 200, souped in Rodinal 1:50. Pardon the dust and or streaking.


gray by saveamerika, on Flickr


notgray by saveamerika, on Flickr
 
Did you scan the negatives? Some scanners can't handle hilights in the background, and make the rest of the image dull and without contrast.
 
You may also want to explore contrast filters. The background may be light to a similar level, but if the color is different, a contrast filter could help give you some separation between tones.
 
I hope you'll excuse my fiddling and reposting your pic, for demonstration purposes! I worked on the histogram, moving the black slider up to 38, moving the center slider leftward to 10 to lighten some mid-tones, and the highlight slider shifted down to 252. Then added a bit of sharpening and scaled it down. Seems to look a little better with the darks darker. How well does this address your grayness issue?

attachment.php
 

Attachments

  • 5379670347_668e18cfdb_b.jpg
    5379670347_668e18cfdb_b.jpg
    98.4 KB · Views: 0
Last edited:
Pulled up the midtones, clipped some blacks to add contrast to the shadows, pulled the highlights down a little, they looked a little bright. Just an example, I think I went a little too far maybe.

grey.jpg

levels.jpg
 
I hope you'll excuse my fiddling and reposting your pic, for demonstration purposes! I worked on the histogram, moving the black slider up to 38, moving the center slider leftward to 10 to lighten some mid-tones, and the highlight slider shifted down to 252. Then added a bit of sharpening and scaled it down. Seems to look a little better with the darks darker. How well does this address your grayness issue?

Hah! You beat me to it! Great minds, huh?

:)
 
Its perhaps a case of the scanner not knowing the result you want, so you just need to tell it, as Doug has said by altering the tone curve, either at the scanning stage but its often easier in post processing.

In fact I think the first image is absolutely perfect for the type of scan you need to work with in post processing, flat and with no blown areas in the highlights. You then have the widest range of tones available. How you go about post processing depends on the software you use, but a package such as NikSoft 'Silver Efex Pro' as a plugin to Photoshop is ideal. Your tools for adjusting the tonal range are all easy to see and easy to use.


Steve
 
Awesome, thanks guys, I don't mind at all. I'm just now learning how to fiddle with the levels and these examples help out a lot! How come sometimes the skin tones turn out more true like in my second posting? It was scanned on the same scanner.

Thanks again,
 
Awesome, thanks guys, I don't mind at all. I'm just now learning how to fiddle with the levels and these examples help out a lot! How come sometimes the skin tones turn out more true like in my second posting? It was scanned on the same scanner.

Thanks again,

More contrast in the lighting. One of the reasons I stopped shooting digital is to get away from low contrast lighting every damn day.

:)
 
It all boils down to the tonal adjustment. Go on the net and google for using the curves in PS to learn how to do it. Yor photos are perfectly ok,but they need the finishing touch. BTW a great lens rendering in that first portrait - was it the Summicron?
 
It all boils down to the tonal adjustment. Go on the net and google for using the curves in PS to learn how to do it. Yor photos are perfectly ok,but they need the finishing touch. BTW a great lens rendering in that first portrait - was it the Summicron?

Thank you very much! Actually, I just realized it was taken with my Pentax K1000. I shot a roll the other day just to see if
I really prefer rangefinder focusing. I DO! Oops, technically it shouldn't have been in the Leica thread! However, I've experienced this same thing with my summicron also and will happily post an example to keep it relevant to this thread!
 
By the way, I find photoshop so much harder to deal with than an enlarger. And I'm only 30, I should be all over this photoshop business. I have fiddled with the levels some and can't seem to get an accurate portrayal of his skin. BTW, my scanner is an Epson Perfection V500. Perfection? Thats rich...
 
Anita, nothing wrong with the scanner, you can get good results from it (up to a point). I have one and use it.

Usually, you want to add contrast, more than what comes out of the scanner. I do it with curves. Look at this web page by Chris Crawford who posts here on RFF.

http://www.chriscrawfordphoto.com/technical/scanning.php

Skin... Caucasian skin, the usual recommendation is Zone VI (lighter), especially for little kids. In your last image, the bright light is behind, so "normal" exposure makes the face gray. Take control with lighting, exposure, or post to place the face in the zone you want.

And, very cute kid in the photo.
 
Photoshop definitely has a learning curve that's for sure, I'm not all that exited with it either. I tried to raise his skin tone while keeping the background from getting to bright, and getting some contrast in the shadows. Backlight is tough. Anyway this is where I stopped moving dots around. Nice to see the kiddo having fun!

backlightc.jpg

backlightcurve.jpg
 
Nik software's Viveza PS plugin is your friend. It allows you to target specific areas (like the face) or specific colors (if you are shooting color) for adjustment with multiple control points without effecting the rest of the photo. Saves tons of time not having to mess with selections and stuff.
 
Both cases look to me like metering issues first, scanning issues second. In the first one of the man and boy, I'm guessing the meter picked up the white shirt and beard and therefore underexposed. Likewise with the bright sun behind the boy in the second one, I can see the same thing happening. I have read up on the zone system and although I don't use it I do try and incorporate the principles into how I meter my shots. Roger Hicks has a good article on that on his website rogerandfrances.com. I'm no expert though and have similar screw-ups all of the time.

I have a different scanner so I won't comment on that, except to say that my scanner (Canoscan 8800f) can also go for too much of a flat gray on standard settings and often needs tweaking or a bit of post processing.

Cheers,
Rob
 
Back
Top Bottom