
Avotius
Some guy
I need to get a scanner as the lab in town quadrupled their prices. But in the last week I have found that scanners here in China have an anywhere between 50-300% premium on them. Yikes!
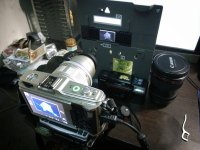
So as I also have some other equipment purchase obligations now and I only need basic scans for reviewing and online use, and then just get the lab scans of what I need later....I just made my own scanner rather then spending money on it.

I used my Olympus EP1 and an old film holder for another scanner and set them up in front of my computer LCD with a white background and it works great, though when I am actually "scanning" I cover up the sides and top of the area between the scanning plate and the camera to cut reflections because I found the chrome body of the EP1 was reflecting on the film (especially the slides). The toothpick is for moving the negative in the holder without touching it which worked great. That is the kit zoom lens on the EP1 which focuses pretty close and though I cannot fill the frame with the negative, the quality is acceptable for my reviewing and online uses!
I can do black and white with reasonable quality, slides so so and color negatives I have not been able to figure out yet, they dont scan well this way it seems. so I may still end up buying a scanner but in the mean time, a decent way to save money!
ps. you might notice what I am using to hold the scanning plate in place, so technically this scanner is really bloody expensive but the old brick will to the trick as well.
pps. I should mention my settings for scanning. I was just using max quality jpg (as there is no inverse color option in camera raw it turns out) with the two second time on and the in camera profile set to normal with everything on zero. Center weight metering, f8, aperture priority, and auto focus on center point. I had the camera on a tripod in front of the desk and the USB plugged in so I could check my results on screen without having to move the camera.
So as I also have some other equipment purchase obligations now and I only need basic scans for reviewing and online use, and then just get the lab scans of what I need later....I just made my own scanner rather then spending money on it.
I used my Olympus EP1 and an old film holder for another scanner and set them up in front of my computer LCD with a white background and it works great, though when I am actually "scanning" I cover up the sides and top of the area between the scanning plate and the camera to cut reflections because I found the chrome body of the EP1 was reflecting on the film (especially the slides). The toothpick is for moving the negative in the holder without touching it which worked great. That is the kit zoom lens on the EP1 which focuses pretty close and though I cannot fill the frame with the negative, the quality is acceptable for my reviewing and online uses!
I can do black and white with reasonable quality, slides so so and color negatives I have not been able to figure out yet, they dont scan well this way it seems. so I may still end up buying a scanner but in the mean time, a decent way to save money!
ps. you might notice what I am using to hold the scanning plate in place, so technically this scanner is really bloody expensive but the old brick will to the trick as well.
pps. I should mention my settings for scanning. I was just using max quality jpg (as there is no inverse color option in camera raw it turns out) with the two second time on and the in camera profile set to normal with everything on zero. Center weight metering, f8, aperture priority, and auto focus on center point. I had the camera on a tripod in front of the desk and the USB plugged in so I could check my results on screen without having to move the camera.
Attachments
Last edited:


