Kevin Brown
Established
Just successfully completed an XA2/3 mod I'd been contemplating for some time and it turned out to be easier than I thought. I shoot mostly intimate landscapes in low light conditions; subjects tend to around 20' away mostly, so that falls right between the mid and distant settings on these cameras. Those actual focus points are 9' and 42'; in low light the lens is pretty wide open and even with a 35mm lens, focusing only at 9' OR 42' doesn't quite cut it. Figuring setting the lens halfway between these two settings would put me at close to 20', I added a second notch in the focus ring at that point with the tip of a craft knife. With the front plate off (quite easy, actually if you know the secret!) one can clearly see the silver spring that notches into the black plastic ring around the lens, providing the middle (9') focus position. Noting where this spring contacts the edge of the ring when at the distant (42') setting, I simply (carefully) carved an additional notch halfway between this spot and the existing notch. The ring is rather thick, but the spring only contacts it for about a 1/16th of an inch, so the new notch only needs to go into the ring that far. So I now have settings of 42', 20', 9' and 4'. If one looks at 35mm lens DOF tables, at f/3.5 there is quite a gap in the ranges between 9' and 42'; not so between 4' and 9'. The 9' and 42' 'in-focus' zones don't begin to overlap until f/8. Absolutely worth doing if you shoot a lot in low light.
The 'secret' mentioned above, to get the front plate off is that there is a screw inside the camera that holds one side on. So the full procedure is to remove the bottom plate so the clamshell can be pried off (don't lose the little steel click-stop roller!), then remove the two front screws on the right of the front cover and the screw inside the camera holding the left side on.
I'll post some pics of all this when I do my XA3 (still finishing a roll in it now).
Perks
Established
That's very interesting.
I look forward to the photos and also of the results!
I look forward to the photos and also of the results!
Kevin Brown
Established
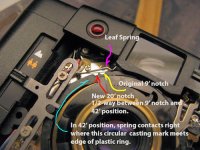
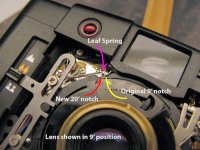
Here are a couple of photos to clarify. The plastic is rather soft and carves easily with firm, steady pressure from the tip of a fresh utility knife blade. Just be sure to blow out any carvings to keep them from fouling other moving parts. Though my new notch looks a bit ragged, it feels nearly identical to the factory one in actual use.
The best shape for the new notch is NOT a v-shape (as might seem the thing to do since the spring is v-shape); this actually makes for a very 'mushy', non-positive click at the detent - the spring slips out of such a notch with very little pressure. My first attempt (seen in the photos) is a bit too v-shape; I got a much more positive detent with a square-shape notch. You want the width of the new notch to be the same as the opening at the top of the circular factory notch, and the same depth; this creates an identical feel for the click.
Further DOF info - at f/3.5, DOF at 42' position is 20.5' to inf. At 9' position it's 7.5' to 11.5'. So, without this new notch, when wide open nothing between 11.5' and 20.5' is in focus; and that's assuming you're happy with the sharpness at the extreme limits of the depth of field, which you may not be depending on how you're using the images.
Assuming the new position is 20', the resulting DOF zones are: 13' to 40' @ f/3.5. 11' to 125' @ f/5.6. 9' to infinity @ f/8. All right in the sweet spot for the kind of shooting I do.
Attachments
David Hughes
David Hughes
Fascinating; many thanks.
Regards, David
Regards, David
Kevin Brown
Established
You're quite welcome.
In retrospect, I realize that the focus lever physical position verses distance focused on is much more exponential than linear; there is considerable throw between 4' and 9' positions for a mere doubling of focus distance, and a very short one between 9' and 42' for a quadrupling of distance. So, a notch added halfway between the 9' and 42' points is most likely closer to 12-15' than 20'. Given that, the resulting DOF zones at the new notch would be 10'-22' @f/3.5, 9' to 34' @ f/5.6 and 8' to 82' @ f/8.
Interestingly, the earlier Olympus Wide camera (also 35mm f/3.5 lens) had click stops at 7' and 15'.
I'm convinced that this focus gap is largely responsible for folks saying the X2's lens is less sharp than the XA; I feel that's only true at the corners.
I suppose if one wanted to get super precise about this, you could use a ground glass to set the focus at exactly 14', for the perfect 'filling of the focus gap', but with a lens this short, only opened to f/3.5 and the shutter only able to hold open for a max. of 2 seconds at a time - sure wouldn't be fun!
For those not willing to do the surgery, one can do this purely visually (and what I've been doing up to now) by sliding the focus lever up to the point where the 'little heads' meet the 'little shoulders'. fine for those who only have occasional need to set this focus point.
Since the XA3 was mentioned, I have to say that it seems most of the write-ups and mentions of it online seriously understate the improvements Olympus made to the XA2 - 'oh, it's an XA2 with DX-coding'; DX-coding is the least of it. In addition to providing it with the +1.5-stop backlight compensation switch from the original XA, the film-loading is easier and more secure (the right side of the film gate is re-shaped and a hard chrome registration pin is added to the lower-left of the gate so that film is far less likely to jump the advance gears resulting in uneven frame-spacing) and the back was re-designed to have proper u-channel light traps in addition to the black foam seals. The addition of the backlight switch greatly compensates for what I always felt was the XA2's most serious limitation: no exposure lock. Auto-exposure cameras are far more useful with one or the other; having to do compensation with the XA2's tiny, fiddly ASA lever was no fun at all!
The only aspect of the '3 that was a step backwards was that manual ISO settings can only be done in full-stop increments. And setting the dial between clicks doesn't work - it's a rotary switch that selects a different resistor at each position. The only way to get in-between ISO speeds is to 'trick' the DX pins with foil and tape.
David Hughes
David Hughes
Exactly, there's a lot to be said for a boring "P" mode P&S that has a +1½ EV switch, mode or whatever. Especially in snow and so on.
Regards, David
Regards, David
Share: