Dave S.
Well-known
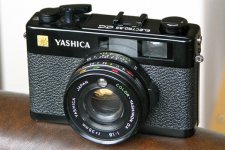
I never thought I would own a Yashica Electro 35 CC until I recently had a chance to pick this one up for peanuts. ")
Everything looks good and works great and I'm very excited to run a roll through it. Nevertheless, the viewfinder / rangefinder needs cleaning.
Is cleaning the rangefinder / viewfinder something I can do myself?
If so, can someone provide me with some pointers on how to go about doing it? ( How do I remove the top plate? Are there things I should be careful of? Etc. )
Thanks!
-Dave
Attachments
Bill58
Native Texan
They're fairly rare and excellent--you're lucky to find one cheap. I've never cleaned mine myself 'cause cleaning here by an experienced tech person is so cheap. I just did a foam re-seal job on it.
Maiku
Maiku
Cleaning a CC viewfinder is pretty straight forward.
Steps:
1. Remove the battery cap.
2. remove three screws. Two at each end of the top plate and one near the battery cap.
3. Remove the film rewind know. Do not let the film door close, put tape over the film door catch. It might be hard to open the door again otherwise. Not impossible, but it might be a problem.
4. Lift the top off carefully. You do not want to lose the red battery check button or pull any wires out.
5. Remove the small metal cover over the viewfinder.
6. Blow out the dirt or dust before cleaning.
7. Use Q-tips to clean the viewfinder glass and mirrors. Do not use any liquids yet.
7. Now, use Q-tips and windex to re-clean the glass and mirrors.
8. Check to make sure the viewfinder is clean. If you are happy re-assemble.
9. The tricky part is getting the red battery check to stay in place. It is going to take a few tries and a lot of patience. You have to push the battery check button in with a small screwdriver or bent watch repairman`s screwdriver and then slip on the camera top. The red battery button does not sit perfectly over the battery check rod then you cannot check the battery charge. The camera will still work.
Good Luck.
Maiku
Dave S.
Well-known
Thanks for the information Maiku! I am surprised I don't need to somehow remove the winder or shutter button lock mechanism. This sounds easier than I expected. Do you have any advise as to what NOT to clean once I'm inside? I remember when I cleaned the rangefinder / viewfinder on my Canon Canonet QL17 G-III I had to be careful not to clean one side of something so as not to wipe away part of the focusing patch.
Thanks again,
Dave
Thanks again,
Dave
Frontman
Well-known
You do need to remove the winding lever.
The only tricky part is removing the screw which holds on the winding lever. You can use a pair of tweezers with small points, or use a proper pointed spanner. The shutter lock button doesn't need to come off, the button assembly is part of the cover and not physically attached to the camera mechanism inside.
The film rewind lever is no issue, you just stick a screwdriver in the in the slot which engages the film spool and turn the rewind knob counter-clockwise to remove it. You don't need to tape anything, the rewind shaft will not fall in or out.
Remove the battery cap and the three screws which hold on the top cover and lift the cover up carefully to remove it.
You cannot fully remove the top as there is a green wire which runs from to the flash pc socket. Be careful not to break the wire or you'll have to solder it back in place.
Clean the inside of the windows on the top cover, and then the outer glass of the viewfinder. This is normally enough to clear things up. Take a look through and see if it is clear. If the inside of the rangefinder is dirty, lift off the sheet metal cover on top (it is held on only by a couple of drops of glue) and clean the inside elements and mirror carefully with q-tips. Replace the sheet metal cover with a couple of drops of fresh glue.
The difficult part about this job is putting the camera back together. There are two parts to be careful with, first is the small brass pin which fits in the PC socket, and next is the red plastic battery test button. You also need to make sure that the spring between the shutter mechanism and the shutter button is in place.
You can leave out the brass pin, the camera will work better without it. The brass pin closes a circuit when when a flash is connected, and this sets the shutter speed to the 1/30th flash synch speed. Leaving this pin out will allow you to use fill-flash at any speed.
The red button is tricky, because the battery check switch must be depressed for the cover and button to go back on properly, if you don't do this right you can break the switch and turn your camera into junk.
Lower the cover carefully, it will not go on all the way. Stick a small screwdriver through the screw hole below the flash PC socket for the cover to drop down on that side. Then, if you look through the battery access hole in the cover, you will see the metal pin at the head of the battery check switch below the red button. You must depress this pin with a small (tiny) screwdriver so the red button can slide over it. Holding the camera with the back facing toward the floor slightly will keep the red button in place.
Once this is done, the top cover will slide down easily, and you can reattach the screws, etc.
Another thing to be careful of: some of the CC cameras come with an aluminum screw which holds on the winding lever, these aluminum screws are very fragile and easy to break. Do not use the tweezers/spanner to tighten this screw, just use your thumb, and don't overdo it.
Last edited:
Dave S.
Well-known
Thanks for the super helpful instructions Frontman! One question: regarding the winding lever - which way do I turn the screw that holds the winding lever to LOOSEN it? I assume it's counter clockwise, but I want to be double sure.
Thanks again,
Dave
Thanks again,
Dave
Frontman
Well-known
Thanks for the super helpful instructions Frontman! One question: regarding the winding lever - which way do I turn the screw that holds the winding lever to LOOSEN it? I assume it's counter clockwise, but I want to be double sure.
Thanks again,
Dave
Yes, it is counter-clockwise.
A good idea when working on cameras is to place a white towel on the table you are doing your repairs on. This makes it easy to spot small screws and such. I use an old Japanese ironing board (which is white in color, rectangular in shape, padded, and fits conveniently on my work bench).
Dave S.
Well-known
Thanks again for your help Frontman. I'll be sure to use your suggestion of a white cloth to work on - I know those screws can get lost really easily.
Just out of curiosity does anyone know how long the Yashica Electro 35 CC was made? The inside of mine is stamped "June 8 1977".
-Dave
Just out of curiosity does anyone know how long the Yashica Electro 35 CC was made? The inside of mine is stamped "June 8 1977".
-Dave
Bill58
Native Texan
"If the inside of the rangefinder is dirty, lift off the sheet metal cover on top (it is held on only by a couple of drops of glue) and clean the inside elements and mirror carefully with q-tips."
I think cleaning the mirror is a big no-no. Its coating is too fragile and you'll risk damaging it.
I think cleaning the mirror is a big no-no. Its coating is too fragile and you'll risk damaging it.
Frontman
Well-known
"If the inside of the rangefinder is dirty, lift off the sheet metal cover on top (it is held on only by a couple of drops of glue) and clean the inside elements and mirror carefully with q-tips."
I think cleaning the mirror is a big no-no. Its coating is too fragile and you'll risk damaging it.
It is fragile, but I've serviced literally dozens of these cameras and have managed not to do it any harm.
Dave S.
Well-known
Update
Update
Thanks for everyone's help on this project!
I took the camera apart tonight and cleaned the rangefinder / viewfinder. I used a pair of toothpicks to remove the screw which hold on the winding lever and that worked great (and didn't scratch anything). I did not lift off the sheet metal cover on top - I just cleaned what was easily accessible. it looked so good afterward I figured why try and fix what is not broken.
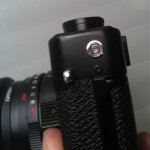
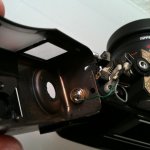
I was unable to remove the small brass pin which fits in the PC socket though. I'm not sure if it is supposed to fall out or what? Frontman, if you have any suggestions about how to remove the pin I would still like to make this modification. I have attached a couple pictures to show you what I'm dealing with.
Thanks again,
Dave
Update
Thanks for everyone's help on this project!
I took the camera apart tonight and cleaned the rangefinder / viewfinder. I used a pair of toothpicks to remove the screw which hold on the winding lever and that worked great (and didn't scratch anything). I did not lift off the sheet metal cover on top - I just cleaned what was easily accessible. it looked so good afterward I figured why try and fix what is not broken
.I was unable to remove the small brass pin which fits in the PC socket though. I'm not sure if it is supposed to fall out or what? Frontman, if you have any suggestions about how to remove the pin I would still like to make this modification. I have attached a couple pictures to show you what I'm dealing with.
Thanks again,
Dave
Attachments
Frontman
Well-known
Thanks for everyone's help on this project!
I took the camera apart tonight and cleaned the rangefinder / viewfinder. I used a pair of toothpicks to remove the screw which hold on the winding lever and that worked great (and didn't scratch anything). I did not lift off the sheet metal cover on top - I just cleaned what was easily accessible. it looked so good afterward I figured why try and fix what is not broken
I was unable to remove the small brass pin which fits in the PC socket though. I'm not sure if it is supposed to fall out or what? Frontman, if you have any suggestions about how to remove the pin I would still like to make this modification. I have attached a couple pictures to show you what I'm dealing with.
Thanks again,
Dave
It's funny that the pin is stuck, normally they fall out quite easily, and if you have a CC or CCN which rattles when you shake it, it is often due to this pin having fallen out.
To knock it out, you can attach a PC cord to the camera, this is supposed to push the pin back so it pushes the switch contacts together. If you don't have a flash with a PC plug/cord, a small screwdriver which will fit into the center hole of the socket may also do the job.
Dave S.
Well-known
Thanks for the suggestion Frontman. I tried to push the pin out with the end of a safety pin when I had the camera opened up. Nevertheless, it wouldn't come out. I didn't think of plugging PC plug/cord in to the terminal. I'll give it a try and update later.
Dave S.
Well-known
Update
Update
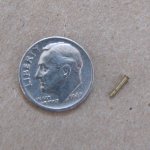
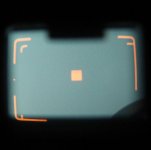
Plugging a PC plug/cord in to the terminal worked great! The pin came right out. I've attached a photo of the pin in case anyone is interested. I've also attached a photo of my very clean viewfinder / rangefinder. I had read the viewfinder / rangefinder on this camera was exceptionally nice - and I completely agree!
Of course, now that all seems to be in order...
I noticed that the lens barrel has a bit of a loose wobble to it. I mean the whole lens barrel unit doesn't seem to be snugly attached to the camera body. It doesn't wobble a lot, but it is definitely noticeable. Is this something I should be concerned about?
Update
Plugging a PC plug/cord in to the terminal worked great! The pin came right out. I've attached a photo of the pin in case anyone is interested. I've also attached a photo of my very clean viewfinder / rangefinder
. I had read the viewfinder / rangefinder on this camera was exceptionally nice - and I completely agree!Of course, now that all seems to be in order...
I noticed that the lens barrel has a bit of a loose wobble to it. I mean the whole lens barrel unit doesn't seem to be snugly attached to the camera body. It doesn't wobble a lot, but it is definitely noticeable. Is this something I should be concerned about?
Attachments
Last edited:
Frontman
Well-known
Plugging a PC plug/cord in to the terminal worked great! The pin came right out. I've attached a photo of the pin in case anyone is interested. I've also attached a photo of my very clean viewfinder / rangefinder
Of course, now that all seems to be in order...
I noticed that the lens barrel has a bit of a loose wobble to it. I mean the whole lens barrel unit doesn't seem to be snugly attached to the camera body. It doesn't wobble a lot, but it is definitely noticeable. Is this something I should be concerned about?
The wobble is probably due to loose screws. If you remove the front name plate from around the lens, and then the light baffle beneath it (there are two screws, one on top, the other on the bottom), you will see three silver screws which hold the front half of the lens assembly in place, tightening these should eliminate the wobble. The lens itself is fixed to the body of the camera, and should not wobble with the rest of the lens housing.
If this doesn't tighten it up, you'll have to remove the three screws, then the black housing and aperture selection ring. This will reveal a brass plate with three more screws. These screws may also need tightening if tightening the first three didn't work.
You'll need a lens spanner to remove the front name plate properly, the metal ring which holds it on is made of aluminum and is very fragile. Sometimes the ring is not tight, and can be turned off (counter-clockwise) with a small screwdriver. If not, don't attempt to force it off.
Dave S.
Well-known
Thanks Frontman! Sounds like it shouldn't effect my images ("lens itself is fixed to the body"), but it would be best to tighten up just the same.
I recently bought a lens spanner, but I don't think it's a very good one (just seems cheaply made all around). I scratched up a Konica Auto S2 front name plate with it a couple weeks ago (and never did get the plate off). I will try to remove the plate on my CC very carefully, but if it doesn't loosen easily I'll wait until I get a better spanner wrench. I've been thinking about getting a new one or a set of them from www.heavystar.com.
Please let me know if you have any tips on getting a good spanner wrench or wrench set. Again, I appreciate all the great information you have provided me with. Thank You!
Last edited:
Frontman
Well-known
Thanks Frontman! Sounds like it shouldn't effect my images ("lens itself is fixed to the body"), but it would be best to tighten up just the same.
I recently bought a lens spanner, but I don't think it's a very good one (just seems cheaply made all around). I scratched up a Konica Auto S2 front name plate with it a couple weeks ago (and never did get the plate off). I will try to remove the plate on my CC very carefully, but if it doesn't loosen easily I'll wait until I get a better spanner wrench. I've been thinking about getting a new one or a set of them from www.heavystar.com.
Please let me know if you have any tips on getting a good spanner wrench or wrench set. Again, I appreciate all the great information you have provided me with. Thank You!
The set of three spanners for $39.95 is the set I have, and will work fine on your CC. When removing the trim lock ring make sure that the camera is resting on it's back on a flat surface, and make sure that when using the spanner you apply even pressure to both points. Once the ring is loose you can turn out the ring using a small screwdriver, if the lens spanner slips it will scrape the lock ring and/or the lens name plate.
Dave S.
Well-known
Frontman:
Regarding:
"You'll need a lens spanner to remove the front name plate properly, the metal ring which holds it on is made of aluminum and is very fragile. Sometimes the ring is not tight, and can be turned off (counter-clockwise) with a small screwdriver. If not, don't attempt to force it off."
Well, mine does not seem to want to come off. Any suggestions on how to loosen it up?
Thanks,
Dave
Bill58
Native Texan
Thanks Frontman! Sounds like it shouldn't effect my images ("lens itself is fixed to the body"), but it would be best to tighten up just the same.
I recently bought a lens spanner, but I don't think it's a very good one (just seems cheaply made all around). I scratched up a Konica Auto S2 front name plate with it a couple weeks ago (and never did get the plate off). I will try to remove the plate on my CC very carefully, but if it doesn't loosen easily I'll wait until I get a better spanner wrench. I've been thinking about getting a new one or a set of them from www.heavystar.com.
Please let me know if you have any tips on getting a good spanner wrench or wrench set. Again, I appreciate all the great information you have provided me with. Thank You!
Heavystar sells good stuff and great customer service.
Brian Legge
Veteran
I managed to scratch up a few retaining rings before I realized that sometimes a chemical solvent like Liquid Wrench can help loosen them a bit. I basically put a few drops around the ring and let it sit for a few hours. Attempt to loosen it.
I repeat until it either comes loose or I lose patience and try forcing it again. A few rings have taken a substantial amount of work to get off. The ones I forced often were left with marks - I generally only did that with cheap, common cameras. If you're concerned about that and can't get anywhere, don't force it, take it to someone else to have them work on it. Its surprisingly easy to damage the rings.
I repeat until it either comes loose or I lose patience and try forcing it again.
A few rings have taken a substantial amount of work to get off. The ones I forced often were left with marks - I generally only did that with cheap, common cameras. If you're concerned about that and can't get anywhere, don't force it, take it to someone else to have them work on it. Its surprisingly easy to damage the rings.
Share:
-
This site uses cookies to help personalise content, tailor your experience and to keep you logged in if you register.
By continuing to use this site, you are consenting to our use of cookies.