Yashica Lynx two aperture blades stuck

Bunnyblaster

Member
Local time
4:41 PM
Joined
Mar 22, 2014
Messages
27
First time poster, long time watcher.

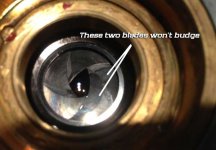
I got ahold of this Yashica Lynx 1000. Seemed to be working well when I met with the guy to buy it. However, soon after I got it home I noticed something was very wrong with the aperture. It would move from f22 through 2.8ish, but never to 1.8. Then that eventually changed to never moving past f4. It seems two of the blades are stuck, yet the others move relatively freely, but at some point they all reach their stopping point...I'm assuming because they're all linked together.

My question is this. What might be causing those two blades to stick? Bad lube thats broken loose? A linkage issue?

I looked around for several hours and found a good bit of people discussing the entire diaphragm being stuck, but not just a couple blades.

Any insight here would be greatly appreciated.
 

Attachments

  • yashicalynx1000diaphram.jpg
    yashicalynx1000diaphram.jpg
    23.5 KB · Views: 0
The blades look quite dirty, so my first guess would be that they're stuck. Hopefully nothing has been broken, but you'd need to dig further to find that out.

If it were me, since the lens is already open, I'd drop some Ronsonol in there and see if I could free it up. Once you get everything loose, you'll be able to see if all the blades move or if two are still immobile. In the latter case, you'll have to disassemble the shutter and inspect for damage. If they start moving, you'll only need to do some cleaning to make it serviceable. Personally, I'd probably disassemble and thoroughly clean the whole thing, but it may not be necessary.
 
I don't think the blades are stuck, I'm afraid that one or more have become unseated from their attachment. Because of the way aperture blades are fastened together, they all need to move as one. If you have a rogue one, at least on every camera I've ever owned, it means something has broken or come loose.
 
That's what I was afraid of. The sheen on the blades is lighter fluid. I was trying to unstick it. It feels like something isn't lined up right. Eh. Should be a fun trip anyway. Any tips before I dig in?
 
I've never had one of these apart, but the best thing to do when going into an unfamiliar shutter is to take pictures of each step (I use my phone just because it's easy to look back at the pictures while I'm working). I'm reasonably confident it's a pretty standard leaf shutter, so as long as you've got the tools to get in there you should be OK.
 
I haven't dismantled this particular shutter but years ago (Rogue Designer?) dealt with blades which had studs broken off them (right, in many shutters blades have holes but 5000 have studs on blades). So this may mean you will need parts camera or just get another one to start with.
 
You may need parts, or not.

I've seen a couple of lenses where the plate holding the blades in place had come loose.
This assumes the blades weren't forced when they began to stick.
 
I hope I didn't force something too much. I generally back off of resistance, as its never a good thing. Guess we'll find out. I'll document the process as it goes and update with images. I'm sure at some point someone else may have a similar issue and want a visual way to see the problem before digging in.

So far, this has been the closest example of my problem I've found.

http://www.kyphoto.com/classics/yashicalynx.html

This question has been in my head though. After getting the camera home, for some reason I wanted to make sure the iris was opening and closing all the way. In my brilliance, I decided to do this by holding the shutter open in Bulb mode and turning the aperture ring to see move. I believe thats when I first noticed the issue.

Feel free to make fun of me if this was a horribly stupid idea. But, I still have to ask...could that have caused this problem?

Thanks again.
 
No, your actions most likely didn't cause the problem. It was probably already there, and if you had done that while you were still in the presence of the seller, you wouldn't have had to pay him for a broke camera. I'd take it back and ask for a refund, if that's possible. But then you've already flooded it with lighter fluid, so that voids any impressed warranty.

PF
 
In all honesty, it's not worth the time to even drive to him given the price of the camera. At worst if it goes to crap I'm out $40 and learned a little about the inner workings of this lens.

Good to know that my actions didn't likely cause the problem. I think it has potential to take some great images.
 
A look from the back. Studs on a couple blades are busted.

13439480174_077bd6606a_c.jpg


However, before I can get to those, I've got to get that retaining ring off. I've read it was tight. Blah blah blah I thought. In all seriousness, I think they put this thing on with an impact wrench. Pretty sure I'm going to break my spanner wrench unless I make another tool.

Any tips for super tight rings?
 
A look from the back. Studs on a couple blades are busted.
However, before I can get to those, I've got to get that retaining ring off. I've read it was tight. Blah blah blah I thought. In all seriousness, I think they put this thing on with an impact wrench. Pretty sure I'm going to break my spanner wrench unless I make another tool.

Any tips for super tight rings?

You could try to heat things up with a hair dryer just before you start to unscrew the ring.
 
I'm assuming a heat gun would be too much? My brother was giving me some advice on it this morning, but he's an auto guy...most of his suggestions revolved around vises, long ratchets and PB Blaster.
 
Some repair books suggest using other tools that you make yourself from existing tools. Sometimes you may need to make a tool that will only really work for one part of one camera. Things such as small long nose pliers that you heat and bend then grind the ends on. Ed Romney used to show that in his books. In the event they used some kind of low-stick adhesive, something like a really small amount of brake fluid allowed to soak in might work. It works on some car parts, but I have never tried it on cameras. It would certainly want to be a really small amount.

What I am most anxiously awaiting is how you are going to glue those studs back together. If it is like my Komuranon-E 50mm it doesn't screm or press in. When is shears off, there must be some other way. At least from what I have seen of my Komuranon. Anyone else have any suggestions for putting two pieces of stud back together?

What
 
Once I get in there, my plan is to replace the blades with the broken studs with those from another camera. I'll likely buy a non working camera from Ebay and use it for parts. I figure once those studs shear off, not much is going to hold them back on.
 
Yeah, a parts donor is the ticket. But I've bought donor cameras that were better than the one I was trying to fix.

PF
 
"I think they put this thing on with an impact wrench".

LOL! That's exactly how I feel whenever I work on a camera. Things are generally fastened WAY too tightly. Your idea of holding the shutter on 'B' and moving the aperture is exactly how to ck it. Too bad. Me, I would just get another camera and put this one away in a box for parts. I have a Retina 1a like that, and it actually came in handy the other day when I needed a part on another Retina. Now it's back in the box and nestled in the sock drawer where it's lived the last 2 years.
 
Thats the plan...just got to get that ring off.

Has anyone ever found a better way to hold a lens in place while putting a relatively high amount of pressure on a ring like that? A. I don't want to slip and damage the inside, and B. I don't want to damage any part I'm holding on the outside.
 
If you're handy with woodworking, get a block of hard wood twice as wide as the lens board. Cut a channel in it to hold the lens board steady. Maybe even cut out a hole in the center of the board to let the lens hang suspended in the air just above your work surface, so that it's not touching anything.

PF
 
Back
Top Bottom