Summaron 35 f3.5 help

It may mean the rear inner element is not fully seated, and preventing the rear outer element from screwing in. If it is just slightly askew it won’t seat all the way. Try pushing down at single points along the circumference of the rear inner element.
 
It may mean the rear inner element is not fully seated, and preventing the rear outer element from screwing in. If it is just slightly askew it won’t seat all the way. Try pushing down at single points along the circumference of the rear inner element.
Thank you @jc031699 , I also thought about it, but I measured with the caliper and that is not the problem. Also, screwing is tight from the very begining...
 
Very useful topic. Waiting for my summaron to arrive soon. Will need all this information. Thanks for sharing!
 
screwing is tight from the very begining...

Sounds like it's cross-threading. Turn the group backwards carefully while feeling for the threads to pop together before turning forward. Put too much pressure on the threads when they're not lined up and you might destroy them.
 
Success!

In the end I managed to screw the element. @GMOG , I expressed myself wrong. Really it was not difficult to screw it in from the beginning. It's true that it wasn't going very smoothly, but it was getting to the end when it got really hard. So what I did was to cut a piece of rigid plastic (like a credit card) with two grooves to save the ring of the main block Something like this:

IMG_8116.jpg

This way I was more comfortable than with the lens spanner. And more safer for the lens. So I start screwing-unscrewing gently and very little by little. And so I've been three days, advancing slowly until I got it in place. And it has turned out so well, that now it can be screwed in and out without any problem.

Thank you all very much, I would not have made it without your help.
 
Excellent news! It's good to be wrong! 😁

I sometimes make tools like you made from plastic out of brass or aluminum scraps I have laying around. As you found, the grip is better, much harder for it to slip.
 
Success!

In the end I managed to screw the element. @GMOG , I expressed myself wrong. Really it was not difficult to screw it in from the beginning. It's true that it wasn't going very smoothly, but it was getting to the end when it got really hard. So what I did was to cut a piece of rigid plastic (like a credit card) with two grooves to save the ring of the main block Something like this:

View attachment 4838474

This way I was more comfortable than with the lens spanner. And more safer for the lens. So I start screwing-unscrewing gently and very little by little. And so I've been three days, advancing slowly until I got it in place. And it has turned out so well, that now it can be screwed in and out without any problem.

Thank you all very much, I would not have made it without your help.
I had to do something of this sort with an old Zeiss Triotar 135mm f4 (the "fat" version). The entire lens optical and focusing assembly is held in the lens barrel by this kind of ring. But it is deep inside the camera and had to be approached from the lens mount (rear of the lens) and was quite inaccessible to ordinary tools due to its depth- certainly no normal lens spanner would work. So, I had to make your kind of tool but with a long handle on it (so that it looked kind of like an upside-down capital "T". That worked, though it was still difficult due to the very tight working space when accessing it through the lens mount.
 
I could work a bit more in this. Still unsuccessful....:

1. I removed the tiny grub screw under the name plate. Unscrewed the front silver ring.
2. Removed the three screws to lift the aperture index ring.
3. The same with the two pins that holds the ring that operate the aperture. Careful with the two ball bearings.

And that's it. When I try to unscrew the rear retaining ring (wich requieres a lot of strength), the whole optical block rotate (dashed line). I'm stuck here.
Sometimes, these retaining rings are secured with thread-locking compound. Applying gentle heat using a hairdryer or a heat gun (on a low setting) can help to soften the adhesive, making it easier to unscrew the ring.
 
I've just acquired this version of the Summaron-M 35mm f3.5. Of course it has haze, but on one of the rear elements, so I'm interested in opening it up from the back to see if I can clean it.

I'm a little confused about the conclusion - should I remove the outer ring (#1) or the middle one (#2)? Or both - and if so, in what order?

I have quite a bit of experience working with older LTM lenses. I also tend to make my own tools for opening lenses (often using a 3D printer) so I'd be OK working with the rings, I just don't want to open them in the wrong order and regret it.

Thanks for going through this first!
#2
 
I've just acquired this version of the Summaron-M 35mm f3.5. Of course it has haze, but on one of the rear elements, so I'm interested in opening it up from the back to see if I can clean it.

I'm a little confused about the conclusion - should I remove the outer ring (#1) or the middle one (#2)? Or both - and if so, in what order?

I have quite a bit of experience working with older LTM lenses. I also tend to make my own tools for opening lenses (often using a 3D printer) so I'd be OK working with the rings, I just don't want to open them in the wrong order and regret it.

Thanks for going through this first!
I bought one of these first version Summaron 35mm's in M mount quite some years ago. I got it pretty cheaply because it had some haze which eventually I had cleaned by a trusted technician who has a whole career of CLA'ing Leitz stuff.. He did a pretty good job but he did warn me that he felt he could not get it absolutely clean as the internal coatings on these early post war Leitz lenses was notoriously soft and he feared that if he got too aggressive with it, he would damage the coatings. As it happens, I have no problems with the results he achieved but I mention it only because if you plan to do it yourself you may wish to know that this is reputedly an issue to take account of. when you are cleaning the haze.
 
Thanks, that worked.

I've got the optical block (with aperture) out, but the rear optical element is really stuck. It unscrewed a bit, then sort of jammed. Never had that happen before. I'm making a spanner tool (basically a plastic cup with small copper pieces that go into ring slots) I hope will give me enough leverage to get it out. Seems like they coated the brass with something then screwed it all together & whatever they used gums up the threads.
 
I bought one of these first version Summaron 35mm's in M mount quite some years ago. I got it pretty cheaply because it had some haze which eventually I had cleaned by a trusted technician who has a whole career of CLA'ing Leitz stuff.. He did a pretty good job but he did warn me that he felt he could not get it absolutely clean as the internal coatings on these early post war Leitz lenses was notoriously soft and he feared that if he got too aggressive with it, he would damage the coatings. As it happens, I have no problems with the results he achieved but I mention it only because if you plan to do it yourself you may wish to know that this is reputedly an issue to take account of. when you are cleaning the haze.
Thanks. I've worked on a bunch of Canon & Nikkor lenses from around this time, so I'm familiar with soft coatings. I just hope it isn't actually delamination of one of the doublets... we shall see eventually!
 
Thanks, that worked.

I've got the optical block (with aperture) out, but the rear optical element is really stuck. It unscrewed a bit, then sort of jammed. Never had that happen before. I'm making a spanner tool (basically a plastic cup with small copper pieces that go into ring slots) I hope will give me enough leverage to get it out. Seems like they coated the brass with something then screwed it all together & whatever they used gums up the threads.
This is as far as I've gotten. The black tool on the right is my home-made spanner (3-d printed). Unfortunately the tabs broke off because the lens element is so stuck - they're just part of the 3d print and aren't super strong. I'm going to replace them with little copper tabs that I super-glue in.

I've also resorted to putting a bit of oil on the threads, I'll let it sit over night and will try again tomorrow.

IMG_4643.jpeg
 
A traditional spanner with metal blades would be stronger and more likely to work. But they require a bit of skill to use and I'm certain many a retaining ring has been marred by poor technique. And I'm sure some have even slipped onto the glass elements causing even greater damage.

But there may be a way to mod your tool to get it to do the job. It appears you're relying on just the plastic tabs to exert pressure on the retaining ring, and as you've demonstrated, they are too fragile for the task. They are breaking before the retaining ring comes loose.

But, if you put a sticky substance -- such as sticky rubber or maybe even double sided tape -- on the flat, circular part of the tool and then push the tool into the retaining ring with greater downward force than circular force as you turn it, you'd be redirecting and redistributing the forces to the much larger, flat area. That should stand a significantly better chance of getting the retaining ring loose and it shouldn't pose any significantly greater risks to the lens, unless, of course, you push with such force as to break the tool into pieces.

If it were my lens and tool, I'd probably try it, while being mindful of the forces exerted.

p.s., just a couple drops of alcohol or acetone at the junction between the retaining ring and outer wall might help. But use very sparingly to avoid contaminating the optics.
 
Last edited:
A traditional spanner with metal blades would be stronger and more likely to work. But they require a bit of skill to use and I'm certain many a retaining ring has been marred by poor technique. And I'm sure some have even slipped onto the glass elements causing even greater damage.

But there may be a way to mod your tool to get it to do the job. It appears you're relying on just the plastic tabs to exert pressure on the retaining ring, and as you've demonstrated, they are too fragile for the task. They are breaking before the retaining ring comes loose.

But, if you put a sticky substance -- such as sticky rubber or maybe even double sided tape -- on the flat, circular part of the tool and then push the tool into the retaining ring with greater downward force than circular force as you turn it, you'd be redirecting and redistributing the forces to the much larger, flat area. That should stand a significantly better chance of getting the retaining ring loose and it shouldn't pose any significantly greater risks to the lens, unless, of course, you push with such force as to break the tool into pieces.

If it were my lens and tool, I'd probably try it, while being mindful of the forces exerted.

p.s., just a couple drops of alcohol or acetone at the junction between the retaining ring and outer wall might help. But use very sparingly to avoid contaminating the optics.
Thanks so much for your thoughtful and helpful reply.

I tried rubber and sticky tape as you suggested, but neither worked well. I also combined them with both acetone and alcohol, but the element wouldn't budge.

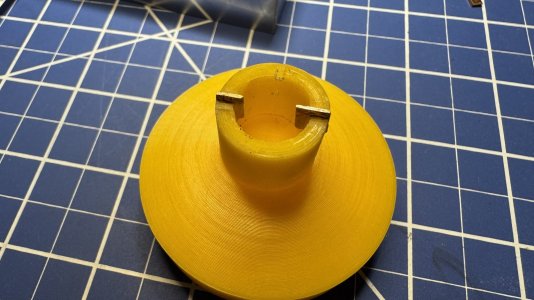
I ended printing a new spanner tool and cut slots in it so I could glue 1mm thick copper pieces. I chose copper because it's roughly the same hardness as brass and was less likely to scratch. The spanner exactly fit in the lock ring, almost impossible to slip, but the element still wouldn't budge, even with alcohol and acetone.

So, here's what worked:

1) Glued (with super glue, very sparingly) the base of the optical block to a steel block, to provide traction. I chose super glue because it's removable with acetone.
2) Applied a small amount of lightweight oil (sewing machine oil) to the exposed threads & tried unscrewing after an hour or so, but still wouldn't budge.
3) Applied a small amount of acetone with a syringe, hoping to both push the oil into the threads, and to dissolve the paint that I suspected was locking the screws.

The combination of these 3, plus the custom spanner too, were what worked. Gluing the block to the steel plate kept it from moving, and the oil + acetone dissolved enough of whatever was gumming up the threads that I was able to get the element moving, the spanner tool provided the torque I needed.

Once the element out it out it was clear what was happening. Leica painted the threads with the same light blocking material the used inside the optical block and it had hardened over the years. Why they painted the threads, I have no idea, except maybe it was easier just to paint the whole element. I removed as much of the paint as I could from the threads with acetone & a q-tip and now it screws in and out very smoothly.

The rest was relatively easy... removed the remaining lens elements, cleaned everything, re-assembled the lens, and now the lens it's haze-free and working well. I suspect the helicoid grease is what caused the haze in the first place, but the focus is working smoothly & maybe it's outgassed as much as it's going to, so I didn't mess with the helicoid.

One odd thing was that the rangefinder focus was off after re-assembly. I hadn't tested the foucus before opening up the lens, so I'm not sure if it was always off. I thought I might have mis-assembled the elements but they all look correct. Maybe someone else had been inside the lens before me I lost a spacing element, or I misplaced a spacer ring after opening up the lens? Fortunately I had some shim material, did a few calculations, & made an 0.1 um shim which fixed the focus.

Thanks again for your help!
 

Attachments

  • IMG_4656.jpeg
    IMG_4656.jpeg
    233.3 KB · Views: 3
That's great nevetssf! I'm glad the principles suggested above worked for you even though you had to use them to a more extreme degree.

In difficult cases it helps to let the solvent penetrate and soak for hours or even days in order to soften whatever substance is causing the retaining ring to stick. Acetone usually works very well but it can be tricky because if it gets on optics it can damage coatings and perhaps more importantly it can harm the bond between cemented groups.

'Glad it worked out for you.

p.s., a change in rangefinder focus after disassembly and cleaning can result from the elements not being seated properly upon re-assembly. Often a glass element will get hung up just a few microns from its intended seat. It's easy to recognize when additional force is applied and it finally snaps into the correct position. Or it might be screwing in an element too far or not far enough compared to the original assembly. Or possibly loss of a shim. I'd make sure to check and rule out the first two possibilities before making a shim.

But if you've got accurate focus at both infinity and near distances, you're golden.
 
Last edited:
Back
Top Bottom