michaelwj
----------------
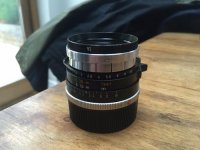
So I recently got a 35 summilux pre ash, complete with the original 12504 Leica hood. While the original hood is okay, the tabs really get in the way of the aperture and my copy is bit loose. On top of all this, it's a pain changing filters and it's expensive - so having two (one with a UV and one with a yellow for instance) so I don't have to mess around unscrewing the hood over and over would be out of the question.
A very quick search revealed that I'm not the only one who has sought an alternative solution. In particular, this thread had a wealth of information: http://www.rangefinderforum.com/forums/showthread.php?t=80916 and I found RichC's idea very neat: http://www.rangefinderforum.com/forums/showpost.php?p=1164783&postcount=20
Now, there is talk about the (37mm or 39mm) filter mounted in the front of this hood causing vignetting which is understandable as it is smaller than the front of the lens. I don't believe the hood by itself would cause vignetting int he corners - it's a rectangle so the corners are actually well out of the way. I also (non-scientifically) tested the naked hood on the lens and found none.
So what I was after was a clamp mounted to a Leica 12524(6) hood to stop it rotating, with the largest possible filter mounted as close to the front element as possible. No gluing so I can swap parts out if the filter gets scratched, but not necessarily "hot-swappable".
Here is my solution:

And here is how I made it:
The parts you'll need:
1 x Leica 12524 hood (the spring clamp is removed, so if that bit's broken all good)
1 X 42mm clamp on hood - I used a Minolta D42KA cause it was cheap
1 X filter glass - The glass (no mount) needs to be between 43.7 and 46.6mm - I used a Pentax 49mm filter which fits perfectly.
First, remove the clamp(s) from their respective hoods and the glass from the filter. Remember that you need the clamp from the clamp on hood and the hood from the Leica hood! You can see on the Minolta clamp the lip that held the hood in place - this gets removed later.


I made a small cut on the Leica hood to remove the clamp - it also allows the screw clamp from the other hood somewhere to go.
Check that the filter glass is going to fit inside the hood, there is a lip that normally stops the Leica clamp from moving to far forward

I then filed down the brass clamp to reduce it's diameter to about 0.8mm larger than the ID of where it is going to fit. This makes it very tight so it doesn't rotate at all, and takes some pushing to remove.
I also filed the front face of the clamp flush (the lip in photo #2) - there is still a small lip to stop it sliding all the way onto the lens, but it is very thin. If it has to be removed completely, then the filter glass will stop it going on too far. The aim here is to have the hood the same distance forward as with its normal clamp and has the filter glass as close to the lens as possible. Here are all the parts ready to go - you can see the exposed brass where it has been filed.

Assembled from the side - you can see the lip that stops the clamp sliding too far on This is very this and doesn't encroach at all into the field of view. I chose to put the screw on the RHS (from using the camera). Basically you can point it anywhere, just cut into the plastic. Down it interferes too much with the focus for my big hands. On this side it gets in the way when selecting apertures smaller than f/8 but otherwise is okay. As always, YMMV so make a choice. I don't think there is a perfect choice though (maybe up?!).

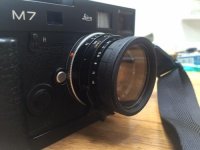
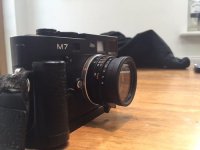
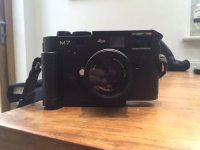
And mounted


I've done some test shots to test for vignetting, but I haven't developed the roll yet ...
A bit of matt black paint wouldn't go astray!
If it works, I'll make another one with a UV filter and just swap when I need to. The whole lot (not including my time!) cost about A$100, so about the same as a Leica Series 7 filter.
Anyway, that turned out to be a long post!
EDIT: I know that the photos are rubbish, my only digital camera is an iPhone. I understand the irony of posting such bad photos on a photography forum 🙂
A very quick search revealed that I'm not the only one who has sought an alternative solution. In particular, this thread had a wealth of information: http://www.rangefinderforum.com/forums/showthread.php?t=80916 and I found RichC's idea very neat: http://www.rangefinderforum.com/forums/showpost.php?p=1164783&postcount=20
Now, there is talk about the (37mm or 39mm) filter mounted in the front of this hood causing vignetting which is understandable as it is smaller than the front of the lens. I don't believe the hood by itself would cause vignetting int he corners - it's a rectangle so the corners are actually well out of the way. I also (non-scientifically) tested the naked hood on the lens and found none.
So what I was after was a clamp mounted to a Leica 12524(6) hood to stop it rotating, with the largest possible filter mounted as close to the front element as possible. No gluing so I can swap parts out if the filter gets scratched, but not necessarily "hot-swappable".
Here is my solution:
And here is how I made it:
The parts you'll need:
1 x Leica 12524 hood (the spring clamp is removed, so if that bit's broken all good)
1 X 42mm clamp on hood - I used a Minolta D42KA cause it was cheap
1 X filter glass - The glass (no mount) needs to be between 43.7 and 46.6mm - I used a Pentax 49mm filter which fits perfectly.
First, remove the clamp(s) from their respective hoods and the glass from the filter. Remember that you need the clamp from the clamp on hood and the hood from the Leica hood! You can see on the Minolta clamp the lip that held the hood in place - this gets removed later.
I made a small cut on the Leica hood to remove the clamp - it also allows the screw clamp from the other hood somewhere to go.
Check that the filter glass is going to fit inside the hood, there is a lip that normally stops the Leica clamp from moving to far forward
I then filed down the brass clamp to reduce it's diameter to about 0.8mm larger than the ID of where it is going to fit. This makes it very tight so it doesn't rotate at all, and takes some pushing to remove.
I also filed the front face of the clamp flush (the lip in photo #2) - there is still a small lip to stop it sliding all the way onto the lens, but it is very thin. If it has to be removed completely, then the filter glass will stop it going on too far. The aim here is to have the hood the same distance forward as with its normal clamp and has the filter glass as close to the lens as possible. Here are all the parts ready to go - you can see the exposed brass where it has been filed.
Assembled from the side - you can see the lip that stops the clamp sliding too far on This is very this and doesn't encroach at all into the field of view. I chose to put the screw on the RHS (from using the camera). Basically you can point it anywhere, just cut into the plastic. Down it interferes too much with the focus for my big hands. On this side it gets in the way when selecting apertures smaller than f/8 but otherwise is okay. As always, YMMV so make a choice. I don't think there is a perfect choice though (maybe up?!).
And mounted
I've done some test shots to test for vignetting, but I haven't developed the roll yet ...
A bit of matt black paint wouldn't go astray!
If it works, I'll make another one with a UV filter and just swap when I need to. The whole lot (not including my time!) cost about A$100, so about the same as a Leica Series 7 filter.
Anyway, that turned out to be a long post!
EDIT: I know that the photos are rubbish, my only digital camera is an iPhone. I understand the irony of posting such bad photos on a photography forum 🙂