I just had to tweak the vertical alignment on my S3, and found this thread useful, but the links that Mablo posted are broken.
Mablo's first link, for getting the top cover off, is currently available on archive.org:
https://web.archive.org/web/2013052...sics/forum/messages/6901/2833.html?1100490851
If that link also expires in time, here's my summary of what you need to do to remove the top:
- Pull the film rewind knob up, then insert something (e.g. a small bar) into the claw at the base of the shaft.
- Unscrew the rewind knob, using the bar to prevent the shaft from turning. Be careful not to lose the very tiny washer that's inserted between the shaft and the knob!
- Make sure you don't close the camera back for the rest of this procedure, as you need to be able to pull up on the rewind knob to reopen it, and now that you've removed it you'll find that tricky!
- There's a small screw under the rewind knob; undo that to release the left end of the top cover.
- Unscrew the small disc on the top of the film advance lever; it has two small holes in the top that are designed to be turned with a "spanner wrench". I've heard people have had success with very fine-tipped pliers, but I bought a spanner wrench on eBay. You can also get them from micro-tools.com.
- Remove the rewind lever and the small metal plate beneath it, and remember the orientation so you can easily put them back the same way later.
- Unscrew the small nut (it doesn't look like a normal nut) that's on the top of the film advance shaft. I used my spanner wrench to undo this too.
- The top cover will now lift off, but be careful not to damage the short wire that connects the hot shoe to the camera. It's long enough for you to rest the upturned top cover on the back of the camera, with the lens facing down.
- If you don't remove the shutter button, it will fall out, so you should lift it off now. Note the orientation; the notch faces the rear of the camera.
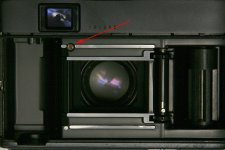
To adjust the vertical alignment you'll want to turn the small screw just to the right of the hot shoe, near the back of the camera. There are actually two screws there, but you'll soon work out which one I mean; one's holding stuff together, the other is just a screw sticking up in mid air. You'll need a screw driver with a very thin blade to do this; the slot in the head of the screw is very narrow.
Adjusting the screw while looking through the view finder is tricky, but I held the top cover in place (so the wires and soldered joints didn't get stressed) by lightly taping it to the camera body.
Putting it all back together is easy enough; you just do the same things in reverse. Hopefully that'll help the next person who wants to adjust the vertical alignment on their S3 Auto or C35 FED!