Mostly Successful GPM Grip Modification
Mostly Successful GPM Grip Modification
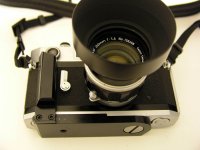
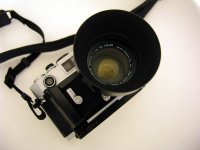
Well, several snapped drill bits, a snapped tap and two grips later, I've adapted an original GPM (now Photo Equip) grip to my 7S. If I had a bench vise, drill press, patience and a touch of common sense, it would have been a simple job with no snapped bits/taps and only one "modified" grip. The silver grip I just bought is still functional, but has extra holes in the rear and still won't fit the 7S. I was more successful with another black grip I already had.
There are two ways I can think of to adapt the grip:
Method 1. Remove grip from base, install base backwards/reversed, drill/tap two new holes for grip mounting bolts on what used to be the rear/left base face, now front/right.
This is what I did, and, again, with the proper tools and common sense, it could be a 15-30 minute job. Grip removal takes less than a minute, then all you need to do is properly locate and drill/tap two holes.
The main disadvantage with this method is the grip won't sit quite as far to the right outside edge of the camera, making finger fit not as secure for folks with shorter fingers. The only inward/outward adjustability is where you drill the holes, and there just isn't enough base to mount it as far outwards. Still works for me, though.
The grip/base lines are not as flowing/organic with the grip stuck on a different part of the base, if you care about that (in original form, the base curves smoothly taper into the grip). The battery cover is covered, but batteries don't need to be replaced all that often. The back locking key is accessible, but access is a little tight. Usable fingernails help; gloves wouldn't work. You could fairly easily remove some metal to improve access to the lcoking key. The slanted cut of the grip top nicely prevents interference with the meter cell window.
Method 2. Leave grip/base as is, remove base mounting bolt, drill new hole at opposite end of base, either mount base with new/different longer bolt, or relieve/radius the base to fit the original bolt. The original bolt head fits into a recess on the bottom of the base, so it sits flush with base bottom. It looks to be too short to reach the camera if you just drill a new hole to fit the threaded section.
The base is actually recessed top and bottom: bottom to make the bolt head flush with the base bottom, and top to provide space for the circlip that holds the bolt in place. You'd need to be able to cut both recesses to use the original bolt and have the bolt stay attached to the base when removed.
I thought this method would be too complex for me. I don't have the tools needed to cut the recesses into the base, didn't want to spend time looking for a different mounting bolt, and thought having the bolt head flush with the base was more important than having a bit more outward positioning of the grip. If I had a lathe, and knew how to use it, this method could be better/funner/cleaner.
BTW, in case you were thinking of an easier way out, the threaded tripod socket at the other end of the base is too far inward to use. The new mounting bolt hole would have to be fairly close to the end/edge of the base.
Mechanical basics: The handle attaches to the base with two small 4-40 thread cap bolts; 3/32" allen key is needed to remove/install bolts. There's no glue or threadlock used, so the grip comes off easily. With the grip and base both aluminum, you could change bolt size/thread fairly easily if you want to use metric bolts, or whatever. The base mounting bolt is held in place with a circlip, which comes off easily, too. No great mechanical knowledge/talent is needed here.
I'll try to upload some pix of the finished, mounted grip. I was too feverish to take any pix while working on it, but it's fairly straightforward. You'll see some missing anodizing where the bit slipped.
I haven't seen the current, longer Photo Equip M-L grip, which completely covers the base of a Leica M camera. I'm not sure if you could simply reverse the base and relocate the handle as in Method 1. That might also leave the back opening lock blocked, so you'd have to remove the grip to change film.
YMMV. I shredded much metal in the process, but spilled no blood. I'm sure there are some very profficient metal workers out there who could do a quicker and beautiful job. I offer this for informational purposes only, and accept no responsiblity if you hurt yourself, others or your grip/camera trying it yourself. Aluminum cuts/drills easily, but lots of sharp little metal filings will fly around. You should always wear eye protection, and if you're not to be trusted with power tools, think twice.
Two last, rambling thoughts:
1. If Photo Equip designed a short base plate with a short slot for the mounting bolt, like generic pistol grips and flash brackets back in the day, it would allow a bit of adjustability to fit different cameras, as well as for grip position.
2. This original grip fits Canon Barnack-style bodies well, and the Ps and VLs. The holdability is compromised a bit by not having a wind lever to park your thumb behind, and takes away some compactness, but it does help the body fit my hand better.