Building a darkroom

ChrisN

Striving
Local time
8:12 AM
Joined
Apr 6, 2005
Messages
4,496
A week or so ago Charles (Journeyman) posted about his plans to build his darkroom (here), and I mentioned my start on the same project. I thought I'd start a thread here to document the project, for fun and inspiration and to invite you along.

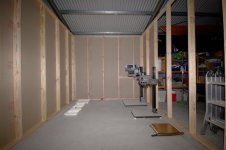
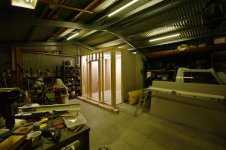
Last week I cleared a corner of my big tin shed (every Aussie boy needs a shed!).

attachment.php


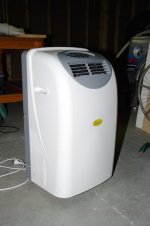
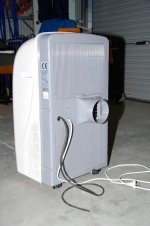
The shed gives me space and a dry area, but it is freezing in winter (literally) and up to 45 degrees celcius in summer, so insulation and a heating/cooling system are essentials. I've settled on 3m x 2.7m in size, with the door in the middle of the short side, the wet bench on the left (so plumbing is along the wall of the shed) and the dry bench on the right.

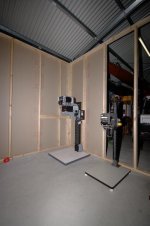
The dry bench will be about 740mm deep (front to back) to allow for my big enlarger (Durst Laborator 1200 with CLS 450 head, for up to 4x5 format). The Durst will be dedicated to 4x5, and I'll also have the LPL VC7700 VCCE enlarger for 35mm and 6x6 medium format.

On the wet side I'll build a 2400mm long sink in plywood and coat it in marine epoxy (leftover from another project.

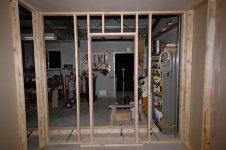
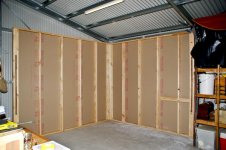
This week I've managed to get two wall frames built, and I'm starting to get a sense of the space. I had to panel the outside of the walls before lifting them into place, as there's no access behind. I'll leave the inside panelling until all the four walls and the ceiling are complete.

I'll add photos as I go. Please feel free to offer your ideas and suggestions - cheers! :)

attachment.php
 

Attachments

  • _IMG6674.jpg
    _IMG6674.jpg
    74.3 KB · Views: 0
Last edited:
Chris,

Looks great so far!
I would suggest that you actually use a shower valve, single handle thermostatic temperature control type, instead of the more expensive darkroom Thermostatic mixing valve.

Regards,
RLouzan

--------------------------------------------------------------------
WTB: 35mm f3.5 W Komura, W Acall Kyoei, Telesar or Accura ltm lens.
Please send PM with details.

--------------------------------------------------------------------


Last edited:
Quite a project, Chris!

Looking forward to seeing it progress. One day I'll build something similar.

Cheers...
Fergus.
 
Thanks Charles. I missed the extraction fan at Bunnings! I found a fan at the local hydroponics supply shop, also a 100mm size. I'm thinking of using 100mm plastic tubing placed just above the sink against the back wall as a collector for the extraction fan. This will look like an inverted "T", with holes drilled in the horizontal collector section and caps on the ends, with a T-piece joining to a vertical section leading to the fan and out through the ceiling. This would put the collector below the plumbing and pretty close to the trays. I'll need an inlet for fresh air on the other side of the room, probably at high level. This little fan would thus be the primary means of ventilation, supplemented by the room air-con that exhausts hot air through it's own outlet vent (again out through the wall). How do you think that would work?
 

Attachments

  • _IMG6675.jpg
    _IMG6675.jpg
    71.8 KB · Views: 0
The air con unit is a small portable refrigerated unit we bought during the worst of last summer's heat wave. I plan to put it in the corner near the door under the dry bench. If we get a heat wave I'll have to wheel it back into the house! In cooling mode it pumps a lot of hot air out the back so I'll need to vent it out through the wall.

For a fresh air inlet vent I'll use the wall cavity - inlet low on the outside wall panel and high on the inside wall panel, with the space inside the wall painted mat black and baffled to keep the light out. I need to locate some filter material to put over the inlet.
 

Attachments

  • _IMG6679.jpg
    _IMG6679.jpg
    47.3 KB · Views: 0
  • _IMG6677.jpg
    _IMG6677.jpg
    58.2 KB · Views: 0
Some more progress this week: another wall!

The enlargers are keen to move in - they are already fighting over which will get to sit where. I think the Durst will win - it's bigger. :)
 

Attachments

  • _IMG6687.jpg
    _IMG6687.jpg
    57.2 KB · Views: 0
  • _IMG6688.jpg
    _IMG6688.jpg
    56.6 KB · Views: 0
Last edited:
I'd suggest more space between the enlargers if that can work- that way the paper can always be in the same place, and safe-lighting can be tuned more easily.
 
I'd suggest more space between the enlargers if that can work- that way the paper can always be in the same place, and safe-lighting can be tuned more easily.

Thanks - I should be able to manage that. I'm thinking that once I'm happy with the spacing I'll mount the enlarger columns directly to the bench-top, which will be very rigid and help avoid any movement in the enlarger, along with bracing the top of the column to the wall. That will also allow me a continuous flat enlarger base of generous width. I'm mindful of Tom's advice from the other thread:

Tom A said:
The enlarger can be a standard tableheight (27-30") and with stool on wheels - and a foot switch for the enlarger! The surface for the baseboard should only occupy 30-35% of the table - leave at least 12-18" on one side and 20-24" on the other side. You be surprised how many small gadgets you need (timer,dodging tools, scissors, paper boxes etc).

Cheers!
 
Wow, it's looking great in there already!

Am I just a little bit jealous? Yes, yes I am.

I can't wait to see this project unfold. Good luck!
 
I'd spend a lot of time deciding on just EXACTLY how high each side should be. If you;re the only one printing there make it as comfortable as can be. My sink is what most folks might consider very high, but I can work in there for 6 hours without any aches or pains- and the enlarger counter height is just as important- think burning and dodging when deciding how tall it should be. Sure one has to focus, but you'll spend a lot more time making test strips and dancing around with that dodging cards/wands than focussing. Make it comfortable! This is what I learned most from building and working in five darkrooms before this one.

I have one baseboard enlarger and one wall mounted one (with the counter as the baseboard) and don't really have a preference in printing. As I use the enlarging counter as a staging area for packing camera bags, loading sheet film holders etc. the open counter side gets a lot of use besides enlarging- so I'm glad that one ended up nearer the door.

I also would advise you to not think of it as done for a few years. I built my current darkroom from the ground up, and knew I'd need several years of tweaking to get it 'right'. I worked in this one for two years, making notes about what was wrong and right before doing a renovation, then spent another year before renovating again. I'm going to redo my ventilation at some point, to have the PVC pipe over the sink rather than just the wall mount fan, as the fan alone is too loud. Keep in mind a darkroom can be a work in progress even after it is 'done'.
 
Last edited:
For the dry side I've tentatively settled on 940mm as my bench height. My woodworking bench is that height and I find that very comfortable for most jobs, and I've played with the enlargers set up on that bench. That's a little taller than many, and I'm only 178cm, but I dislike bending any more than necessary. And yes - I need to keep some clear space for loading sheet film holders, bulk-rolling 35mm film and loading developing tanks.

For the sink I'm still thinking. I'll probably go for 150mm sides, with the base of the sink probably between 900mm and 930mm from the floor. I'll be mounting that on a solid wooden frame that is bolted together, so I'll be able to make adjustments later if I find it needs fine tuning. Is 2400mm too long for the sink? I want to be able to print up to 16x20 eventually, even though I'm currently only playing with 8x10. 2400mm long x 700mm deep should allow for that, but only leaves me with 600mm of adjacent bench space on that side.

"Done". What does that word mean? :) Looking at pics of other people's darkrooms here and on the other forums I can see that some have had years of use and many refinements along the way. I expect this will be the same and I'm deliberately not putting my wiring or plumbing inside the wall cavity so I can make changes to the layout further down the track, especially with regard to positions of safelights and other lighting. At this stage this is to be a one-man darkroom, and I can always build a low platform for the grand-daughter to stand on if she gets interested.
 
Chris, darkrooms are strange. If you finish it completely - you end up moving! Always leave some small thing unfinished - this way you can be sure of staying put. It has happened to me at least 3 times.
My current darkroom has two things to be finished (after 22 years) - the wall behind the 2nd enlarger needs to be painted matte black. I also need to change the hoses on the water outlet's to quick coupling versions and replace the green garden hoses with 3/4" clear, more flexible ones. I think I can get away with painting the wall - but fixing the water hoses will probably cause a move.
Yours look very good and a systematic approach to setting it up pays off in the end.
As for speakers for the sound system - look for marine quality ones - regular ones tend to die from moisture!
 
A too big darkroom means a lot of moving about, If you need to work fast it's better to have everything close by to minimize walking and reaching.

A small darkroom is easier and cheaper to heat and cool, and it will heat up or cool down to the desired temperature a lot quicker.
 
A too big darkroom means a lot of moving about, If you need to work fast it's better to have everything close by to minimize walking and reaching.

extra steps can sum up to good excersize, in same time voiding darkroom's impact on health :)

My version of darkroom is less than 1sq. metre of floor, working area is a bit wider. After printing session I feel like I sat in front of TV.
 
A little more progress: I have four walls (well, the frames at least), space for a door, and most of a ceiling. I've done the ceiling in pre-fabricated sections as big as I can manage to lift into place single-handed, and I have one small section to complete tomorrow. Then I can look to finishing most of the wall insulation and lining with gyprock (plasterboard). Before I can finalise that I need to install some vents which will rely on an air passage through the wall cavity (low entry high exit) so I need to construct a baffled passage and insulate around that. The first photo shows the darkroom in context - it is basically a cube that fills one corner of my 6m x 9m shed.

attachment.php


attachment.php


attachment.php
 

Attachments

  • _IMG6925.jpg
    _IMG6925.jpg
    24.1 KB · Views: 0
  • _IMG6936.jpg
    _IMG6936.jpg
    38 KB · Views: 0
  • _IMG6943.jpg
    _IMG6943.jpg
    40.1 KB · Views: 0
Back
Top Bottom