RichC
Well-known
I started photography with a Canon 10D digital SLR, and now use a Leica M8 - I have never been a film user. However, a few months ago I fancied trying film. There was no point in buying a 35 mm film camera as the format is too similar to my APS-format digital cameras with non of digital’s advantages, so I decided on a format entirely different and complementary: 6x6 120 film.
One of the reasons I use a rangefinder is its small size, so I wanted a medium-format camera that was small and portable. I’m not interested in cameras except as tools, so I had a minimum specification for it to be usable to me. In short, it had to match my Leica M8: compact size; easy to use; reliable; accurate viewfinder with a rangefinder and parallax correction; fast, high-quality lens; fast shutter; PC flash socket. SLRs and TLRs were out because they’re too large and bulky, so that left collapsible/folding cameras. Modern ones like the Mamiya 6 are too expensive, so that meant buying a camera older than myself, as this type of camera seems to have largely died out by the start of the 1960s.
I researched folding cameras by playing around with a few top-end 1950s models in my local camera shop, such as those made by Agfa and Zeiss. I found that these old folders have some unforgivable faults - unforgivable as there is no reason I can see why a manufacturer would offer a high-quality camera with major deficiencies that significantly impact the camera's usability whereas 35mm cameras designed in the same era (and often by the same companies) not only did not suffer from these afflictions but had improved features (e.g. a combined shutter-cocking/film-advance lever and double-exposure prevention). It's as if the manufacturers simply weren't interested in making folding cameras user-friendly - even top-of-the-line models aimed at serious photographers! 😱
The main faults were:
• Small squinty viewfinders
• Viewfinders suffering from distracting flare and reflections
• No strap lugs on the camera body
• Uncomfortable, awkwardly placed controls
The first camera I bought was an Iskra, going by its high specifications (on paper) and glowing reports by users. Big mistake! I’ve never seen such a crude, poorly built machine in my life - it looks like it was made and designed by a blacksmith! And it’s an ergonomic nightmare; for example, the knurling on the controls is so sharp that it takes the skin off your fingers, and the focusing lever disappears awkwardly behind a strut! Then the shutter jammed, tearing the blades! Back to the drawing board... 😡
After more research I decided on the Certo Six, mainly because of its parallax correction mechanism, and managed to find one after some serious searching. It’s a nice camera, well built and well specified, and was obviously not cheap when new, but suffers from the faults common to many folding cameras listed above. I sent the Certo to Newton Ellis Ltd (Liverpool, UK) for a complete overhaul after the shutter jammed when I used the self-timer. (I would like to congratulate Newton Ellis for doing a superb job.)
Collectors will probably hate me, but I've now irreversibly modified this rather uncommon camera! 😛
My Certo, though no longer original, is now much easier to use, and I can now concentrate simply on taking photographs rather than wrestling with poor camera design. In case anyone wants to improve their Certo or another old folder, I'm giving detailed notes below. I'm especially pleased with the viewfinder modifications, as they've transformed it: it's clear, bright, accurate and does not suffer from reflections or glare even when facing a low sun. 😀
These old European cameras remind me of how the Japanese were able to destroy the entire British motorcycle industry within a few short years: our poorly designed machines made by complacent manufacturers were decimated by simple, well-designed models that performed reliably and efficiently. The Japanese considered what a motorcycle had to do, then created ones that met all the criteria: the best British motorcycles used high-quality components but still borrowed heavily from decades-old designs, and were often created by committees with no experience of the motorcycle industry - peddling their own agendas and uninterested in their customers' needs. Hence, we have Triumph producing the 1971 "Umberslade" Bonneville - which was too tall for anyone to sit on, overheated because the oil tank was too small, vibrated like h-ll because the engine size was stretched beyond its limit, and wouldn't stop because the brakes didn't work! When looking at old European cameras, I get the same feeling about their manufacturers' complacency... :bang:
So, as a photographer who’s used only modern cameras, what I can I take from my foray into the world of classic cameras? First, when sellers say that a camera is in full working condition and reliable, don’t believe them unless they can prove it’s been recently serviced - both sellers were very unhappy when I told them that their cameras had broken, accusing me of mistreating them (yeah - if using the camera counts as misuse!), with one saying that self-timers should never be used (I can’t believe that - presumably, self-timers worked reliably when the camera was new, otherwise the makers wouldn’t have fitted them)!
Secondly, like old motorcycles, it seems that many people view old cameras through rose-tinted spectacles - most of both types of machine were utter rubbish and are best forgotten, and many of the remainder had serious flaws. (I should mention that I ride and rebuild classic motorcycles - but am very selective which ones I own, and have no qualms about modifying them to fix glaring flaws. So, I do like old machines - but good design is timeless, and a well-designed machine (e.g. a Leica M3 or an MV Augusta 750 cc motorcycle) should be able to perform and handle as well as its modern peers.)
Anyway, the modifications... 😎
Squinty viewfinder
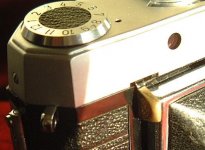
The viewfinder eye hole is far too small: you have to put your eye so close to the camera to see the entire view that the camera is literally touching your eyeball! You can forget about using the Certo with glasses. My solution (see first thumbnail image) was to:
1. Remove the screwed-on dioptre lens holder
2. Enlarge the eye hole. The hole is now a 6 mm-sided square. I may enlarge this to 7 mm
3. Paint the eye hole surround matt black
4. Screw on a 0.5 mm-thick square of black-painted brass in place of the dioptre holder, to act as an eye shield
(Note: the dioptre holder (safely stored) can be replaced at any time, hiding the enlarged hole, although this would, of course, negate the point of this particular modification.)
Viewfinder flare and reflections
This was very distracting, but was easily solved with a bit of experimentation. A bit Heath Robinson, but the transformation is startling. Note: I used PVA glue (easily removed).
1. Paint the inside of the top plate matt black, as well as anything in the light path
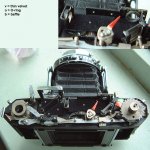
2. Glue a 6 mm (inside diameter) rubber O-ring to the inside of the rangefinder window (behind the glass), to act as a baffle (see second thumbnail - also note the black-painted brass baffle I made, to the right of the O-ring, and the velvet glued to the rangefinder floor (see point 3))
3. Glue a strip of a non-reflective black material (e.g. thin velvet) between the rangefinder mirror and the collimating lens (the small lens that moves when the camera is focused) – make sure that (a) the mechanism is not hindered and (b) the adjustment screw is not covered. After making this and the previous modifications, the rangefinder patch no longer flared or had multiple images
4. Glue two roughly triangular pieces of velvet in front of and behind the beam splitter, abutting the beam splitter. Glue a semicircular piece of velvet to the pivot just in front of the rear viewfinder window. Before this modification, when looking through the viewfinder, the surface on which the beam splitter is mounted could be seen, as could the bottom edge of the beam splitter, and part of the film advance mechanism. With the velvet, the viewfinder is totally free of distractions
The second thumbnail also shows the rangefinder mechanism with parts in the light path painted matt black and the velvet in place (each piece labelled "v")
Fitting strap lugs
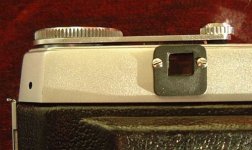
I hate camera cases, so wanted to fit strap lugs. The camera body is 2–3 mm thick aluminium alloy, so it’s straightforward to drill and tap some holes for threaded strap lugs. I got the threaded strap lugs simply by emailing a camera restorer I found on the web.
The only problem was preventing the lugs from unscrewing. In the end, I had to epoxy them in place as even Locktite studlock wasn't strong enough - this is not as drastic as it seems, as heat applied to the lug (e.g. with a soldering iron) will break down the epoxy. I used JB Weld, which is the toughest epoxy I know of! The third thumbnail shows one of the lugs.
Uncomfortable controls
I don’t mind cocking the shutter nor the unusual focusing method using a lever under the camera, but I do have a problems with the shutter button. First, it moves sideways, not down – I expect that it feels strange as I’m used to pressing shutter buttons down! Secondly, the button is rectangular, and the sharp edges and corners press uncomfortably into my finger.
I can’t do anything about the button direction, but the shutter button was made more comfortable by filing the edges and corners round. For the sake of appearance, I polished off the remaining chrome on the button, to leave bare brass (see the third thumbnail).
The Certo Six can't be closed with the shutter cocked as the cocking lever fouls the top of the camera. This can be fixed by grinding a cut-out for clearance. I haven't done this yet, but will do so at some stage.
My Certo Six (before modification):

One of the reasons I use a rangefinder is its small size, so I wanted a medium-format camera that was small and portable. I’m not interested in cameras except as tools, so I had a minimum specification for it to be usable to me. In short, it had to match my Leica M8: compact size; easy to use; reliable; accurate viewfinder with a rangefinder and parallax correction; fast, high-quality lens; fast shutter; PC flash socket. SLRs and TLRs were out because they’re too large and bulky, so that left collapsible/folding cameras. Modern ones like the Mamiya 6 are too expensive, so that meant buying a camera older than myself, as this type of camera seems to have largely died out by the start of the 1960s.
I researched folding cameras by playing around with a few top-end 1950s models in my local camera shop, such as those made by Agfa and Zeiss. I found that these old folders have some unforgivable faults - unforgivable as there is no reason I can see why a manufacturer would offer a high-quality camera with major deficiencies that significantly impact the camera's usability whereas 35mm cameras designed in the same era (and often by the same companies) not only did not suffer from these afflictions but had improved features (e.g. a combined shutter-cocking/film-advance lever and double-exposure prevention). It's as if the manufacturers simply weren't interested in making folding cameras user-friendly - even top-of-the-line models aimed at serious photographers! 😱
The main faults were:
• Small squinty viewfinders
• Viewfinders suffering from distracting flare and reflections
• No strap lugs on the camera body
• Uncomfortable, awkwardly placed controls
The first camera I bought was an Iskra, going by its high specifications (on paper) and glowing reports by users. Big mistake! I’ve never seen such a crude, poorly built machine in my life - it looks like it was made and designed by a blacksmith! And it’s an ergonomic nightmare; for example, the knurling on the controls is so sharp that it takes the skin off your fingers, and the focusing lever disappears awkwardly behind a strut! Then the shutter jammed, tearing the blades! Back to the drawing board... 😡
After more research I decided on the Certo Six, mainly because of its parallax correction mechanism, and managed to find one after some serious searching. It’s a nice camera, well built and well specified, and was obviously not cheap when new, but suffers from the faults common to many folding cameras listed above. I sent the Certo to Newton Ellis Ltd (Liverpool, UK) for a complete overhaul after the shutter jammed when I used the self-timer. (I would like to congratulate Newton Ellis for doing a superb job.)
Collectors will probably hate me, but I've now irreversibly modified this rather uncommon camera! 😛
My Certo, though no longer original, is now much easier to use, and I can now concentrate simply on taking photographs rather than wrestling with poor camera design. In case anyone wants to improve their Certo or another old folder, I'm giving detailed notes below. I'm especially pleased with the viewfinder modifications, as they've transformed it: it's clear, bright, accurate and does not suffer from reflections or glare even when facing a low sun. 😀
These old European cameras remind me of how the Japanese were able to destroy the entire British motorcycle industry within a few short years: our poorly designed machines made by complacent manufacturers were decimated by simple, well-designed models that performed reliably and efficiently. The Japanese considered what a motorcycle had to do, then created ones that met all the criteria: the best British motorcycles used high-quality components but still borrowed heavily from decades-old designs, and were often created by committees with no experience of the motorcycle industry - peddling their own agendas and uninterested in their customers' needs. Hence, we have Triumph producing the 1971 "Umberslade" Bonneville - which was too tall for anyone to sit on, overheated because the oil tank was too small, vibrated like h-ll because the engine size was stretched beyond its limit, and wouldn't stop because the brakes didn't work! When looking at old European cameras, I get the same feeling about their manufacturers' complacency... :bang:
So, as a photographer who’s used only modern cameras, what I can I take from my foray into the world of classic cameras? First, when sellers say that a camera is in full working condition and reliable, don’t believe them unless they can prove it’s been recently serviced - both sellers were very unhappy when I told them that their cameras had broken, accusing me of mistreating them (yeah - if using the camera counts as misuse!), with one saying that self-timers should never be used (I can’t believe that - presumably, self-timers worked reliably when the camera was new, otherwise the makers wouldn’t have fitted them)!
Secondly, like old motorcycles, it seems that many people view old cameras through rose-tinted spectacles - most of both types of machine were utter rubbish and are best forgotten, and many of the remainder had serious flaws. (I should mention that I ride and rebuild classic motorcycles - but am very selective which ones I own, and have no qualms about modifying them to fix glaring flaws. So, I do like old machines - but good design is timeless, and a well-designed machine (e.g. a Leica M3 or an MV Augusta 750 cc motorcycle) should be able to perform and handle as well as its modern peers.)
Anyway, the modifications... 😎
Squinty viewfinder
The viewfinder eye hole is far too small: you have to put your eye so close to the camera to see the entire view that the camera is literally touching your eyeball! You can forget about using the Certo with glasses. My solution (see first thumbnail image) was to:
1. Remove the screwed-on dioptre lens holder
2. Enlarge the eye hole. The hole is now a 6 mm-sided square. I may enlarge this to 7 mm
3. Paint the eye hole surround matt black
4. Screw on a 0.5 mm-thick square of black-painted brass in place of the dioptre holder, to act as an eye shield
(Note: the dioptre holder (safely stored) can be replaced at any time, hiding the enlarged hole, although this would, of course, negate the point of this particular modification.)
Viewfinder flare and reflections
This was very distracting, but was easily solved with a bit of experimentation. A bit Heath Robinson, but the transformation is startling. Note: I used PVA glue (easily removed).
1. Paint the inside of the top plate matt black, as well as anything in the light path
2. Glue a 6 mm (inside diameter) rubber O-ring to the inside of the rangefinder window (behind the glass), to act as a baffle (see second thumbnail - also note the black-painted brass baffle I made, to the right of the O-ring, and the velvet glued to the rangefinder floor (see point 3))
3. Glue a strip of a non-reflective black material (e.g. thin velvet) between the rangefinder mirror and the collimating lens (the small lens that moves when the camera is focused) – make sure that (a) the mechanism is not hindered and (b) the adjustment screw is not covered. After making this and the previous modifications, the rangefinder patch no longer flared or had multiple images
4. Glue two roughly triangular pieces of velvet in front of and behind the beam splitter, abutting the beam splitter. Glue a semicircular piece of velvet to the pivot just in front of the rear viewfinder window. Before this modification, when looking through the viewfinder, the surface on which the beam splitter is mounted could be seen, as could the bottom edge of the beam splitter, and part of the film advance mechanism. With the velvet, the viewfinder is totally free of distractions
The second thumbnail also shows the rangefinder mechanism with parts in the light path painted matt black and the velvet in place (each piece labelled "v")
Fitting strap lugs
I hate camera cases, so wanted to fit strap lugs. The camera body is 2–3 mm thick aluminium alloy, so it’s straightforward to drill and tap some holes for threaded strap lugs. I got the threaded strap lugs simply by emailing a camera restorer I found on the web.
The only problem was preventing the lugs from unscrewing. In the end, I had to epoxy them in place as even Locktite studlock wasn't strong enough - this is not as drastic as it seems, as heat applied to the lug (e.g. with a soldering iron) will break down the epoxy. I used JB Weld, which is the toughest epoxy I know of! The third thumbnail shows one of the lugs.
Uncomfortable controls
I don’t mind cocking the shutter nor the unusual focusing method using a lever under the camera, but I do have a problems with the shutter button. First, it moves sideways, not down – I expect that it feels strange as I’m used to pressing shutter buttons down! Secondly, the button is rectangular, and the sharp edges and corners press uncomfortably into my finger.
I can’t do anything about the button direction, but the shutter button was made more comfortable by filing the edges and corners round. For the sake of appearance, I polished off the remaining chrome on the button, to leave bare brass (see the third thumbnail).
The Certo Six can't be closed with the shutter cocked as the cocking lever fouls the top of the camera. This can be fixed by grinding a cut-out for clearance. I haven't done this yet, but will do so at some stage.
My Certo Six (before modification):
Attachments
Last edited: