ColSebastianMoran
( IRL Richard Karash )
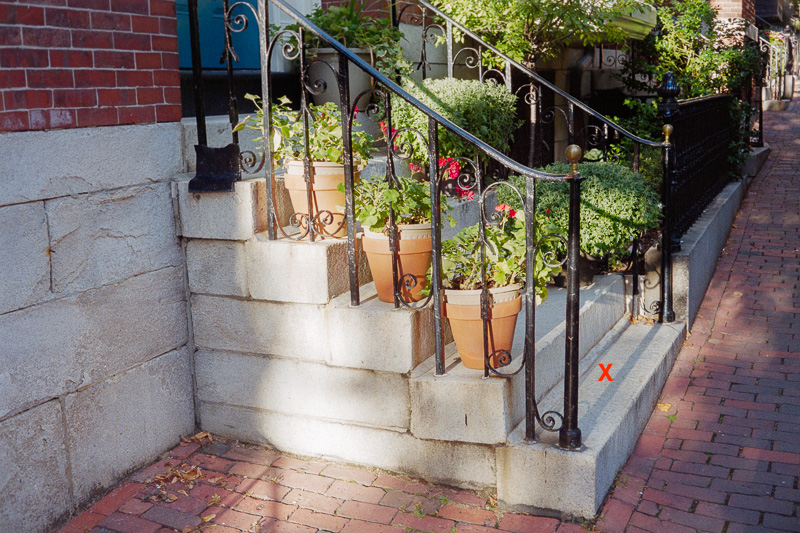
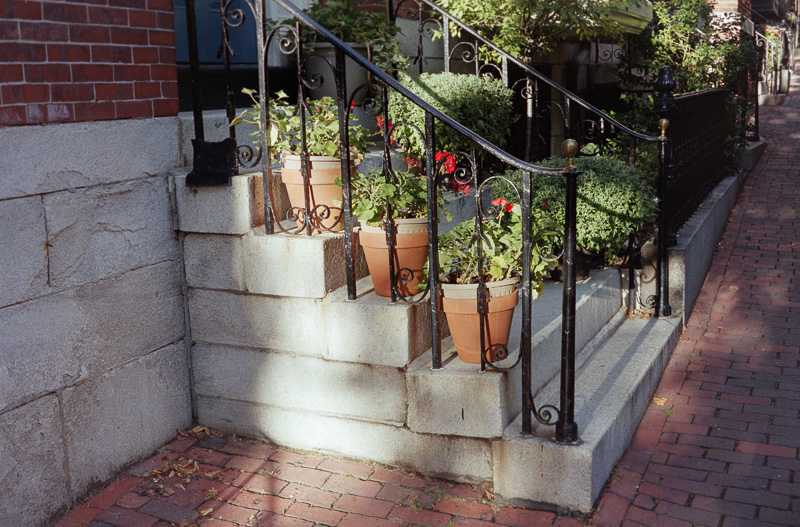
Next, I did a little bit of manual adjustment. I'll show the adjustments in the next post, but the most important is color. I know the granite steps are quite neutral, so I corrected, working again in LR. In the photos, X marks the eyedropper spot.
With No Filter:
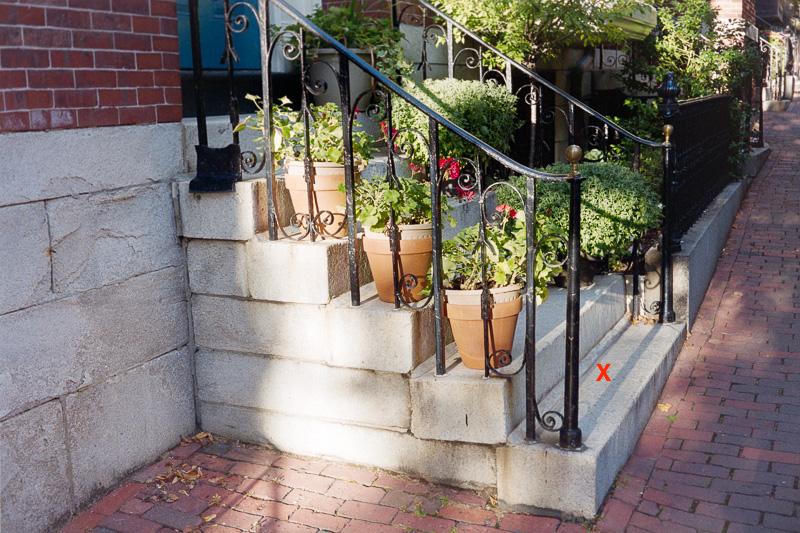
With CMFilter:
With No Filter:
With CMFilter:
ColSebastianMoran
( IRL Richard Karash )
Here are the adjustment required to get to the "final" images just above:
With No Filter:

With CMFilter:
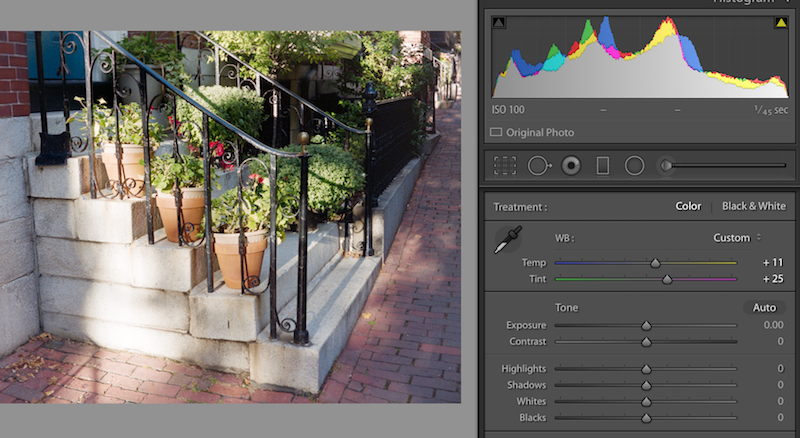
Histograms are good in both. The final color correction (eyedropper on the X) are about the same. But, other adjustments are more severe in the NoFilter image.
With No Filter:
With CMFilter:
Histograms are good in both. The final color correction (eyedropper on the X) are about the same. But, other adjustments are more severe in the NoFilter image.
ColSebastianMoran
( IRL Richard Karash )
Finally, a side-by-side comparison of the final adjusted images:

My conclusions:
1. Not very different in results. Either could work, with some more touch-up.
2. Both are better than the mini-lab print I got in 2010.
3. The flash+filter illumination produces the result with less severe adjustments. Many advocate ETTR; this approach gives a file with better placed Green and Blue histograms. I have long believed that severe adjustments produce artifacts, so I'll favor the Cyan/Magenta filter version.
4. I think the new-to-me option in PS Curves-Auto is a break through. I've tried various auto adjustments in the past without much success, this one is different. Hit Auto with the option key, "Find Dark and Light Colors," and "Snap Neutral Midtowns."
Looking forward to your thoughts. For Jack and anyone else who wants to play, here are the RAW files:
I suggest starting with this one
No Filter, Flash illumination: 2under.net/images/160712-Steps-Flash-NoFilter-DSC0007.ARW
CM Filter, Flash illumination: 2under.net/images/160712-Steps-Flash-CMFilter-DSC0005.ARW
No Filter, 3000K illumination: 2under.net/images/160712-Steps-3000k-NoFilter-DSC0004.ARW
Ranchu
Veteran
Pretty similar. I guess I was wrong, but the bluish bricks in the filtered version look more accurate to me than the other. Could just be bias from knowing which is which. Still, filtering the light to remove as much mask as possible couldn't hurt. I appreciate the additional investigations! In all, a really nice histogram for full sunlight and shadows! ")
Ranchu
Veteran
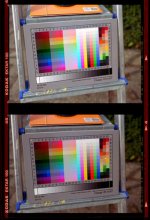
If you want get maniacal, you could filter to compensate for the relative sensitivities of the RGB filters on your sensor, plus the mask. Hit the 'Color Response' tab ..
https://www.dxomark.com/Cameras/Canon/EOS-5D-Mark-II---Measurements
I believe the trial version of Rawmagick lite has a check box to show the three channels before they're manipulated by the profile..
http://www.rawmagick.org/
https://www.dxomark.com/Cameras/Canon/EOS-5D-Mark-II---Measurements
I believe the trial version of Rawmagick lite has a check box to show the three channels before they're manipulated by the profile..
http://www.rawmagick.org/
Godfrey
somewhat colored
I told you what I did and why. Telling me it isn't a finished rendering so therefore brbo has a better methodology is just stupid ... I told you it wasn't a finished job that when I posted it. It proves nothing other than that you want to try to put me down. I don't give a rat's patootie what you think.
You can carry on blathering all you want. I'm done with this stupidity. Now you all should delete the copies of my photo from your computer .. it is copyrighted and all rights reserved, like all my work.
G
You can carry on blathering all you want. I'm done with this stupidity. Now you all should delete the copies of my photo from your computer .. it is copyrighted and all rights reserved, like all my work.
G
Exactly. For all the cross-criticism of each other's workflows in this thread, the best, and most neutral version so far is brbo's. Other people telling him that he's doing it 'wrong' (ironically I've accused him of saying this to other members in the past), in view of his vastly superior result that discussion seems essentially moot to me.
FWIW that workflow is almost exactly what I do in CP (apart from adjusting saturation and gamma). Nowadays I spend about 10 seconds in ColorPerfect: if the WB isn't correct, I adjust it by clicking a neutral area. If no neutral area is available I use the Ring CC interface to fine-tune the color parameters by eye. When I was using Vuescan I'd also need to adjust the Highlight and BP Tails a bit, but with Silverfast I can even skip those settings totally.
When you simply begin to understand the very unique interface, ColorPerfect is fast, consistent and usually very, very good.
Ranchu
Veteran
lmao. :dance:The guy's colors are cleaner right out of the raw converter, where you still had the cast. Then you wanted to jam him up and act like you didn't understand what he was saying. Then you start crowing about how everyone else's was so 'complicated' when you hadn't even finished doing the work on yours.
Get a grip, you're talking to people who are serious about this.
:dance::dance:
Get a grip, you're talking to people who are serious about this.
:dance::dance:
ColSebastianMoran
( IRL Richard Karash )
Pretty similar. I guess I was wrong, but the bluish bricks in the filtered version look more accurate to me than the other. Could just be bias from knowing which is which. Still, filtering the light to remove as much mask as possible couldn't hurt. I appreciate the additional investigations! In all, a really nice histogram for full sunlight and shadows!
Yes, more similar than I expected. Frankly, hard to choose in a blind test, looking only at the processed images.
And, thanks. I chose the negative for the full range of tones.
mani
Well-known
I told you what I did and why. Telling me it isn't a finished rendering so therefore brbo has a better methodology is just stupid ... I told you it wasn't a finished job that when I posted it. It proves nothing other than that you want to try to put me down. I don't give a rat's patootie what you think.
You can carry on blathering all you want. I'm done with this stupidity. Now you all should delete the copies of my photo from your computer .. it is copyrighted and all rights reserved, like all my work.
G
Well that escalated quickly.
As so often on the internet, someone mistook the tone of what was meant as an innocuous statement and ran with it... FWIW I wasn't trying to put anyone 'down' in my comment post about ColorPerfect. I just felt it was worth reiterating what brbo was saying: the workflow with Cp is very fast and very simple. It's also consistent, once you get the hang of the very weird interface.
Very impressed otherwise with the seriousness and thoroughness of the techniques being discussed in the thread. Can't help thinking there's such a massive hole in the market for the continually-growing interest in film photography: when it comes to capturing/scanning and post-processing, we're left to find our own techniques and solutions - which is both exciting and frustrating.
ColSebastianMoran
( IRL Richard Karash )
Will no one rid us of this meddlesome orange mask?
A plug-in? A camera calibration?
Invert followed by PS Curves with "Find Dark and Light Colors," and "Snap Neutral Midtones" does well enough for some images, but we know it's technically flawed and these flaws will show sometimes.
A plug-in? A camera calibration?
Invert followed by PS Curves with "Find Dark and Light Colors," and "Snap Neutral Midtones" does well enough for some images, but we know it's technically flawed and these flaws will show sometimes.
jzagaja
Well-known
Hue shift (more greenish) and saturation/clipping depends on output color space. I can set dcraw to no clipp (camera space) but image is not nice. I can set sRGB and no color balance and again get no clipping. Conclusion - all depends on RAW converter. My advice:
- use RPP with LAB Tiff output, convert in PS to RGB and apply levels, nice colors
- use dcraw syntax -T -o 1 test.arw then import into PS and set levels
- try balance orange mask with 80A filter
from drum scanners I get nice colors, from digicams it is difficult
- use RPP with LAB Tiff output, convert in PS to RGB and apply levels, nice colors
- use dcraw syntax -T -o 1 test.arw then import into PS and set levels
- try balance orange mask with 80A filter
from drum scanners I get nice colors, from digicams it is difficult
jzagaja
Well-known
marekvesely
Newbie
Woha! This is super-interesting! Is your plugin working with Photoshop CC? It should be easily applicable to 16-but RAW output (they are always linear, right?) TIFF scans from VueScan.2) My plugin for inverting negatives: https://drive.google.com/open?id=0ByP8kkW_h00uN3pPNGZZR2hIZU0
it applies log curve, linearize image if needed, applies levels, applies Schlick curve for contrast fine tune, changes midtones balance through film gamma settings.
I wish I was at home to test this!
EDIT: Ah, now I see that it works only up to PS CS6
jzagaja
Well-known
If your Photoshop requires installator for plugin then no. It was written 15 years ago in Filter Meister, some functions not implemented. New interface has histogram, ctrl+M switches off clipping markers.
https://drive.google.com/open?id=0ByP8kkW_h00ueW9PR2k4Zmlkazg
Vue outputs linear gamma 1 files too that can be used. Nonlinear can be used too if you write file gamma in the plugin.
https://drive.google.com/open?id=0ByP8kkW_h00ueW9PR2k4Zmlkazg
Vue outputs linear gamma 1 files too that can be used. Nonlinear can be used too if you write file gamma in the plugin.
ColSebastianMoran
( IRL Richard Karash )
My advice:
- use RPP with LAB Tiff output, convert in PS to RGB and apply levels, nice colors
Using Jack's suggestion:
- Working from the Cyan/Magenta Flash illuminated camera-scan
- RPP with LAB 16 bit Tiff output, adjusting to put the histogram in the middle, and a full stop away from clipping at either end
- Open in PS, crop, invert, convert to RGB
- Then run Curves, Auto, with "Find Dark and Light Colors," and "Snap Neutral Midtones"
- Back in Lightroom, Clarity +13, one more color correct with eyedropper, same spot on last step
- Slightly reduce exposure -0.10
Here's the result:
Good result, a bit different, more pop in the red flowers I like, green tint on sunlit granite I don't like but could easily correct.
Note that none of the images I've shown do I consider fully finished.
My conclusion for Camera-scan of color negs:
- RAW converters are different, as we knew.
- The PS Curves Auto-with-options continues to look good.
- I'll continue to illuminate with the CMFilter and 5000K flash; offsetting the mask can't hurt.
- I'll probably stay with ACR for RAW conversion
- ... but will watch for images that might work better with something else
- Still will be some color casts to correct
Thanks all for the comments! At this point, I'll stop experimenting.
ColSebastianMoran
( IRL Richard Karash )
Summarizing my color neg camera-scan workflow:
- Illuminate the neg with +50 Cyan +15 Magenta on Beseler Dual-Mode Duplicator
- Shoot with 24MPx digicam, good macro lens, RAW capture, tethered shooting, RAWs go right into Lightroom
- Get a WB from film rebate, adjust histogram to be broad and a full stop away from clipping at both ends; use for all shots on the roll
- Crop as needed
- Edit in... Photoshop
- Run the Action in Huss's suggested article (Invert, then Curves Option-Auto "Find Dark and Light Colors," and "Snap Neutral Midtowns")
- Save in PS, creates a big tiff file
- Back in Lightroom, make final adjustments
- Export in desired format and resolution
Lightroom manages the RAW, the positive tiff, and the final adjustments
Ranchu
Veteran
Many thanks for the investigation, Colonel!
Kamph
Established
Woha! This is super-interesting! Is your plugin working with Photoshop CC? It should be easily applicable to 16-but RAW output (they are always linear, right?) TIFF scans from VueScan.
I wish I was at home to test this!
EDIT: Ah, now I see that it works only up to PS CS6
I believe you have a Scanmate 5000, correct? Then I'm afraid that 16 bit RAW won't work, as QC has a bug that corrupts the SM5000 16bit RAW files. The single issue I've with this otherwise wonderful scanner.
jzagaja
Well-known
Below please find logarithmic drumscans: (desribed by me earlier, very simple)
https://drive.google.com/open?id=0ByP8kkW_h00uY0ZfdDQwa2ZCMGc
this is same as Cineon/Cintel Millenium scanner log dpx file output but with applied levels. Now see this image on HDR OLED (LG B7) or any quality bright display in the dark and you will see a beauty of the fillm capture and how easy it is with good scanner or make positive copy in cine laborathory (cheap) and project on wall.
ColSebastianMoran
( IRL Richard Karash )
Workflow for scanning negatives is very easy - you make a photo or scan in linear gamma 16 bit and apply log curve (I can send) then invert and set black/white point convert to 8 bits. For most films this is all so only three steps. Some films require midtones correction with levels or curves eg. Ektar has too much magenta. All depends on scanner spectral response too. If your photo is in gamma 2,2 space (windows) then log curve approx. is gamma 3 so you need add gamma 0,8 (lighten image). I wrote plugin in 2004 for that that works in older PS.
Orange mask removal through mixing light or exposure is a good thing that maximize bit depth and prevent banding.
Here is inversion curve from gamma 2,2 image into log space so you can apply in any Adobe application and set black/white point. Two steps only.
https://drive.google.com/open?id=0By...Uxsend6LTl2eGc
Jack, thank you for comments on gamma vs log and your offer of the custom curve. I have been thinking about this since your first comments.
My concern had been that the gamma transformation of digital data would mess up the inversion from negative to positive.
Your comments raise a different hypothesis: that gamma in digital is not a problem, but the non-linearity of film IS a problem.
Here's a line I think is suggested by your comments:
- Film has a very non-linear response to light. While the characteristic curve has a segment linear in log-log space, even in that range it's quite non-linear in the base variables (scene brightness vs. light transmission of the resulting negative).
- My camera scan of the negative is linear. RAW capture counts photons linearly, even though all our software applies gamma when displaying an image.
- If we invert the camera-scan directly, we'll get unwanted tonal changes.
- The "righter" way is to apply a non-linear transformation to the camera-scan RAW file before or during the inversion.
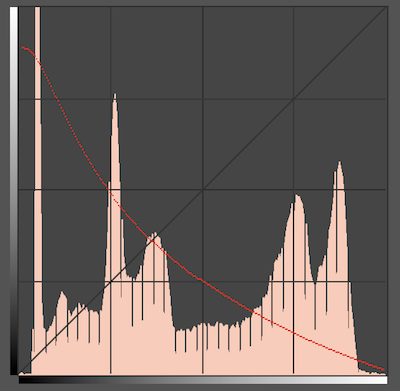
Jack provided us a Photoshop curve that applies a non-linear transformation and inverts. I haven't tried to validate the curve, instead I've simply tried using it on images.
Jack's curve looks like this (the red channel curve is shown, blue and green are similar, ignore the black line).
Here's a process that would follow from above:
- Illuminate a color neg with +50 Cyan +15 Magenta using 5000K flash
- WB from rebate (it is 4350K and -8 tint with my setup, with one typ film)
- RAW conversion with default settings
- Set White and Black points in PS (Levels)
- Transform and Invert with Jack's curve
- Curves Option-Auto with Huss's options: Find Dark/Light, Snap Neutrals
Over next couple days will make some comparisons, but initial tests appear promising, possibly better than the other's I've tried.
Thanks Jack and Huss for the tips.
Share:
-
This site uses cookies to help personalise content, tailor your experience and to keep you logged in if you register.
By continuing to use this site, you are consenting to our use of cookies.