Canonet GIII QL17 - sticky frame counter

RicardoD

Well-known
Local time
3:05 PM
Joined
Mar 24, 2006
Messages
356
Location
South Bay, CA
I am having a problem with winding up the film in my GIII QL17 and the frame counter. Here is what is happening.

Background, new-to-me GIII, looks brand new, this is the result of my first time trying to run film through it.

1)The manual states after closing the back cover to wind the film lever 3 or 4 times until it stops. At first this wasn't happening, but in preparation for this post I have been loading and unloading film and now I get this to work right. That is after 4 cranks of the lever the "film wound up" indicator turns red and you can't crank anymore.

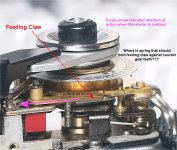
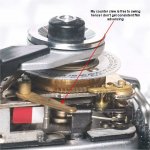
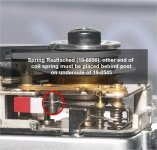
2)At this point the film counter kinda sticks, or if I can get it to advance at all it won't go past 10. And it is not advancing properly each time, so sometimes the film counter will stick on a number for a few frames.

3)The film is definitely advancing properly, I can get my 24 clicks in on a 24 exposure roll. Also tests with the door slightly open shows the film is winding up and advancing properly (not to mention you can see the rewind crank spin at each advance)

Has anybody encountered this before? Any suggestions? Perhaps it just needs some lubrication sits it was probaby sittting for a very long time prior to my receiving it.
 
Last edited:
First thing to check is the light seals. When they turn to gunk, they get the little chrome lever in the top groove (behind the shutter button) gets hung up on them, and doesn't come out to reset the counter to 0.

Even in "as new" condition, the seals will be shot by now.
 
Sounds like you need to have an adjustment on the camera. You might want to contact G'Man and discuss sending it to him for the job. I had a similar problem with the same kind of camera and he took care of it so that now it's just like a brand new camera. Highly recommended. It's my impression that this is a fairly common kind of problem with GIII Canonets and that it is easily corrected.

Good luck,

Frank
 
Frank,

I am trying to determine what that adjustment is and whether it requires removel of the top only. In the Repair Notes forum G'man has unfortunately reported that he has stopped taking further repairs due a medical issue. I think I would like to tackle this adjustment on my own if possible.
 
Ricardo:

Ok, well I'm sure there are some other people here who could help you. I remember that it was just an adjustment. Apparently many, if not most of these cameras seem to have the problem as they get older and need to be adjusted. I too was a bit worried when it happened to me, and now that it's back with a fresh "CLA" it's a gem. Well worth the trouble.

Let us know how it works out. Also, if you don't get a response right now, you might start a new thread just asking if anyone knows how to do the specific adjustment or where the information might be located on the web.

All the best,

Frank
 
Making Progress!

Making Progress!

I've diagnosed the problem. I managed to remove the top cover off my Canonet.

Other repair newbies out there look here and here to learn how to remove the top cover. Just 3 screws, one removed rewind lever, and friction driver for film advance lever.

I do have the Canonet Repair manual which can be found free on the web here but I can't figure out what spring I am missing.

I have determined that my counter claw is not being forced against the counter gear due to a missing spring I believe. What spring is missing I can't figure out even from the exploded view assembly drawing in the repair manual. Or perhaps a spring is there but not hooked on to the counter claw properly.

See attached photos for an explanation. Anybody care to share a similar photo from a working frame counter Canonet?

Edit: Success! Read post below. You little bastard Canonet I got you!
 

Attachments

  • counter1.jpg
    counter1.jpg
    62.7 KB · Views: 3
  • counter2.jpg
    counter2.jpg
    51.7 KB · Views: 2
Last edited:
Success!!!

Success!!!

Yeeehaaa!! I figured it out all by myself! (Taking bow before large crowd of rangefinder repairmen)

Turns out it is spring 97-6656 that was not hooked properly on either end. I need much better light in my work area and some magnifying glasses. One end is shown in the attached photo below. The other goes to the a little post on the bottom side of 19-0545.

I didn't bond with my car until I changed the turbocharger in it...
I didn't bond with my motorcyle till I did a spline lube...
And know I have bonded with my Canonet. 😀

Who cares that I take lousy pictures, its just the little bit of artist in my trying to get out. Can you tell the Engineer in me rules my persona!
 

Attachments

  • counter3.jpg
    counter3.jpg
    65.5 KB · Views: 2
Back
Top Bottom