charjohncarter
Veteran
You are in business! Keep this thread alive by showing us more prints. In 1970 I made positives by using Panorex dental x-ray film in the place of paper. Then I would put them on my x-ray viewer to view the positive. Patients would sometimes get to see themselves.
Nice darkroom I know it was much work but it looks like it was worth it.
Nokton48
Veteran

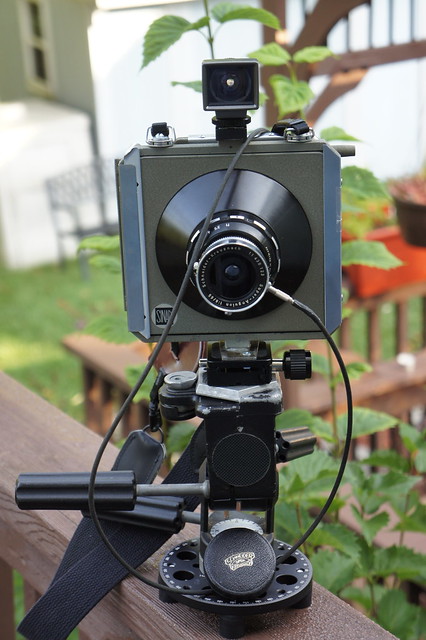
Here is my fifth Sinar Norma camera. This is my handmade (by me!) Sinar Norma Handy. I can shoot handheld with this or use the lowboy platform. I think Irving Penn would have approved
This is the camera Sinar Norma should have manufactured back in the sixties. This was great fun to design and build, most parts are original Norma

charjohncarter
Veteran
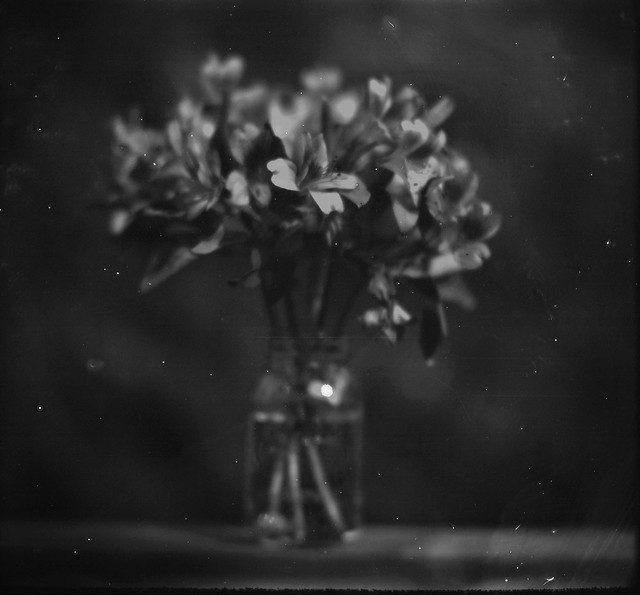
That flower and vase photo on Photrio is great.
Nokton48
Veteran
That flower and vase photo on Photrio is great.
Well Thanks! It was really something to use my old 4x5 Norma again
Here it is

My first Norma 4x5 photo in twenty five years taken yesterday. Fuji 8x10 HR-U X-Ray cut down to 4x5, Graphmatic Holder, 4x5 Sinar Norma 180mm f5.6 chrome Durst Componon lens, full key sun. This was exposure #6, two stops over ambient reading of grey card EI 50 TTL Sinarsix 1/15 @ Fll. Short development is stock Legacy Mic-X 5 minutes 68F. Cesco flat bottomed 8x10 tray, sheets developed singly. I did a sort of ring-around, varying exposure and development times. This is the lowest contrast version which I like. 8x10 Arista RC #2 Multigrade dev Omega DII with Omegalite circuline head Cool thing is this works out to about 7 cents per 4x5 sheet. I may load up the truck
Here I have loaded up the truck.

$28 plus ship for 100 8x10 sheets. What a steal deal!
Nokton48
Veteran

9x12cm J Lane Dry Plate, loaded into a 9x12cm RADA Normalfaltz Single Plate Holder. Exposed in Plaubel Makiflex Automatic with a lens purchased from an Antique shop in the UK. An 8 inch F4 (?) approx brass projection lens of the Petzval variety. 1/4 sec exposure at wide open F4 (?) approx EI of 1, lightest cloud veiling direct key sun. Almost key light. No fill. Glass neg processed in Ilford Multigrade paper dev 10 mins at 20C. I also shot frames with modern film, Efke PL100 and FOMA 100. Will be interesting to see the differences.
It does have a period look to it.........
Nokton48
Veteran
I fogged some Ilford Commercial Ortho with my old safelights, so I knew I needed something safer....
Jason Lane (the dry plate manufacturer) knows exactly what he is talking about. I ordered a batch of his ASA 25 glass "Speed Plates" and was waiting for shipment. He emailed me that he had to toss and re-do coating more plates, they were ruined by safelight fog. He then told me what he made up as a replacement. I followed his lead, and I'm delighted, no fog even after eighteen minutes of development, with lamp six feet away. Go with the 3 watt LED from Lowes, and it goes into the Kodak Bullet Safelight, with the dark red 1A filter. So it's a 3W LED, being additionally filtered by the dark red Kodak 1A. VERY VERY deep red light is emitted and I have have zero fogging now. I have one in one corner for film cutting and loading, and one over the developer tray, both more than six feet away. And more than bright enough once my eyes adjust, I can hold a sheet up and inspect the shadow values quite accurately. Works great for me!
3W LED from Lowes:
https://www.lowes.com/pd/Energetic-Watt-EQ-A19-Red-LED-Light-Bulb/1000623747
Thanks for this Jason Lane!
Kodak 1A Grey Bullet Safelight 1 by Nokton48, on Flickr
https://www.lowes.com/pd/Energetic-Watt-EQ-A19-Red-LED-Light-Bulb/1000623747
Kodak 1A Grey Bullet Safelight 2 by Nokton48, on Flickr
Jason Lane (the dry plate manufacturer) knows exactly what he is talking about. I ordered a batch of his ASA 25 glass "Speed Plates" and was waiting for shipment. He emailed me that he had to toss and re-do coating more plates, they were ruined by safelight fog. He then told me what he made up as a replacement. I followed his lead, and I'm delighted, no fog even after eighteen minutes of development, with lamp six feet away. Go with the 3 watt LED from Lowes, and it goes into the Kodak Bullet Safelight, with the dark red 1A filter. So it's a 3W LED, being additionally filtered by the dark red Kodak 1A. VERY VERY deep red light is emitted and I have have zero fogging now. I have one in one corner for film cutting and loading, and one over the developer tray, both more than six feet away. And more than bright enough once my eyes adjust, I can hold a sheet up and inspect the shadow values quite accurately. Works great for me!
3W LED from Lowes:
https://www.lowes.com/pd/Energetic-Watt-EQ-A19-Red-LED-Light-Bulb/1000623747
Thanks for this Jason Lane!

https://www.lowes.com/pd/Energetic-Watt-EQ-A19-Red-LED-Light-Bulb/1000623747

charjohncarter
Veteran
Good idea, double safe. We had some I guess special X-ray film that we could use what appeared to be a yellow light. It seemed impossible because it was pretty bright in the darkroom.
Nokton48
Veteran

Automatic Makiflex #2 150mm F2.8 Xenotar wide-open 1/15 Fuji 8x10 XRay HRU cut down to 4x5 in Graphmatic back StarD tripod. Development 12 minutes 60F straight Mic-X replenished by inspection of shadow values by deep red safelight. 8x10 Arista #2 RC Omega DII 180 Rodagon f22 35 seconds Omegalite diffusion head Multigrade developer

Automatic Makiflex #2 150mm F2.8 Xenotar wide-open 1/15 Fuji 8x10 XRay HRU cut down to 4x5 in Graphmatic back StarD tripod. Development 12 minutes 60F straight Mic-X replenished by inspection of shadow values by deep red safelight. 8x10 Arista #2 RC Omega DII 180 Rodagon f22 35 seconds Omegalite diffusion head Multigrade developer
Nokton48
Veteran

Automatic Makiflex #2 270mm F4.8 Tele-Arton Makiflex Auto Iris 1/30 F11 Fuji 8x10 XRay HRU cut down to 4x5 in Graphmatic back StarD tripod. Development 12 minutes 60F straight Mic-X replenished by inspection of shadow values by deep red safelight. 8x10 Arista #2 RC Omega DII 180 Rodagon f22 35 seconds Omegalite diffusion head Multigrade developer

Automatic Makiflex #2 150mm F2.8 Xenotar wide-open 1/15 Fuji 8x10 XRay HRU cut down to 4x5 in Graphmatic back StarD tripod. Development 12 minutes 60F straight Mic-X replenished by inspection of shadow values by deep red safelight. 8x10 Arista #2 RC Omega DII 180 Rodagon f22 50 seconds Omegalite diffusion head Multigrade developer
charjohncarter
Veteran
Very nice, I especially like the last one.
Nokton48
Veteran
Very nice, I especially like the last one.
Thanks Charjohncarter!

Since we are all locked down I have been working on restoring my old Normas, as they are more than sixty years old, they need some attention. This is my 5x7, I have put in some new light sealing foam in the front and rear standards, and also new foam in this new to me Sinar Norma Shutter. I sent the shutter out for cleaning (it was sticky inside) and replaced the sync cord, although for whatever reason, it is still not firing with strobes. I will get it sorted eventually, for now I will use my other Norma Shutter with my strobes in the studio, it fires 100%. The lens is a Sinar Norma 121mm F8 Super Angulon, forward mounted with copal shutter built-in, and full Norma Auto Aperture automation. This is the most deluxe way you could get this lens from Sinar at the time. Looking forward to shooting more HR-U XRay film with this new to me camera. Should make fantastic split-grade VC RC prints.
Also new in the studio are these background clamp weights from Savage, which keeps my seamless paper from rolling up by itself, and keeps the background tight and smooth looking. I can roll up or down in ten seconds any of my three colors of background paper, I have blue, black, and white. All three shown staggered against my studio back wall.
Nokton48
Veteran

This is a quick test of my new Sinar Norma Copy Stand. Plaubel Makiflex Automatic 9x9cm SLR with hacked Fuji GX680 180mm F3.2. 6x6cm Plaubel Makina film 120 back #4. High contrast polarized lighting. Two Broncolor Impact 21 200 watt second strobes, with polarizing gels adjusted fully. 103mm Sinar Norma glass polarizing disc under the lens, also fully adjusted. Strobes balanced with Broncolor FM2 Strobe Meter, balanced to F/32 1/2 both sides illuminating. The GX680 lens is one of my sharpest for sure. Foba 200 B&W 120 film exposed at EI 100. Developed in ADOX BORAX MQ straight replenished D76 type. This exposure was one pop at F8. Also made exposures at F11 and F5.6, but this is the ONE. 8x8 inch print on 8x10 Aristo #2 RC developed in Multigrade developer.
This setup is good for photographing anything where you want this type of contrasty polarized lighting with 45 degree shadows.
Like photographs or flat art.

Nokton48
Veteran

Ashton Pond Columbus Ohio Sinar Norma Handy 4x5 Fuji HR-U XRay 65mm F8 at F22 Schneider CF + Sinar Norma Dark Yellow 103mm Glass Disk 1 sec at F22 Legacy Mic-X replenished stock in tray 18 mins at 62F Arista #2 RC 4x 8x10 Multigrade dev
charjohncarter
Veteran
Wonderful, how is the grain with the X-Ray film? I broke my thumb 50 years ago, and I X-Ray my thumb using dental film. I took the X-Ray to hospital and the surgeon was impress at the fine grain.
Nokton48
Veteran

Ashton Pond Columbus Ohio Sinar Norma Handy 4x5 Fuji HR-U XRay 65mm F8 at F22 Schneider CF + Sinar Norma Dark Yellow 103mm Glass Disk 1 sec at F22 Legacy Mic-X replenished stock in tray 18 mins at 62F Arista #2 RC 4x 8x10 Multigrade dev
John,
The Fuji HR-U is quite fine-grained and the images have high resolution. This is easy to see with my Micromega Focusing Viewer. I do laser align the negative right after focusing, then refocus again after alignment. Enlarging lens is mid range where it is at sharpest.
Nokton48
Veteran

Plaubel Automatic Makiflex 150mm f4.5 Plaubel Makiflex Auto Xenar 1/30 F11 StarD tripod 4x5 ERA100 film ADOX BORAX MQ Arista RC #2 Multigrade developer
The Xenar has a pleasing look and I am stoked to have it. I have not used it much at all.
Nokton48
Veteran


Auto Makiflex #3 with 21cm f4.5 Auto iris Makiflex Heliar. 1/60 F11 Ilford FP4+ 6x9cm Makina Back ADOX BORAX MQ Developer 8x10 Arista #2 RC print Multigrade developer. Full sun Key Day. Waiting for the Lily in my front garden to fully open up. I am enjoying looking through the 21cm Heliar.
Nokton48
Veteran
This morning I am breaking down a gallon of Freestyle Leagcy Pro Mic-X, into three litres of Mic-X replenisher, which will go into three one litre brown glass bottles. All my glass bottles come from Photographer's Formulary and I have many extra at this point. My present stock Mic-X is from June 2020, and in a brown one gallon bottle will last for many years. My first gallon lasted three and a half years. finally dumped it but didn't really want to. About as economical a developer as you can get at it lasts about forever and gets better as it "seasons".
Here is the stuff for XRay:
https://www.freestylephoto.biz/749710-LegacyPro-Mic-X-Film-Developer-(Makes-1-Gallon)
Kodak has great instructions to make Microdol-X Replenisher, I am listing the steps here it is easy to do.
1. Start with three quarts of 100F water
2. Add the packet of one gallon Legacy Pro Mic-X
3. Add 24 grams of photographic grade Sodium Carbonate, monohydrate
4. Mix until completely dissolved
5. Add water to bring total volume to three liters.
6. Load the replenisher into the three one litre glass bottles.
7. Starting point is 30ml per 80sq" of B&W film
That's it. This stock solution will last for years and years and years.
I have road tested this for the last ten years and it is about as cheap as you can get, since the stock solution lasts so long.
The secret to replenished Mic-X is that it is a sssslllllooooowwww acting developer. I have gone as long as thirty minutes at ambient and that's about it.
Nokton48
Veteran


The oil filled radiator makes it much more comfortable here. When the covid cools down I will have the studio electricals maxed out. Right now it's one 120 line and two 220 lines.
Share:
-
This site uses cookies to help personalise content, tailor your experience and to keep you logged in if you register.
By continuing to use this site, you are consenting to our use of cookies.