Several nice rigs shown here, and good results. Here's my take, following @Takkun's nice outline.
Camera: Mirrorless, for the ease in focusing. I'm using Sony A7Rii, A7, A6000 bodies, all have superb focus magnification and focus peaking, easy to get precise focus and I prefer manual focus. In comparison, I have difficulty getting good manual focus with my Nikon DSLR bodies; for these I pretty much have to use AF.
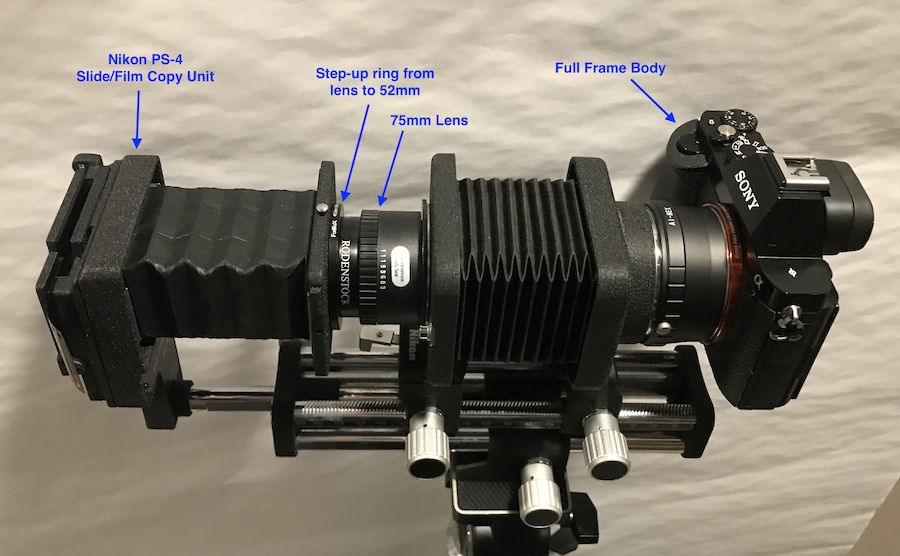
Focus method: Setup the camera and lens for the desired magnification. Then move the whole camera/lens to achieve focus. For this, you'll need a smooth, no-wiggle, no-slip method for moving camera/lens. You need to be able to move without jiggles, and once you have focus, to be able to lock without anything moving. For me, it is a big, sturdy copy stand (made by hacking Polaroid MP-4). Perhaps a good macro rail will do this, but the one's I've tried wiggle too much while moving and shift a bit on lock-down. If you can't do this, then use AF.
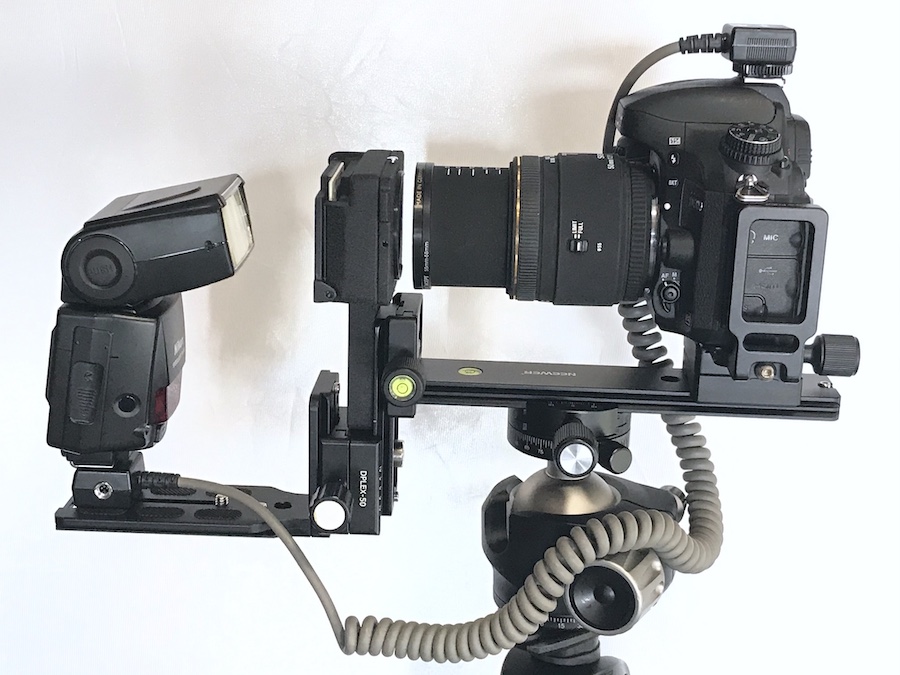
Lens: I've tested a lot of lenses, few lenses are designed for 1x, so cam-scan of 35mm to FF body is the toughest challenge. For 1x, purpose-built 1x lenses are tops. There aren't many; the 75 f/4 APO Rodagon-D 1x and 80 f/4 Olympus Bellows macro are the only ones other than real exotics. Then, it's good modern macro lenses, with floating elements to give better 1x performance, and there are lots of choices. I think these are all excellent; the older 55 f/2.8 Micro Nikkor and 90 f/2.5 Vivitar Macro MF lenses are solidly in this group. Some enlarging lenses are good, some not good. I'll mention a couple, but there are others. I like 80 f/4 Componon-S, 50 f/2.8 El-Nikkor old style w/metal body and huge numerals. Finally, the 50 f/4.5 Tominon from the Polaroid MP-4 system, though designed for higher magnification, gives excellent results.
Film holder: Negative Supply, the Essential Film Holder, and holders in the Skier Copy Box are all very good and let you move the film strip from image to image. Negative carriers from enlargers are excellent, but you have to open up to move the film. Wet mount on glass is said to be fabulous but time consuming. Avoid dry contact with glass unless it's ANR glass.
Light source: Video light, set to daylight balance. Flash, especially TTL-auto flash, but you'll need to have some continuous light for positioning and focus. Kaiser light panel, but you'll be shooting at ~1/3 sec. Avoid cheap tracing panels. Narrow-band tri-chromic light (R, G, and B, not continuous spectrum) gives good results and vivid colors; a current iPhone or iPad is an easy way to experiment with this.
Support: Copy stand that gives precise no-slop movement. Or, a horizontal arrangement with a good bellows or rail system works very well.
Tethering? Many prefer this approach; I do not. I like the focus mag and focus peaking on the LCD with my Sony bodies.
Software: I've tried many methods and products. See my thread "Color-Negative Challenge" here in the "Scanners" group. Today, I prefer Negative Lab Pro, but there is a lot of innovation.
I wish everyone good shooting and good cam-scanning! And, stay safe these days.