DIY 3d print scanning box -- comments please ...

dmr

Registered Abuser
Local time
1:00 PM
Joined
Feb 8, 2005
Messages
4,649
As I (think I) mentioned in one of these threads, a while ago I joined a local "Technology Cooperative" and I've been taking some classes there on 3d printing.

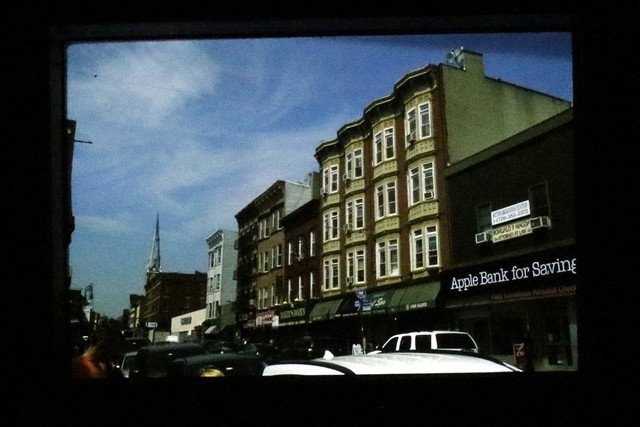
A couple of years ago I saw the Film Toaster at Photo Plus, and it looked like a workable idea, although for $1300 us it's quite steep. I was thinking that something much simpler could be made that would be nearly as functional for much less.

Now that I think I've graduated from making things like little kitchen gadgets and Baby Yoda dolls, I've been playing around with a design for a box to do just this.

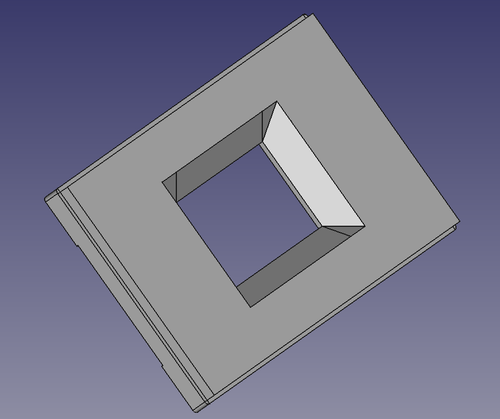
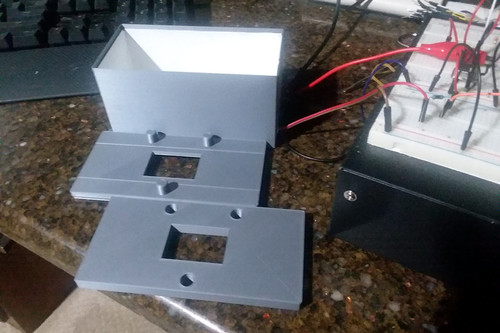
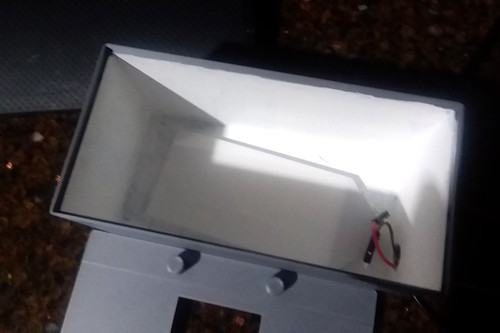
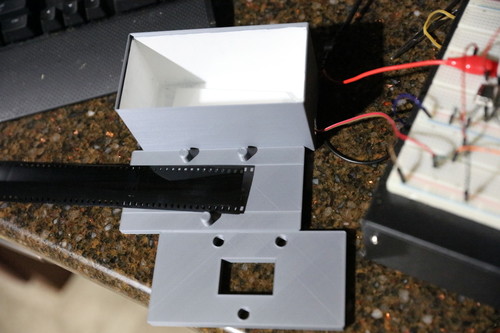
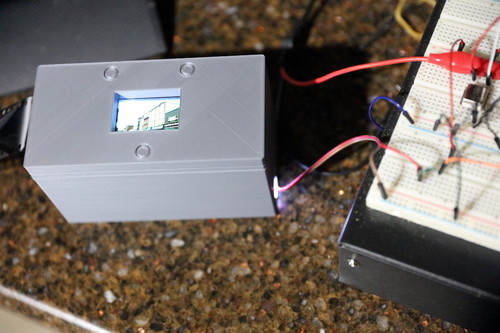
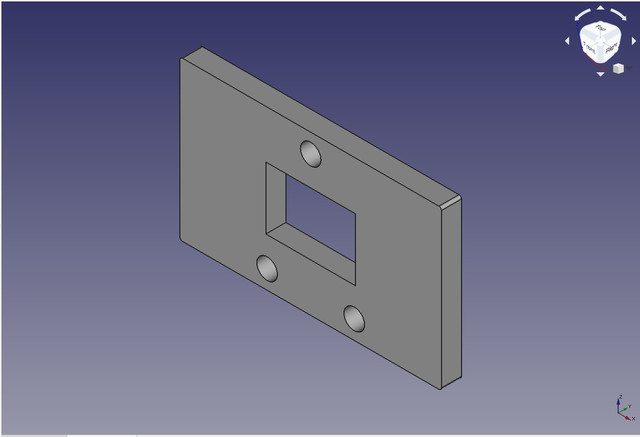
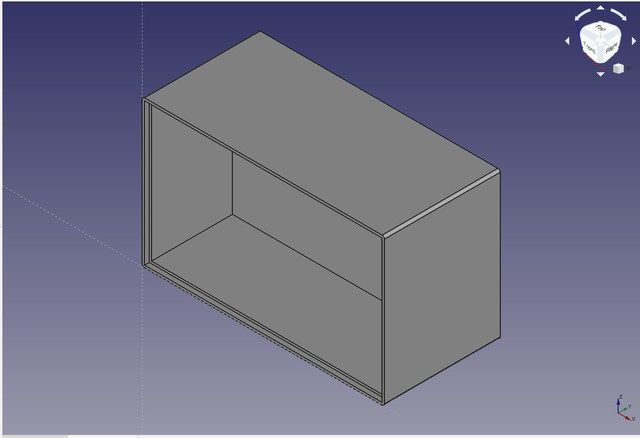
I'm envisioning a box to hold a light source and a two-part plate with a 36x25.. (for a slight overscan) which would all sit on a more or less standard copy stand.

Simple! Almost minimalist.

I haven't printed any of this yet, and I'm interested in hearing if anyone here sees any issues that I'm overlooking.

The one issue I'm well aware of is that (at least the pieces that touch the film) will need to be carefully sanded and polished, as 3d prints tend to be rough, particularly around the edges.

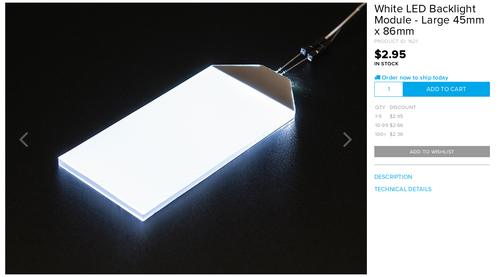
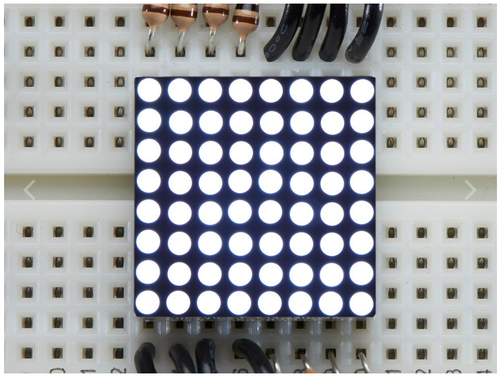
I still haven't figured out what kind of light source to try. (LEDs???) Any suggestions?

Thanks. :)

63400-scanbox3-z.jpg

63401-scanbox2-z.jpg

63402-scanbox1-z.jpg
 
What will serve as diffuser? Where will it be seated? Or would one just drop a smart phone with white screen into the box?
Is the material as thick as it looks? Wouldn't some ridges suffice to keep it rigid?
I think a hinge for the lid would be easier to use than this plug-idea.
Make it longer so a strip of 5 or 6 frames is well supported, even when you're at the last frame?
Many cameras don't center the exposure area well on the film. You should provide for some way to position the film a bit up or down, and maintain that positioning between frames. Removable shims might be easiest. If not, you'll need a more than 25mm wide opening.
You could make a version that can hold a piece of anti-newton glass from a slide mount to hold the film flat. Then you'll get into the territory where 3d printing shines, otherwise the design could be easily made with a saw, file, and glue. Also printing a box seems like waste of time and resources. Make it to use an existing box.
 
I printed this (https://www.thingiverse.com/thing:3985120) and it works great. One can scan an entire uncut roll of film through it. It might give you some ideas for your design. I have not had any issues with film flatness.

The forums on Negative Lab Pro are a big help. Check this out for lighting sources:

https://forums.negativelabpro.com/t/suggested-backlight-sources-for-scanning-film-with-dslr/130/53

I have a Nanguang CN-T96 LED Panel inside a 6x9" bamboo box with several layers of Dura Lar on top as a diffuser. It is a very high CRI light source, but it's very bright and needs a lot of diffusion for even lighting.

http://www.nanguang.cn/product/showproduct.php?lang=en&id=302

https://www.amazon.com/Grafix-Dura-Lar-9-Inch-12-Inch-Sheets/dp/B0027AAOL6/

I'm pretty sure the CN-T96 is the same light source that comes on the Smith-Victor copy stand lights: https://www.bhphotovideo.com/c/product/1336076-REG/smith_victor_402184_led_copy_light_set.html
 
Thanks gang!

This is a first draft of a first draft, and just something I envisioned long before I knew how to draft something like this and get it to the point of being able to be made. I'm still on the steep part of the learning curve.

What will serve as diffuser? Where will it be seated?

That's a good question. :) I've been thinking of what to do for a light source and haven't settled on one. I want something cheap and simple, and, of course, able to evenly light the frame with no hot or dark spots.

Or would one just drop a smart phone with white screen into the box?

Maybe something like that, but more of a small cheaper light box than a phone.

Is the material as thick as it looks? Wouldn't some ridges suffice to keep it rigid?

Yes, the dimensions are hard to tell from the drawings, but the box is small, maybe 2 1/2 by just over 4 inches when viewed from the top. This, of course, is very easily changed if needed. I thought of making it big enough to scan 2 1/4 film easily but I really don't shoot much of that at all.

The walls of the box are 3mm. Some of the others have been doing little "project boxes" with 2mm walls and those feel quite rigid and sturdy when printed on the standard black ABS filament, which is what they (the ubiquitous "they") tell me that Lego blocks are made of.

There's room for some reinforcement type ridges if needed, but I don't think they will be.

I think a hinge for the lid would be easier to use than this plug-idea.

Yeah, uh, maybe, but the plug-in lid is very simple and simplicity is what I want for this. :)

Drafting and 3d printing a hinge is, at the present time, far above my pay grade in the 3d world. :) :)

Make it longer so a strip of 5 or 6 frames is well supported, even when you're at the last frame?

Is this really a need? I was thinking more in terms of the convenience of being able to insert/remove small strips of negative from one end or the other. I'm figuring that the negative will be held steady by "stiction" and the sag of any negatives over the edge should not damage them as long as the surface they touch is smooth.

Many cameras don't center the exposure area well on the film. You should provide for some way to position the film a bit up or down, and maintain that positioning between frames.

I thought of making it large enough to even include the sprocket holes for those oh-so-trendy shots that include them. :) It's easy to change the dimensions of that window.

You could make a version that can hold a piece of anti-newton glass from a slide mount to hold the film flat. Then you'll get into the territory where 3d printing shines, otherwise the design could be easily made with a saw, file, and glue.

I'm trying to keep things simple. :) As in a saw, file, glue, etc. are not that simple. :) :)

Also printing a box seems like waste of time and resources. Make it to use an existing box.

Yeah, if I look I could probably find a box, but I'm really doing this for the experience of making it myself using the 3d technology.


I printed this (https://www.thingiverse.com/thing:3985120) and it works great. One can scan an entire uncut roll of film through it. It might give you some ideas for your design. I have not had any issues with film flatness.

Thanks! This is an example I want to study some more before I actually commit something to print.

May I ask what kind of a 3d printer you used for yours? It looks very sturdy and reasonably smooth.

I have access to a Dimension 1200, a uPrint and a Taz-5, and all of them seem to do very good job. One of the guys in the class is also building a Prusa from a kit, and he says I could use that when (if? LOL) he gets that working. :)

There are also a couple of cheaper DaVinci printers in the lab, but those seem to be definitely in the "you get what you pay for" category. :)

The forums on Negative Lab Pro are a big help. Check this out for lighting sources:

https://forums.negativelabpro.com/t/suggested-backlight-sources-for-scanning-film-with-dslr/130/53

I have a Nanguang CN-T96 LED Panel inside a 6x9" bamboo box with several layers of Dura Lar on top as a diffuser. It is a very high CRI light source, but it's very bright and needs a lot of diffusion for even lighting.

http://www.nanguang.cn/product/showproduct.php?lang=en&id=302

https://www.amazon.com/Grafix-Dura-Lar-9-Inch-12-Inch-Sheets/dp/B0027AAOL6/

I'm pretty sure the CN-T96 is the same light source that comes on the Smith-Victor copy stand lights: https://www.bhphotovideo.com/c/product/1336076-REG/smith_victor_402184_led_copy_light_set.html

Thanks. I'm gonna take a good look at those when I get back this afternoon. Some of those look workable. Those links definitely give me some ideas!

One idea I did have was to paint the interior of the box stark white and glue a couple of those LED strips or rings on the top of the box to illuminate the painted surface and hopefully it will not need any extra diffusion. That may take some trial and error.
 
I'm like the illumination idea. I didn't mean the material looked too thin, I mean it looks rather thick!
More length would help as the film strip wouldn't want to slip off the thing before the lid is closed, and make dust management easier I think, but that would be a much larger contraption for a small benefit.
I didn't mean to suggest printing a hinge! Use one made from metal. Just like the box. You're too in love with 3d printing to choose the most practical solutions/what I'd consider better design with little effort, but you know that :D
 
Perhaps bevel the edge of the gate? I could see that the tall edge might influence how the image is recorded.

That's what one of the respondees on "another network" was pointing out as well, to eliminate any possibility of shadows and uneven lighting of the film area. It's very easy to add a bevel to any surface.

Another topic was the spectra of various LED sources, and I learned a new word, or at least an acronmy, CRI, or Color Rendering Index. The more I think of it, the more I like the idea of using LEDs for the light source, for simplicity and for lack of heat. Some of those "maker" sites have LED strips and bricks and such which look like they should work, either directly with some kind of diffuser or to illuminate a neutral white section of the box.
 
I made a slight tweak to the item that holds the film and faces the light, as shown in the first image below. This view is the side opposite the one shown in the view above, and shows the bevel to control any shadow cast on the negative.

The second view below shows an item I stumbled on last night on one of the "maker" supply sites. It's the light source for a small LCD display, without the LCD display part, and it's ridiculously cheap.

Does anyone see any reason why it would not work as a light source, just placed in the bottom of the box? It looks like it should not need any diffuser at all.

The URL for the item (I have not ordered it yet) is here: https://www.adafruit.com/product/1621 in case anyone wants to look at it.

The third image below shows one of many inexpensive LED items out there. There are tons of them available, from single "stick-on" LEDs to strips to arrays to some that even let you control the color, as in values for R, G and B separately. I was thinking of using one or more LED arrays until I found the flat source in the second view.

12740-screenshot-from-20200224-081038-m.png

12742-screenshot-from-20200224-080935-m.png

12741-screenshot-from-20200224-080954-m.png
 
The CRI of the light source really matters. A low CRI light source will make converting negatives well really challenging. I do not believe all LEDs are created equal when it comes to CRI. I have tried using an iPad/iPhone (pretty good), an LED macro light (Bolt VM-210) (not good), and an IKEA LED lamp (not good). The Nanguang CN-T96 LED Panel is by far the best and it was about $40 when I bought it.

Also, the evenness of the light source is important and that often means good diffusing from LEDs since they are points. Also, if the light is too bright, you will want to find a thick diffuser.

One thought on the beveling is that it would be best to make the angled inside of the bevel non-reflective with either sanding or some kind of flocking or black foam. Otherwise, depending on the angles to your lens, the beveling might be a surface for light to bounce off and create flare.

Back to your earlier question: I printed this (https://www.thingiverse.com/thing:3985120) on an Ender 3 Pro using Cura to slice it. Using basic black PLA. Nothing fancy at all.

I'm interested to see where you end up on this. Good luck!
 
Thanks.

After playing around with an extension to hold the camera and a horizontal design, I'm more or less back to the original, which will use an off-the-shelf copy stand, which I will need to find somewhere.

The CRI does concern me. I did order one of those flat backlight things, and the only way I'll find out if it's gonna work or not is to try it. As a sanity check reference, I have plenty of recent Ektachrome 100 shots that were scanned on the K-M, including some of the MacBeth Color Checker and I can then see how much difference there is in rendering various colors.

I'm about ready to print, and I'm surprised how long this is gonna take! The bottom part is estimated to be 3 1/2 hours to print! I can book time on the machines in four-hour blocks and all three parts are going to take almost all of two of them!
 
I printed this (I have a Nanguang CN-T96 LED Panel ...ang.cn/product/showproduct.php?lang=en&id=302

https://www.amazon.com/Grafix-Dura-Lar-9-Inch-12-Inch-Sheets/dp/B0027AAOL6/

I'm pretty sure the CN-T96 is the same light source that comes on the Smith-Victor copy stand lights: https://www.bhphotovideo.com/c/product/1336076-REG/smith_victor_402184_led_copy_light_set.html

Find "CN-T96" on eBay or on AliExpress, excellent video light, bright, even, good for camera-scanning. About $35. This is the light panel in the Skier CopyBox.

Good combination: CN-T96 and DuraLar for diffusion, with a box to hold things. Keep the film far enough away so diffuser is well out of focus.
 
For those who care (and for those who don't) :) I've successfully 3d-printed what is basically the first version of the scan box and it does look promising.

80827-sbox01-m.jpg


I painted the inside of the box and the top of the middle item flat white. In 20/20 hindsight, they did have some white 3d print filament, and I guess I could have used that instead of the default grey color. I placed the backlight thing (not really sure of the best name to call it) in the bottom of the box, not permanently mounted yet. Not having a real power supply for it yet, I took it in and got it to work (with some help, of course) in the lab using an adjustable bench power supply. Using a 150 ohm resistor (that's what one of the guys who knows these things said was a good value to start with) it starts to light at about 4 volts and anything over 10 volts gives it no significant change in brightness. The light intensity looks very consistent across the plane.

80826-sbox02-m.jpg


The whole thing fits together like a glove! I'm impressed! {blow on fingernails, wipe on blouse} :) The top two pieces which hold the film fit together very precisely. I centered the one image and slid on the top.

I have not sanded or smoothed it, so I was VERY careful in loading a test slide, one from a roll of Ektachrome 100 that I shot last year.

67996-sb05-m.jpg


The light appears to be bright white and consistent across the film plane. I have no practical way (that I know of) to measure the color spectrum, so further tests with this light source will probably be trial and error.

67997-sb04-m.jpg


I do not have anything close to a good copy lens! For this "proof of concept" I zoomed way out (in? well, you know what I mean ...) and used manual focus and manual exposure. It's still a very significant crop. I got as close as I could still being able to manually focus on the film. For some reason, auto-focus appeared to always want to focus on the (very dimly lit, lab lights were out) top of the box. Auto exposure grossly overexposed things, with the majority of the frame being the dark top of the box.

This was hand-held. I tried to look as straight down on the lab bench as I could and hold it as steady as I could in that contorted position. :) Trial and error seemed to give 1/125 and f/11 as the best exposure.

Anyway, here's the first "scanned" image.

67998-skan01-z.jpg


Yes, far from perfect, but it looks promising! I have NO CLUE what the shadow in the upper right is. I do not remember seeing it in the viewfinder. It may be from one of the connecting wires, which were simply placed in so they would fit. As you see, there's some obvious barrel distortion in there.

For comparison, the same image, scanned last year on the KM SD IV, is below.

Next steps are to semi-permanently mount the light source, get a dedicated power supply set up (I know I have a whole drawer full of various charger plugs of uncertain origin), and then get a good copy lens and copy stand. Unless something unexpected happens, I don't think I'll have to re-3d-print anything.

Of course I'll need to carefully evaluate the color situation.

Thanks for the feedback, gang! :)

Now? Does anyone have any suggestions for a good but not extortive macro/copy lens for the X mount?

93089-201905090016-z.jpg
 
It looks great!

One way to check evenness of the light source is to take a photo of a negative and then slide the contrast way up in Lightroom. It will show if there is uneven illumination.

I have a Spiratone Flat Field 75mm f3.5 that requires a bellows to focus (no built in helicoid), but I think you can find a whole setup for maybe under $50. It is a great value and provide good working distance.

Something like a Micro-Nikkor 55mm f3.5 might be a good reasonably priced alternative too. I did not have good luck with it on a full frame digital camera because it requires getting too close to the negative and that causes a lot of flare problems. YMMV with X-Mount though.

I bet the "shadow" in the corner is flare from light seeping around the corner of the image.

Good luck with the final touches!
 
Congrats!
Re. macro lens, I'd try to find a copy stand first (seem harder to find, less choices), then you can work out what focal length works best.
You should probably find out what is in the white paint you used, if it has florescent brighteners it might be bad for CRI.
 
Congrats!

Thanks! {blush} :)

Re. macro lens, I'd try to find a copy stand first (seem harder to find, less choices), then you can work out what focal length works best.
You should probably find out what is in the white paint you used, if it has florescent brighteners it might be bad for CRI.

I seldom do That Auction Site anymore, but it's still handy for finding out what's available.

They have many copy stands, from el-cheapo $25-ish imports to several hundred.

They also have quite a few X-mount lenses, but there are more and better places to get those.

I haven't abandoned the idea of making my own stand dedicated to this, but using a rigid metal rod for the vertical piece instead of a 3d printed one. I could still 3d print the base, which would be much smaller than the usual copy stand base, and the bracket that holds the camera above the scan box.

I am concerned about the spectrum. I'm thinking of temporarily (somehow) mounting some small incandescent lamps to the inside of the box and doing a comparison.

I have no clue what's in that white paint in addition to the pigments. There could very well be brighteners. I just went to a small local hobby shop and asked for a small bottle of flat white.
 
For those who care, I did a quick non-scientific test to do a sanity check on the purity of the light coming from the backlight module that I used in the last test.

These were both shot with the Fuji that I intend to use to copy the negatives and slides. One of these was in outdoor daylight. The other was in the bathroom, vanity and overhead lights off, illuminated by the light from the backlight module in the box.

Anyone care to guess which is which? :)

59992-outd1-n.jpg


59991-lbox1-n.jpg
 
I reckon the lower one is the outdoor one, only because it's dimmer and less evenly lit, plus you got your thumb in the picture!
 
I reckon the lower one is the outdoor one, only because it's dimmer and less evenly lit, plus you got your thumb in the picture!

Survey says ... ... {long awkward pause} ... ... BBBZzzzzzzzt!

The upper one is outdoor daylight. Lower one is the light from the backlight module.

Quite honestly, I expected something much worse. I do realize that this is most definitely a non-laboratory-grade test, but it shows that the backlight module will probably give good results when I get the thing all put together and use a proper lens.

And, BTW, the only adjustments I made to these was to set the black and white levels using the eyedroppers on the black and white patches.

It's not perfect. I do realize that red is weaker with the backlight module, but that can probably be corrected.

Oh, that's not my thumb. That's the round thingy on the top of a jar I was using to prop up the Color Checker. :)
 
Back
Top Bottom