DIY 6x9 or 6x12 or even 6x17

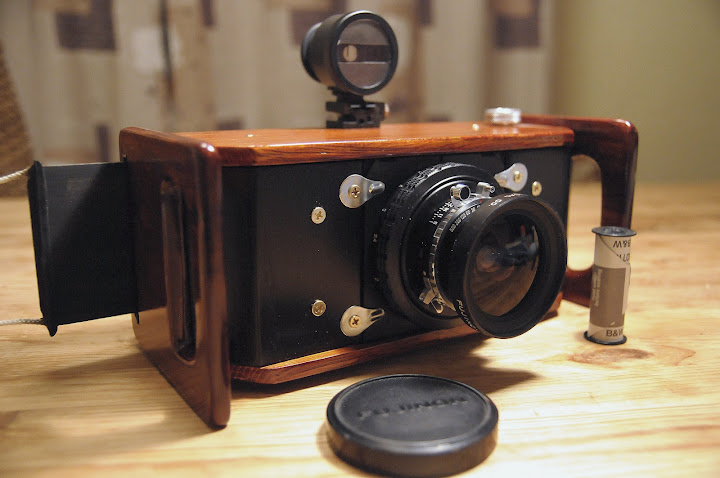
it is now official...i am building a 6x9 :)

The plan is a very small 6x9 with a heli mounted 90 SA. The back will be a graflex 2x3 back in 6x9 mounted to either a 2x3 g lock (if i can find one) or a cut down 4x5 g lock. I want this to be able to use both a 65SA and a 90SA.

So far I have a 90SA lens, a 2x3/6x9 back, a 4x5 donor speed graphic and I hope a good condition 2x3 speed graphic when the auction ends later today.

I really want a small but hi quality 6x9 for landscape work and maybe some slow street shooting !

Lots of inspiration here!
 
I am in touch with him right now ordering one as soon as the chinese new year is over.

Ezzie, David, Phil,

Jinfinance first came to my attention when Razzledog (I forget his real name -- and I think he is a member here) mentioned he used him to manufacture parts for his Polaroid conversions -- 4x5 and 6X12

homepages.ihug.com.au/~razzle/.

Any of you mind talking about how much a helical like that cost form him?

Thanks.

Giorgio
 
I think it will be about $120 + shipping.

real nice guy....


Hard to beat the 617 razzle for price and cool factor. I sort of wish I did not wnat to make one!
 
Good on you David. Would love to see your results.

As to Dean's Razzle 617 creations, I drooled over them long enough to consider buying a lathe and CNC machine, before waking up. They really are the creme de la creme of DIY 120 cameras. Something to aspire to.
 
90 SA arrived today. Last night I took apart an olympus 50/2.8 with the goal of using what is left as the focus mech on the 90...it might work.

Won the auction so my 2x3 is on its way 100% complete and ready to be cannibalised :)
 
Last edited:

In similar vein, has any of you (us) looked at

http://cgi.ebay.com/12-17mm-Zoom-4x...ccessories&hash=item35adbe6d55#ht_5801wt_1141

This vendor seems to offer focusing helicals in different extensions. Any experience here?

I've read, but cannot retrieve, one opinion that there is slop in the item, but wonder whether that is true, and, even if true, whether they could be relubed to make do?

Giorgio
 
Not sure...I found another guy on e bay selling much the same thing in China. Worth looking at.

Stupid question time!

I got my 90 today. I measured the threaded porion that i figure will screw into the adptor and it is 32mm. I guess that is also copal #0. What is the 42mm or 52mm measurement as in the e ba post above?
 
Uncertain answer time -- I think M42 means the camera side is a Pentax screw mount thread and the lens side is a larger diameter opening. That's my story and I'm sticking to it until proven wrong, but it took me a while to reach that after asking the same question when I first saw it.

Photos, suggest you mount the lens on the lens side and the M42 into a Pentax screw to whatever native mount you have on your camera. Anybody out there got a better idea? I'm easy.
 
Well, I started this thread with the intention of building a 6x17. Somewhere down the road I convinced myself that building a multi format camera would be a better idea. I now intend to rectify this misconception. Don´t get me wrong, I loved building the 4x5/6x12 P+S, but I have to try out 6x17 one way or the other. The idea resurfaced one evening when looking at two bottles of Cognac in their wooden cases. The cases look to be a good starting point for a panoramic camera. There will be some rather peculiar design points. For one the back will have to slide into place, meaning the pressure plate will have to be detached from the back. I´ll be making a light box/mask that can be removed in order to gain access to the film spools (tight fit). I´ve scrounged parts from an old Genos Rapid, the film rollers, the film tensioners, the red film counter window, the winder knob and so on. I´ll be using the same lens and helical (mounted on a Linhof lens board) as for the P+S. Getting the thing light tight will be a challenge, but hey - thats half the fun. Luckily an acquaintance of mine has sent me 10 rolls of expired film I can play around with.
 
And here it is, at least the still non-functioning version. I need to adjust the thickness of the pressure plate somewhat before taking it out for a test run. As I said, the main body is built out of a case for a bottle of A.E.Dor Cognac. That of course ment I had to do what the British are best at, work around the inherent design faults, rather than fix the design.

I had to chop the case down lengthwise as there was a divider 2/3 of the way up. This meant there would be so little room to load and unload the film I had to have a removable chambre noir with film gate and rollers all in one. Getting the rear light tight would be difficult since I have a sliding rear door. The pressure plate has to be removable too, for the same reason the chambre noir is. I chamfered the corners of the face of the camera for cosmetic reasons. The case top, bottom and front are clad in oak. The sides, doubling up as handles, in another hardwood. The lens is the same as for the 4x5/6x12 project, and Fujinon SW 90 f8 on a Chinese helicoid mounted on a Linhof lensboard. Finder also from the 4x5/6x12, with a new mask.

Here are som low resolution pictures describing the parts of the camera. Bottom of this post there's a link to the full resolution pictures.

The camera front (notice the sliding rear door protruding from the side):
D3C_1799.JPG


The rear and side (again the sliding rear door protruding through the side handle):
D3C_1814.JPG


Rear with rear door halfway open:
D3C_1807.JPG


Rear exploded view, parts explained:
D3C_1809.JPG


Rear view: After putting a roll of film in on one side, and the take up spool on the other, insert chambre noir:
D3C_1810.JPG


Rear view: Then spool film onto take up spool and insert pressure plate (locating pegs on film gate):
D3C_1811.JPG


Rear view: Then slide rear door in
D3C_1813.JPG


https://picasaweb.google.com/lh/sre...=true&authkey=Gv1sRgCMuojZ-7qtegWQ&feat=email
 
Last edited:
ezzie
your project makes me smile!!!!!!
i wish you (and others trying the same thing) much success
greetings from hamburg
rick
 
Thanks boys. I just hope I can get it to work properly. If not, It'll make a nice shelf queen.
 
Well, no guts no glory. Even without a minutely adjusted pressure plate, and a proper solution for a cover for the frame advance peep hole (used a bit of tape), I went out and pointed it at 4 different not very interesting landcapes. The film is a first too, HP5+ developed in Caffenol. Hanging to dry, the negatives are free from signs of any light leaks, much to my surprise. There doesn´t seem to be any scratches either, even if the rollers are a bit suspect, and the film gate being made of bamboo! I´ll see if I can scan a frame later on, I need to find a way to get my V500 to handle the looooong negs.
 
Excuse the scanning artifacts, you can see some banding. This is due to the negative being scanned directly from the glass plate without any such things as anti Newton ring glass etc.

Findings so far:
1. Its light tight! Hoooray
2. Film transport worked! Hooray
3. The Fuji lens cover the format, no problem. Only very slight fall off towards the corner. I do not need a centre filter. Hooray!.
4. It has a perspective shift or skew towards the right lower corner of the image. Need to fine tune the film gate to be in plane with lens plane.
5. Difficult to say if focus is OK or not, need better scanning to discern this properly. But not far off I'd say.

HP5+ is also first for me. And I rather like it.


Sande bay by Eirik0304, on Flickr
 
Ezzie - congratulations! That is a very good result for your first run with a new camera of this style.

Now be honest - was this inspired by the Cognac, or the box? :)
 
Back
Top Bottom