jordanstarr
J.R.Starr
I have a tendency to do random and archaic things, partially because I'm handy, partially because I'm cheap. But this is a step-by-step process on how I built a Domke/Billingham hybrid bag for under $10 in less than 2 hours. I usually contribute to the APUG forum, but have recently bought an RFF and have been following and learning from this forum, so maybe I can pass on the favour and share my experience in this project.
Intro: I went to Value Village and picked up my necessary materials -a bag and materials for a liner. I then ventured to the dollar store for velcro. I used some thread and needles I had at home and some extra inserts that I also had.
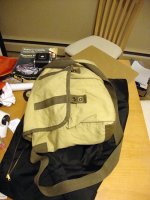
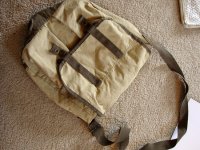
Picture#1: This is the bag. I bought it for $2.99. It was an H&M bag with 2 nice from pockets for a meter, filters, film, etc. It also has a back pocket that I can put a notepad and pen in. Inside there's some hidden pockets for secret things I cannot discuss here. I wanted a nice shoulder bag that is discrete and does not look like a camera bag. I take photos in some sketchy areas, so I wanted something low-key that would draw any heat from anyone who might want to jump me.
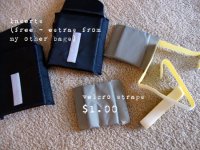
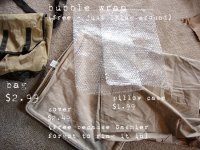
Picture #2: All my materials and pricing. This is all in one trip to Value Village. You could continuously shop and find the perfect materials, but I'm impatient and had the day off, so I made due with what I could find. I scored the cover for free because the Cashier didn't ring it in. I was okay with not saying anything and saving the money as I was pretty keen on doing the bag for under $10 to prove a point. The velcro is not shown yet, but that was $1.00. Regardless, it all still would have came to just under $9.50 + tax for a GRAND TOTAL OF $9.98, $7.50 after my fortunate savings. I know I got pretty lucky with finding my materials and everything, but it was only one trip. If you wanted to invest more time and effort, you could definitely find the lightest and most efficient materials.
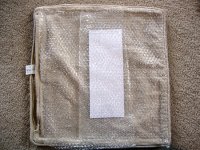
Picture #3: Because the bag was very thin, I needed padding. The padding was a cover that is meant to be stuffed with padding -perfect! The only problem is that it is quite heavy and the materials sheds, which I don't want all over my gear. So, I got a pillow case that fit over it perfectly. For padding I used some old bubble wrap I had kicking around the house. I chose bubble wrap because it was light and offered the extra padding I needed with no extra weight. The downfall is the noise it makes. (NOTE: I will later regret the bubble wrap and it's crinkling, but I was almost finished when I realized how much noise it made. It isn't as bad as I make it sound, but if you have another alternative that is light and mailable, use it).
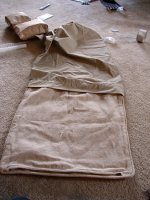
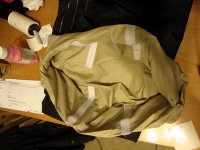
Picture #4: The bottom will need support, not only for shape and protection, but to hold the inner liner in place as well. I measured the bottom and went from there.
Picture#5: I used some old matting board (acid fee of course!) as it's light and offers just enough support. I tapped it into the bubble wrap to keep it in place, then put it in the cover for a perfect fit. I zipped it up and then cut the zipper off so that it wouldn't potentially scratch anything. I put the pillow case cover over it.
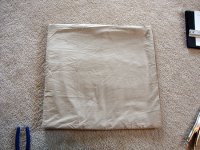
Picture #6: Once tucked in the pillow case, I cut the end and stitched it shut. Perfectly soft, no cloth shedding. A masterpiece.
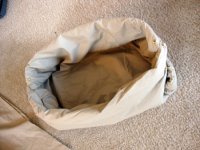
Picture #7: I'm not the greatest seamstress, so finding the perfect fold as a pain in the ass. But I did it after 30 minutes of adjusting it in the bag, fitting it properly and finding a fold that wouldn't leave open ends isn't as easy as this photo makes it look. I think at this point I was also a few beers in, which didn't help. I also almost failed grade 12 geometry, which would have came in useful. Any sober person with some fabric and geometry skills could have done this in 5 minutes. I held it with safety pins for now, but will stitch it later when I'm sure it will work properly. Do not have metal or sharp ends in your bag (ie. glue, safety pins, buttons, etc.) as this will scratch your camera.
Picture #8: I took some inserts I had extra from other bags. I know you all have them, so don't send me messages like "not fair man, you had those for free and if you had to buy them it would put the bag up to $20". And if I didn't have them, I could have used the extra fabric from the pillow case to fill with cardboard (or similar) and stitch my own. It would have looked nicer and matched that way too. And I would have saved $1.00 on velcro, but let's not argue and accept the fact that I'm resourceful. I got the velcro at the dollar store.
Picture#9: I stitched the velcro to the bag. Although the adhesive was pretty damn strong, I thought I should be safer to secure it. I positioned the dividers first so I knew where to put them. It's not a good idea to freestyle this.
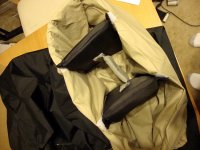
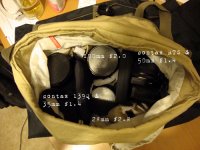
Picture #10: Then I put in the dividers. I currently have a Canon P with a 50mm f1.8, 35mm f1.8 and 21mm f4.0. I have a Konica S3 with a fixed 38mm f1.8 attached. I wanted to make sure my bag held all this stuff. I will eventually replace the Konica S3 with a second Canon P body and telephoto lens when I have the money.
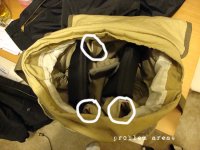
Picture #11: Despite fitting it for 30 minutes, I still have problem spots where the liner appears to be too big, so it starts to wrinkle. I will later stitch these to the side of the liner of the bag, but it will still cause some deformation. I'm okay with this though. If, at this point my biggest mistake is not having the creases perfect, I'm pretty awesome.
Picture #12: The finished product on it's side so you can see the size. It's a little bulkier and heavier than I would have liked, but it's well padded and supportive.
Picture #13: At the time, some of my rangefinder equipment was still in the mail. So, I put in my SLR system, which is bigger and heavier. Check it out. The fit is a little tight for an SLR system of this magnitude and taking in and out the lenses wouldn't be the easiest task of my life, but it works.
Things I love about the bag:
-UNDER $10!!!
-Lots of pockets for accessories
-Very padded liner
-Perfect size for my system
-I have a few inches at the top that will fit a small jacket, hoodie, book, and other things you might want to take with you on a photo outing.
-Style is discrete, yet sexy.
Things I don't love so much:
-It's not as durable on the outside as a Billingham or Domke bag (although I've toyed with the idea of waxing it).
-Not waterproof.
-front pockets don't close (so I have to be careful if I'm biking with it, so accessories don't fall out).
-Bubble wrap noise. It's quieter when everything is done, but I shouldn't have overlooked that detail.
I hope you all enjoy this read and get inspired to make your own DIY bag. Not that I don't like Domke or Billingham bags, but come on. Not everyone has $300 for a bag.
Intro: I went to Value Village and picked up my necessary materials -a bag and materials for a liner. I then ventured to the dollar store for velcro. I used some thread and needles I had at home and some extra inserts that I also had.
Picture#1: This is the bag. I bought it for $2.99. It was an H&M bag with 2 nice from pockets for a meter, filters, film, etc. It also has a back pocket that I can put a notepad and pen in. Inside there's some hidden pockets for secret things I cannot discuss here. I wanted a nice shoulder bag that is discrete and does not look like a camera bag. I take photos in some sketchy areas, so I wanted something low-key that would draw any heat from anyone who might want to jump me.
Picture #2: All my materials and pricing. This is all in one trip to Value Village. You could continuously shop and find the perfect materials, but I'm impatient and had the day off, so I made due with what I could find. I scored the cover for free because the Cashier didn't ring it in. I was okay with not saying anything and saving the money as I was pretty keen on doing the bag for under $10 to prove a point. The velcro is not shown yet, but that was $1.00. Regardless, it all still would have came to just under $9.50 + tax for a GRAND TOTAL OF $9.98, $7.50 after my fortunate savings. I know I got pretty lucky with finding my materials and everything, but it was only one trip. If you wanted to invest more time and effort, you could definitely find the lightest and most efficient materials.
Picture #3: Because the bag was very thin, I needed padding. The padding was a cover that is meant to be stuffed with padding -perfect! The only problem is that it is quite heavy and the materials sheds, which I don't want all over my gear. So, I got a pillow case that fit over it perfectly. For padding I used some old bubble wrap I had kicking around the house. I chose bubble wrap because it was light and offered the extra padding I needed with no extra weight. The downfall is the noise it makes. (NOTE: I will later regret the bubble wrap and it's crinkling, but I was almost finished when I realized how much noise it made. It isn't as bad as I make it sound, but if you have another alternative that is light and mailable, use it).
Picture #4: The bottom will need support, not only for shape and protection, but to hold the inner liner in place as well. I measured the bottom and went from there.
Picture#5: I used some old matting board (acid fee of course!) as it's light and offers just enough support. I tapped it into the bubble wrap to keep it in place, then put it in the cover for a perfect fit. I zipped it up and then cut the zipper off so that it wouldn't potentially scratch anything. I put the pillow case cover over it.
Picture #6: Once tucked in the pillow case, I cut the end and stitched it shut. Perfectly soft, no cloth shedding. A masterpiece.
Picture #7: I'm not the greatest seamstress, so finding the perfect fold as a pain in the ass. But I did it after 30 minutes of adjusting it in the bag, fitting it properly and finding a fold that wouldn't leave open ends isn't as easy as this photo makes it look. I think at this point I was also a few beers in, which didn't help. I also almost failed grade 12 geometry, which would have came in useful. Any sober person with some fabric and geometry skills could have done this in 5 minutes. I held it with safety pins for now, but will stitch it later when I'm sure it will work properly. Do not have metal or sharp ends in your bag (ie. glue, safety pins, buttons, etc.) as this will scratch your camera.
Picture #8: I took some inserts I had extra from other bags. I know you all have them, so don't send me messages like "not fair man, you had those for free and if you had to buy them it would put the bag up to $20". And if I didn't have them, I could have used the extra fabric from the pillow case to fill with cardboard (or similar) and stitch my own. It would have looked nicer and matched that way too. And I would have saved $1.00 on velcro, but let's not argue and accept the fact that I'm resourceful. I got the velcro at the dollar store.
Picture#9: I stitched the velcro to the bag. Although the adhesive was pretty damn strong, I thought I should be safer to secure it. I positioned the dividers first so I knew where to put them. It's not a good idea to freestyle this.
Picture #10: Then I put in the dividers. I currently have a Canon P with a 50mm f1.8, 35mm f1.8 and 21mm f4.0. I have a Konica S3 with a fixed 38mm f1.8 attached. I wanted to make sure my bag held all this stuff. I will eventually replace the Konica S3 with a second Canon P body and telephoto lens when I have the money.
Picture #11: Despite fitting it for 30 minutes, I still have problem spots where the liner appears to be too big, so it starts to wrinkle. I will later stitch these to the side of the liner of the bag, but it will still cause some deformation. I'm okay with this though. If, at this point my biggest mistake is not having the creases perfect, I'm pretty awesome.
Picture #12: The finished product on it's side so you can see the size. It's a little bulkier and heavier than I would have liked, but it's well padded and supportive.
Picture #13: At the time, some of my rangefinder equipment was still in the mail. So, I put in my SLR system, which is bigger and heavier. Check it out. The fit is a little tight for an SLR system of this magnitude and taking in and out the lenses wouldn't be the easiest task of my life, but it works.
Things I love about the bag:
-UNDER $10!!!
-Lots of pockets for accessories
-Very padded liner
-Perfect size for my system
-I have a few inches at the top that will fit a small jacket, hoodie, book, and other things you might want to take with you on a photo outing.
-Style is discrete, yet sexy.
Things I don't love so much:
-It's not as durable on the outside as a Billingham or Domke bag (although I've toyed with the idea of waxing it).
-Not waterproof.
-front pockets don't close (so I have to be careful if I'm biking with it, so accessories don't fall out).
-Bubble wrap noise. It's quieter when everything is done, but I shouldn't have overlooked that detail.
I hope you all enjoy this read and get inspired to make your own DIY bag. Not that I don't like Domke or Billingham bags, but come on. Not everyone has $300 for a bag.
Attachments

Last edited: