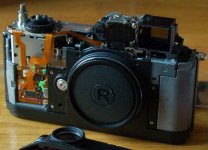
Epson RD-1 Gague Stuck

jbf

||||||
Local time
9:14 AM
Joined
Jun 9, 2007
Messages
958
Hey all,

After using what I guess was an under powered non-epson battery I noticed that my analoge gauge on my Epson RD-1 no longer moves at all. Im not sure if its my fault, as I did remove the battery when the camera was off, but it is definately not moving now.

I've tried to 'initialize settings' as well as calibrate the needles. They dont move at all.


Any advice? The camera is out of warranty.
 
Never got this so far but i would let the camera without battery during 2 or 3 days and try a new battery then.
 
If the "incorrect gauge" fix from Rich Cutler doesn't work, I would try the following:

- remove the left-side rubber grip (fixed with double-sided adhesive)
- remove the 3 small screws holding the metal plate under this grip in place
- check if the ribbon cable coming from the top plate is still in place in its plug under the plate.

This cable connects the body to the gauge. The plug can be seen on this picture:
http://www.richcutler.co.uk/r-d1/images/stripdown/r-d1_strip_03.jpg

It is the grey square in the middle of the left part of the body, partly covered by the ribbon cable coming from the speed dial.

If it is unplugged or loose, put the gauge ribbon cable back in place. On the same picture, it is the second ribbon cable from the left going out of the top plate.

You have to pull up the blocking slider around the plug (the brown part on the picture between the plug and the blue cable). Use a fine pair of tweezers, or a small and hard pen (in this case, one side after the other).

Just put the cable deep into the plug, and push down the brown slider do fix it.

You don't need to remove completely the top plate for this manipulation, just the metal plate, which is quite easy. I can imagine that vibrations or a small shock could put this cable out of place. I hope you can successfully fix it!
 
You can see the gauge cable plug on the attached picture, marked by the big green arrow. The small arrows indicate in which direction you have to pull the sliding part to unblock it.
 

Attachments

  • gauge_plug.jpg
    gauge_plug.jpg
    55.8 KB · Views: 0
Thanks efkbl,

I'll give it a try tonight if I get a chance.

I just got back from a 4 day trip to paris and left the camera with the battery out to see if it'd fix the issue.

Tried the gauge fix tutorial on richC's site last week about thirty odd times with no luck. So i'm guessing your fix is probably what has happened.
 
Well, either that or something is damaged. I don't think the motors for all the needles could fail together, so an unplugged cable could be the cause. Or maybe an IC controlling them if you have bad luck, but in my opinion it's not as probable as an unplugged cable.

Good luck and tell us if you get any results!
 
Quick question, efkbl...

You mention that double sided adhesive? What type of double sided adhesive should I get to reaffix the grip to the camera?

As I'd prefer to obviously have the grip look as if it is new, etc once i've attempted to fix the camera.
 
I used normal, thin double sided adhesive. So far it holds well, but I think if you want something holding well in the long ter, following Rich Cutler's advice on http://www.richcutler.co.uk/r-d1/r-d1_18.htm (3M Scotch Clear Heavy-Duty Mounting Tape) may be a better option.

If (or when) it starts peeling off, I will replace it, but so far I am satisfied and it looks as ggod as new.
 
I too have been trying to determine which tape to use - the 3m HD Mounting tape is very thick and I don't think it would look as original. Micro Tools has some but it is $35 per roll.
 
Thanks Rich!

Thanks Rich!

Hi everybody!

Today I noticed a misaligned fuel needle, thought it just dropped off due to a knock on the camera a few days ago.
After calibrating and switching off 4 times it got aligned.

Great!


Enzo
 
Uggghh.... so I'm in this boat now after a few days of ownership of an R-D1. I inadvertently switched batteries with the camera still in the on position and now, no fiddling with anything has moved the needles from the last position they were in when the power was cut. ALL MY NEEDLES APPEAR TO BE FROZEN! I opened up the camera and checked the ribbon cable and the contacts seem to be in the proper positions.

The needles refuse to move even when I attempt to calibrate them. They are frozen to where they were when the power was cut.

I'm open for any ideas at this point!
 
Last edited:
Not yet, I've been in contact with Jim from Epson's Indiana office and I'm trying an accelerated discharge of the capacitors. I've placed a steel allen key running from the upper spring to the metal contact on the battery door. I've been standing away from the camera... pacing around in circles... for the past two days. I'm hoping when I put a fresh battery in the camera it will wake the needles up and they will function again. Going to wait a few more days before trying. I got some cheap Russian glass on the way and figured I could at least wait until it arrives.
 
Thanks efkbl,

I'll give it a try tonight if I get a chance.

I just got back from a 4 day trip to paris and left the camera with the battery out to see if it'd fix the issue.

Tried the gauge fix tutorial on richC's site last week about thirty odd times with no luck. So i'm guessing your fix is probably what has happened.

Sorry for bringing up the old thread.

Hi, jbf, did you try as what efkbl suggested?

My R-D1s has two dead needles.

I removed the rubber skin & metal plate, found the cable was "not loosen", as shown in the photo below (sorry for the crappy photo by phone camera).

Do I need to remove cable & re-plug it deeper as suggested by efkbl? Is it easy to do so?

DSC00308.jpg


Many thanks
 
Hi,

If you've managed to remove the skin and plate, it shouldn't be a problem to unplug and replug the cable, you can use toothpicks or a small screwdriver to push the sliding part. But I guess that if it looks OK, the problem lies somewhere else...
 
Hi,

If you've managed to remove the skin and plate, it shouldn't be a problem to unplug and replug the cable, you can use toothpicks or a small screwdriver to push the sliding part. But I guess that if it looks OK, the problem lies somewhere else...

Hi, thanks for replying.

May be I just live with the problem, now the needle which indicates the remaining no. of photo also goes wrong...:bang::mad:
 
Back
Top Bottom