Home Darkroom - first prints came out flat

haze can explain flat contrast but it's still very strange that you get 1s time... does the aperture work on the hazy lens?
 
... EL Nikkor 50 ok?

...

Any EL-Nikkor in good condition would be at least an excellent lens. The 50mm f/2.8s are a bit better than the old f/4 and the newer multicoated 50mm f/2.8 N versions are slightly better than the older single coated versions. Still, even the f/4 versions are way, way better than any of the "house brand" lenses that are bundled with enlargers when new.
 
Hello,

Here are some more images from yesterday so you can see better. I checked the lens once again in the morning to make sure I wasn't seeing ghosts and it really is bad. I can see through it but it's incredibly blurry. The photo does no justice to it below.

Enlarge_TroubleShoot_02_LensMilky_Medium.jpg


This is what my prints looked like. I did some charts as above suggested but of course with the lens being how it is, nothing came out good. I then increased the height of the enlarger to the max and printed the girls cropped image at 2.5 seconds. It is underexposed and of course without contrast.
You also see the test paper in total black (exposed to light / developed) and the white paper (exposed to safe light for 5 minutes with object over) which shows no fog what so ever.

Enlarge_TroubleShoot_01_BlackPrint_Medium.jpg


Enlarge_TroubleShoot_03_Prints_Medium.jpg


I think I really need to get the lens replaced and re-do the testing. If we still see the times too short, then think about dimming the setup.

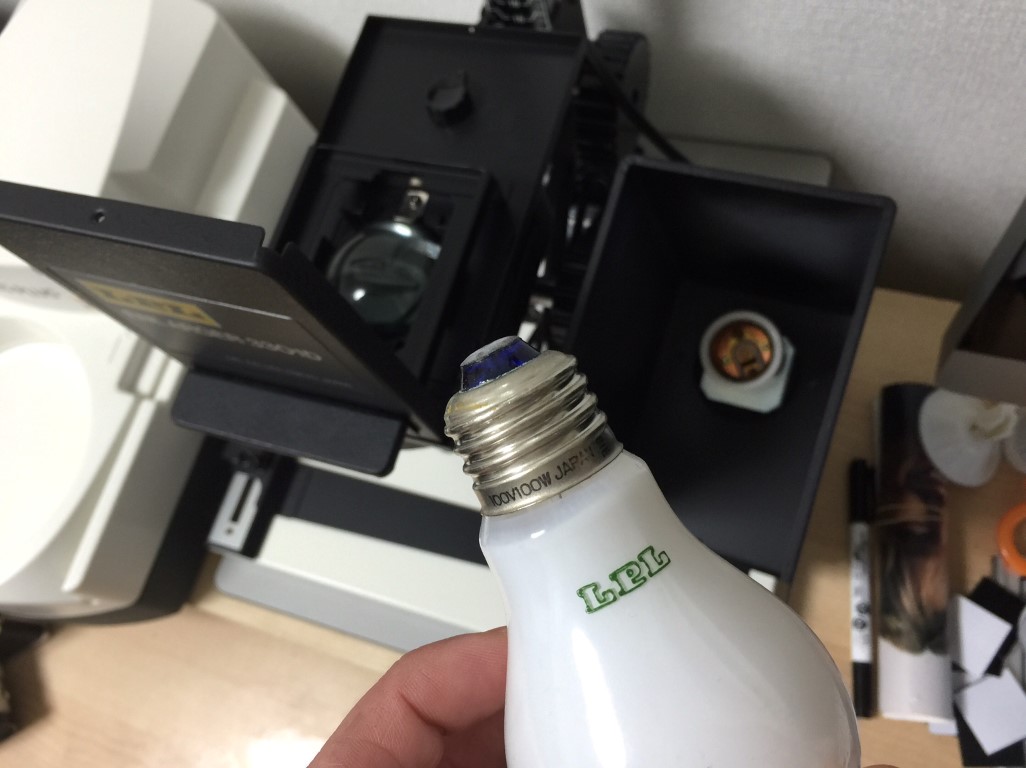
I opened the head to check the bulb and it is indeed the factory one. Would be quite very strange if they sold this enlarger with an overpowered lens. It isn't like it was sold for a short period, it was quite a success in Japan.

The bulb otherwise looks stock in size and color. Can I just add a 75W bulb that is also white (non transparent) or these bulbs must be special ordered?

LPL_3301D_Bulb_Medium.jpg


Thanks,
Ben
 
Snap a photo of your negs on a light box.

I don't have a light box yet as I have just started printing. Normally I scan all my pictures and then decide what to process. I may continue doing this as I also want to produce shots for Online sharing.

Anything else I can do that would tell you more about the negative?

I can tell that at the pro lab this is what I did with the very same neg (democracy girl).

Paper Size: 8x10
Contrast Filter:3
Aperture: f11
Time: 3.5 sec on the whole photo then +2.5 sec on everything else besides the girls face / arm / leg.

It came out looking really nice (for me that is...)

Ben
 
Questions:

What film did you use?
What is your Film Exposure Index?
What developer did you use?
Developer time/temp.?
 
The lens looks very hazy and I would either clean it or get a new one. I suppose the Dilution was 1+4. The exposure test of the democracy girl looks also a lot less contrasty than the print you have shown us for comparison. As for the lamp get a real enlarger lamp, classic white bulbs often have mfg. info printed on top which would be projected onto your print. Could it be exhausted developer paired with the hazy lens you will get less than satisfactory results which appear very flat though you're unlikely to get real blacks in the print if this was the case.

Sparrow tip is a good one btw.
 
Quick mid-session post. First paper pulled from fixer. f16 3-2-1sec chart on 5x7 paper grade 2.

I have my contrast back :)

Thanks for all the feedback I think the setup is working. Lens was to blame.

Next thing to do - dim the output and get longer times for dodging and burning.

Light goes back off now!
Ben
 
Looks okay to me, but I don't know if the developing time is for a condenser or a diffused enlarger. Remember that Kodak's ASA and developing times are only a general starting point, not a substitute for your own EI and developing times.


Souped at 24c for 6min15sec as per the Kodak manual
 
Looks okay to me, but I don't know if the developing time is for a condenser or a diffused enlarger. Remember that Kodak's ASA and developing times are only a general starting point, not a substitute for your own EI and developing times.

So does that mean that I need to develop my negatives according to what enlarger I'll be using later on if I decide to wet print?
I didn't see such distinction in the Kodak manual. It just lists the TMAX100 and TMAX400 films and gives different times for 20C / 21C and 24C for all the different developers like D-76 / Xtol / TMAX.

Since I use TMAX Developer and the film was TMAX100 (and it was summer time with a hot bathroom) I used the times for 24C and made sure my developer was cooled to that temperature. This is why I developed it for 6min15seconds. Yes, the dilution is 1+4. From the 1Liter concentrate I get 5liters.

As for Stewart's question, I have tried to show what the negative looks like by my screen. I had all kinds of reflections this morning so I turned the setup until the negative in question (22) was reflection-less. The rest of the negatives look awkward but that isn't how they look in real life.


Thanks for any suggestions.
Ben

Enlarge_TroubleShoot_04_Negative_Medium.jpg
 
Ben,

It's always better to keep variables to a minimum, to obtain consistent results. Buy big film/paper boxes, same developers, find your own film EI and developing times, examine prints under the light conditions under which you display your prints...

In the past Kodak used to provide times for both condenser and diffuser enlarger heads.
A skilled printer, can get a good print from almost any neg and enlarger, but it takes real skill and time.

Regards,
Robert
 
... those negs look fine to me, and the prints are looking better too. The trick now is to follow a 'scientific' method it's all about repeatability now ... only alter one aspect of the production at once now, so you can understand what difference each makes to the print. (if you change more than one at a time you've no way of knowing which caused any change to the print)
 
Stewart / Robert, thank you!

I will keep variables to a minimum indeed and will try to produce constant results until I know Wet-printing to a certain degree. I am also waiting for a book "The basic Darkroom book" and will be sure to read it asap.

This is what I do also for my photography, keep one focal length and one film / dev combo while learning the craft.

Now the next task is to somehow cheat a few extra seconds of enlarging time out of my Enlarger so I can start dodging and burning.

Ben
 
Ben I took a close look at your negs in photoshop, drag and drop, and they appear a bit flat, low contrast to me. If you're printing on a grade 2 paper and fully developing 2-3 minutes then you need to adjust your development for your paper and enlarging system. I would increase development by about 10% and see how they print. It depends on the lighting of your scene, your enlarger and just how you want them to look.

Condenser enlargers generally print about 1 grade higher or more contrasty than diffusion enlargers. I negative that prints on a grade 2 on a condenser will usually take a grade 3 on a diffusion enlarger. There are exceptions like my Ilford Multi Grade head prints more contrasty than the Durst 5x7 Laborator I had which is condenser.

As mentioned the times and ISO ratings are just a suggestion. Everyone that processes by hand will agitate different. I can give you my times and temps and Iso ratings and they probably won't work for you. You agitate different, your meter may be different in exposure than my meter and your camera shutter speeds may be more or less out of tolerance than my shutter. For example I rate my Fomapan 200 at 160 in my Leicas but in my 4x5 and 8x10 I rate it at 200. My development is different for 8x10 foam 200 because I contact print it and that's totally different than enlarging. My 5x7 foam is even different because I contact platinum prints and platinum needs an extremely contrasty negative for a normal print.

I'm not familiar with Fuji B&W paper but have used many papers over five decades. Every paper even if it's marked grade 2 will be different in printing speed and contrast. I use variable contrast papers almost exclusively. Every brand of MG paper and every different kind within a brand will print different. Matt surface will print flatter than luster and that will print less contrasty than gloss. A silver gelatin glossy paper air dried will be flatter than if you gloss it on a ferrotype sheet.

It takes hundreds if not thousands of prints and a standard to judge your work against before you will get good prints. It's not as easy as people think. Yes you can make an acceptable print but a really fine print is something very few people can make.

I taught photography in a university environment in the 70's. One class was a darkroom class. Honestly I don't think I ever had a student that could print worth a darn even at the end of the semester. They improved and thats what I was looking for but still they weren't good printers.

At one point in my career I estimated I'd printed over 100,000 prints. That was many years ago so who knows how many now, 250,000 possibly. I have about 100,000 negatives in one of my archives and I've printed probably 700-900 of them. Out of this negatives I don't think I've had more than two or three negs that print without dodging and burning to some degree. Some take extreme dosing and burning and others just a little but virtually every neg is improved buy manipulation.

I've thought about teaching again and have thought about what I would do now as a final test for someone in the darkroom. I have a couple of negatives that are some of my best images that are nightmares to print. A couple of negs require 14 times the base exposure to burn in certain areas. The same neg requires dodging certain areas too. It takes dexterity to print something like this and concentration. My ex boss in the early 70's was a fantastic printer and he always said anyone can make one really good print given enough time and materials but try to make 100 prints exactly the same. It's tough to do this but I can do it now.

I'd duggest taking a roll of the film you plan to use. Expose all of it on one subject at the same exposure. have a friend sit and just hammer away until the roll is exposed. Take the roll in the dark and clip about 8 inches and develop it as you normally would. Mark it as to what you did and then take another 8 inch clip and run it 10% longer. Mark it with details. Do this again but 20% longer than the first. Be sure to make what you did on the film or a note so you can identify what you did. No do it again and cut develop meant 10% from the first.

Print a frame from each clip test and see how the prints look. Be sure to mark the print as to what negs and what you did. If the negs are thin in the shadows reduce the ISO by 1/2 or 1/3 stop and try the same development test as before. If they are too dense then increase ISO and repeat the test by exposing another roll and developing clips at different times. Be sure to keep accurate notes.

This is the way t do this unless you have a step scale and densitometer.

I do my testing this way. I find the NEW (as of 8 years ago) TriX doesn't work at box speed for me. I rate it at ISO 250 when developing in HC110 B. Don't be afraid of adjusting ISO and development. It's the first step to becoming an excellent printer. Everything starts with an excellent negative.

Good luck!
 
Back
Top Bottom